Integrating this addon with FullStro’s API is a straightforward process. Follow these steps to enable seamless shipping channel connectivity through this addon.
🔌 Step 1: Start the Connection
- Log in to your FullStro account.
- Navigate to Addon > Addon Integration from the left sidebar.
- On the Addon Integration page, locate your desired addon and click the “Connect” button.
💰 Step 2: Make the Payment
- It is free, so no need to pay right now.
🔧 Step 3: Finalize the Integration
- Just click on the connect button and enjoy.

✅ You’re All Set! The shipping channel is now successfully integrated with FullStro. Enjoy secure delivery processing for your business.
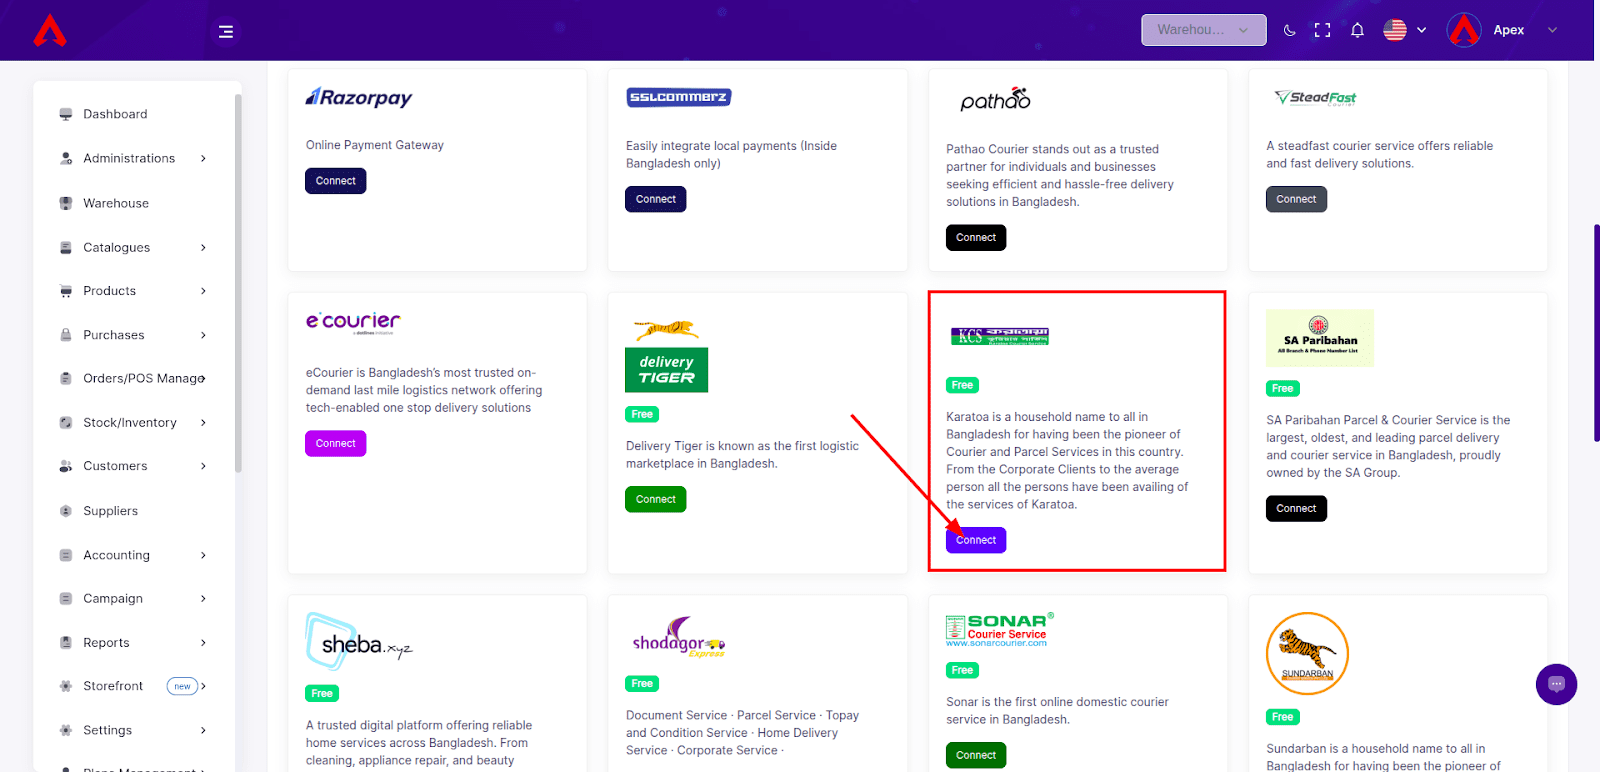
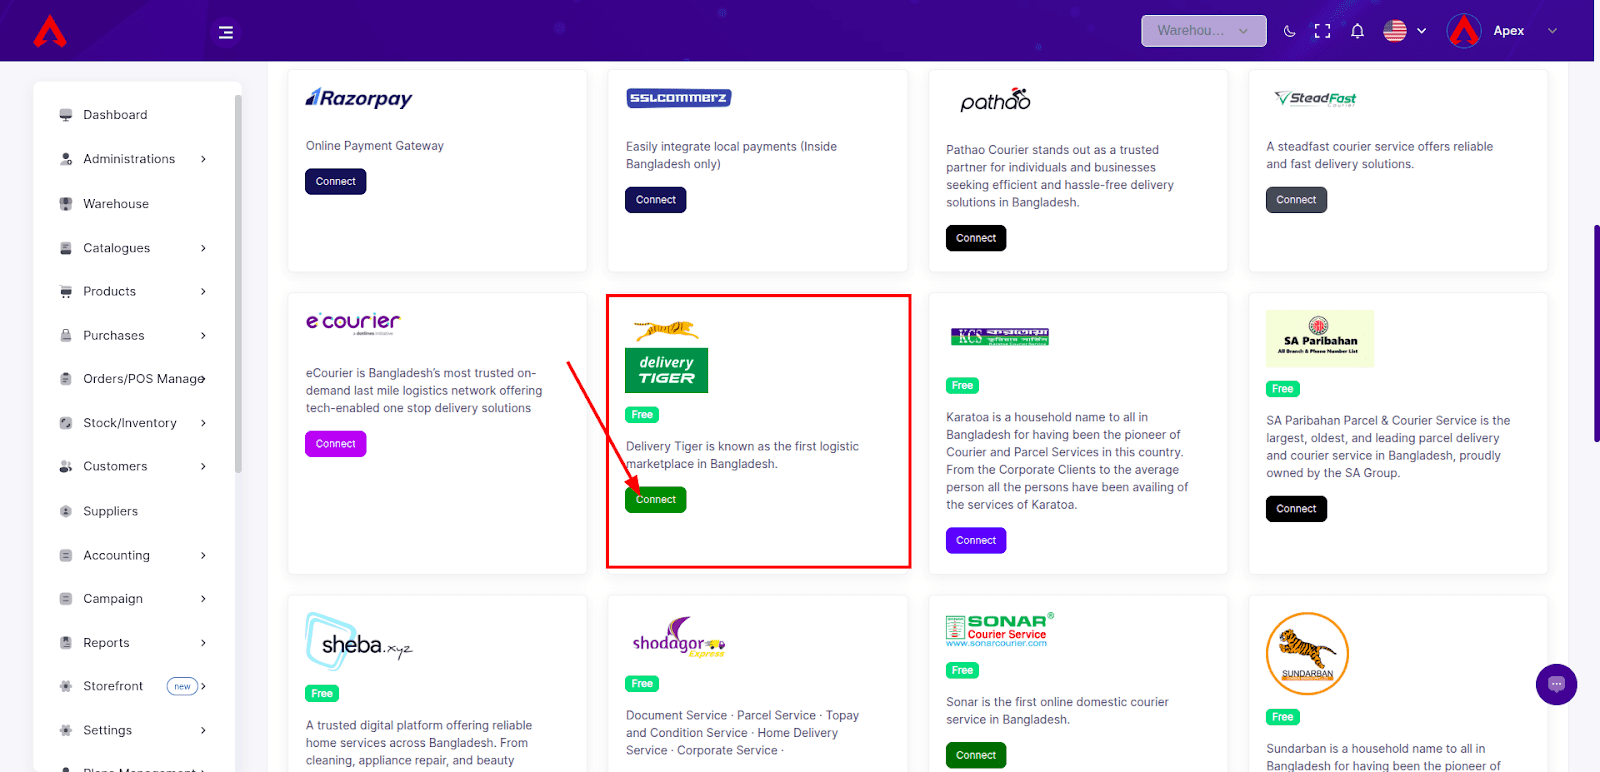
Integrating Delivery Tiger with FullStro’s API is a straightforward process. Follow these steps to enable seamless shipping channel connectivity through Delivery Tiger.
🔌 Step 1: Start the Connection
- Log in to your FullStro account.
- Navigate to Addon > Addon Integration from the left sidebar.
- On the Addon Integration page, locate Delivery Tiger and click the “Connect” button.
💰 Step 2: Make the Payment
- It is free, so no need to pay right now.
🔧 Step 3: Finalize the Integration
- Just click on the connect button and enjoy.
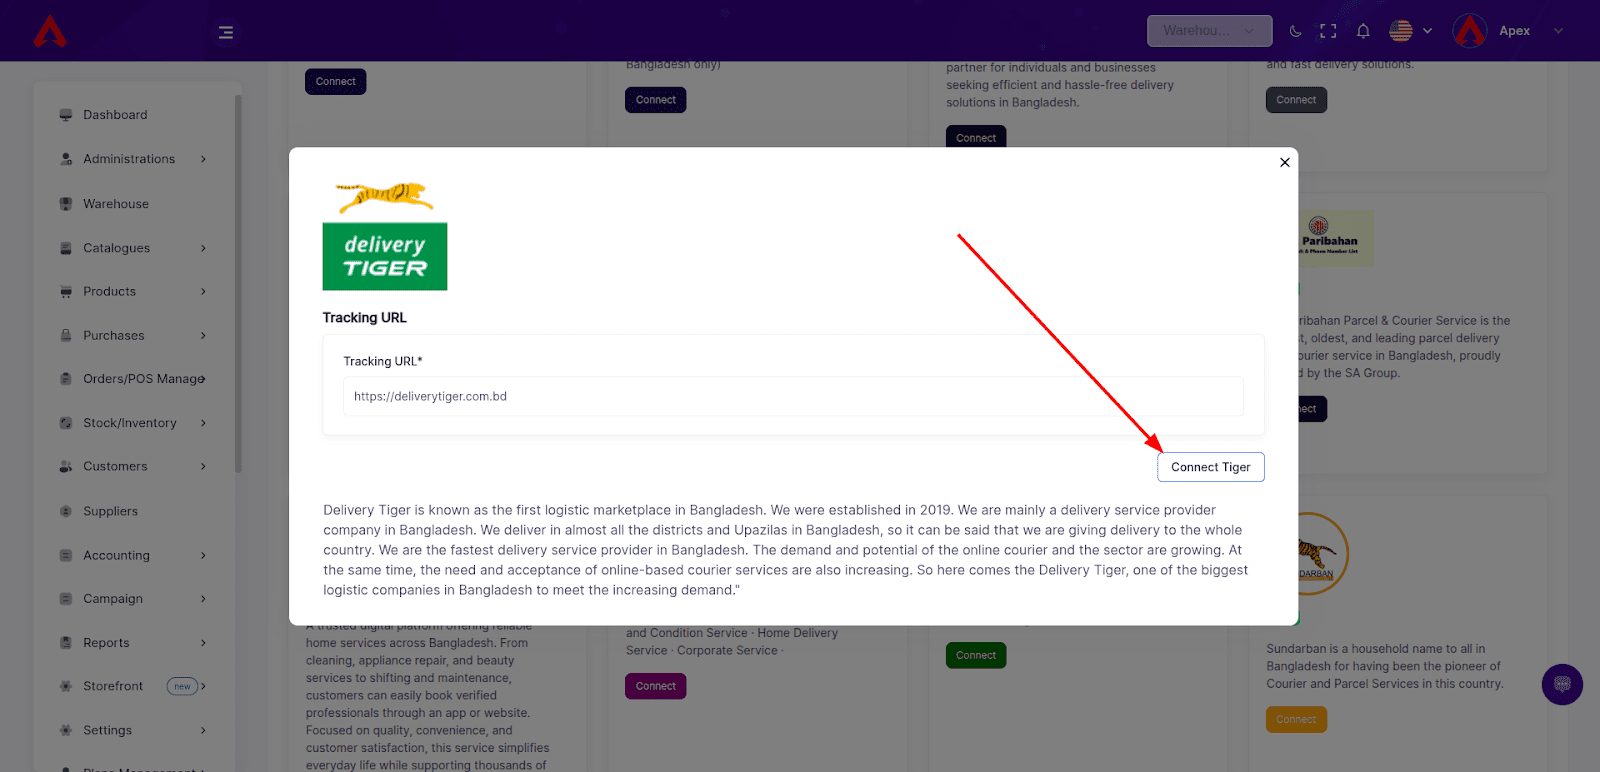
✅ You’re All Set! The shipping channel is now successfully integrated with FullStro. Enjoy secure delivery processing for your business.
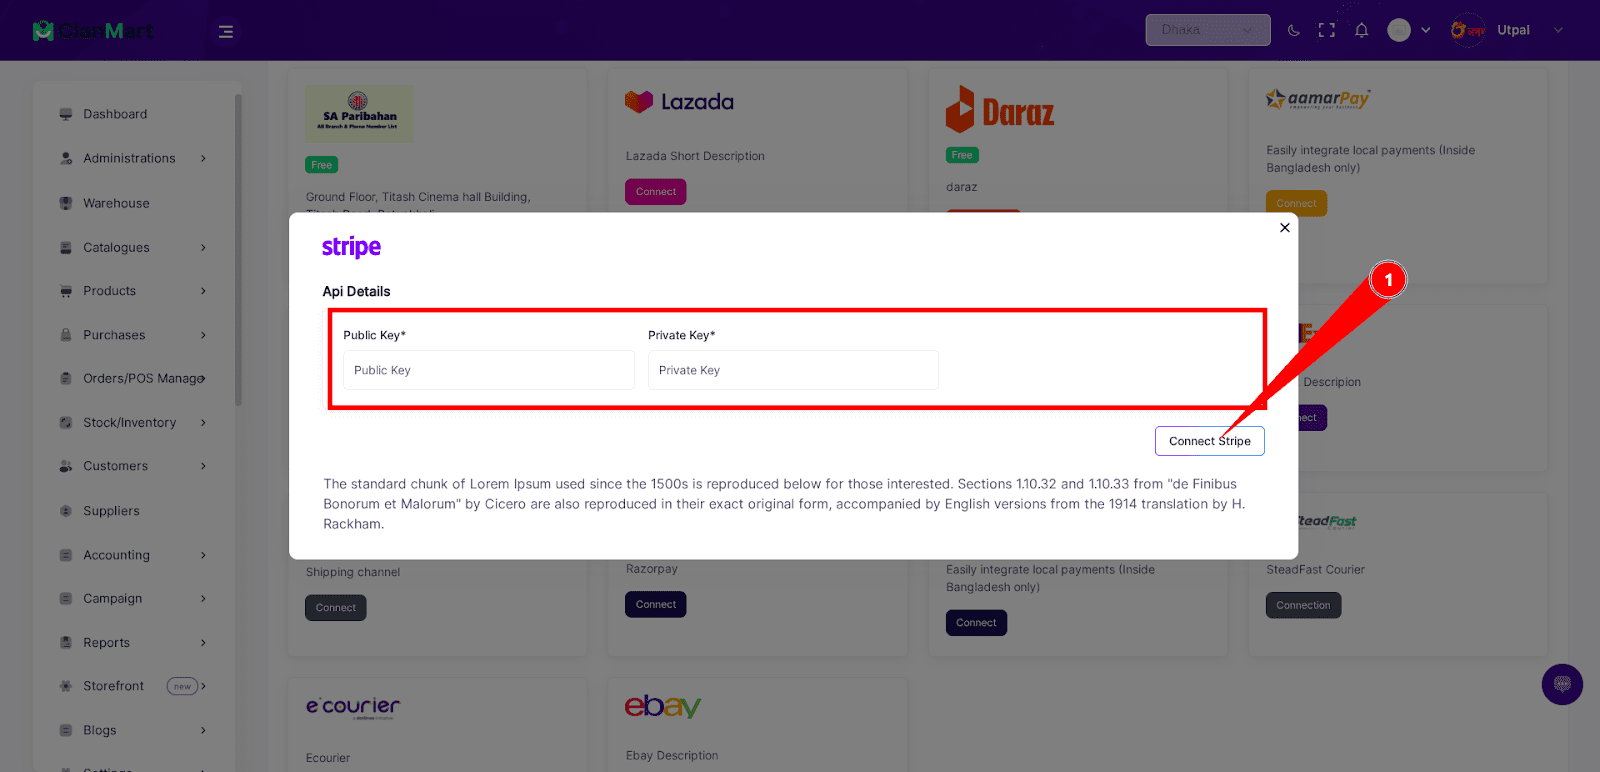
Integrating Stripe with FullStro’s API is a straightforward process. Follow these steps to enable seamless payment collection through Stripe.
🔌 Step 1: Start the Connection
- Log in to your FullStro account.
- Navigate to Addon > Addon Integration💳 Stripe Integration with FullStro from the left sidebar.
- On the Addon Integration page, locate Stripe and click the “Connect” button.

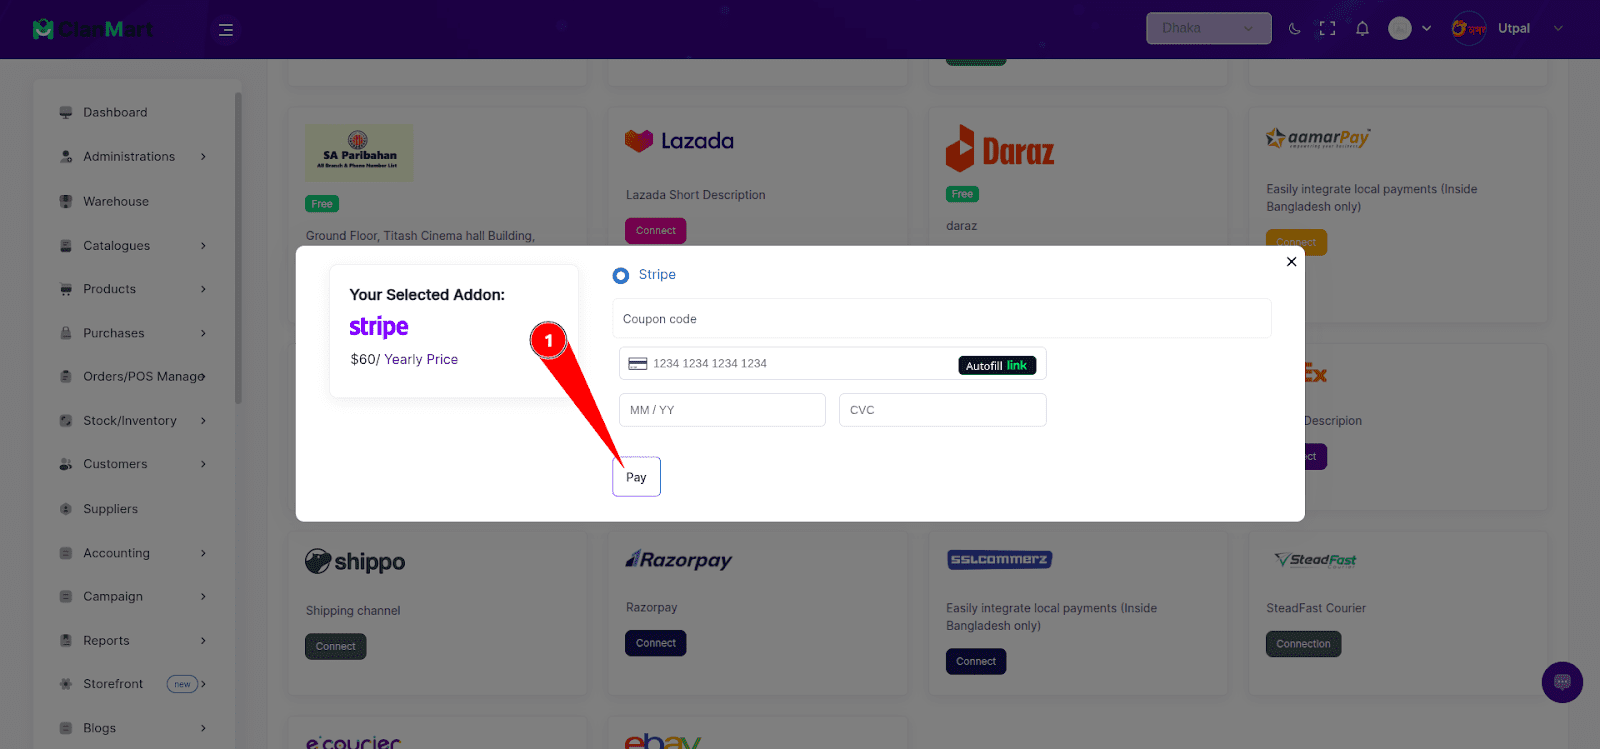
💳 Step 2: Make the Payment
- A pop-up will appear prompting you for payment.
- Click “Proceed” to view the payment details.
- Enter your payment information and complete the transaction for the Stripe Addon.

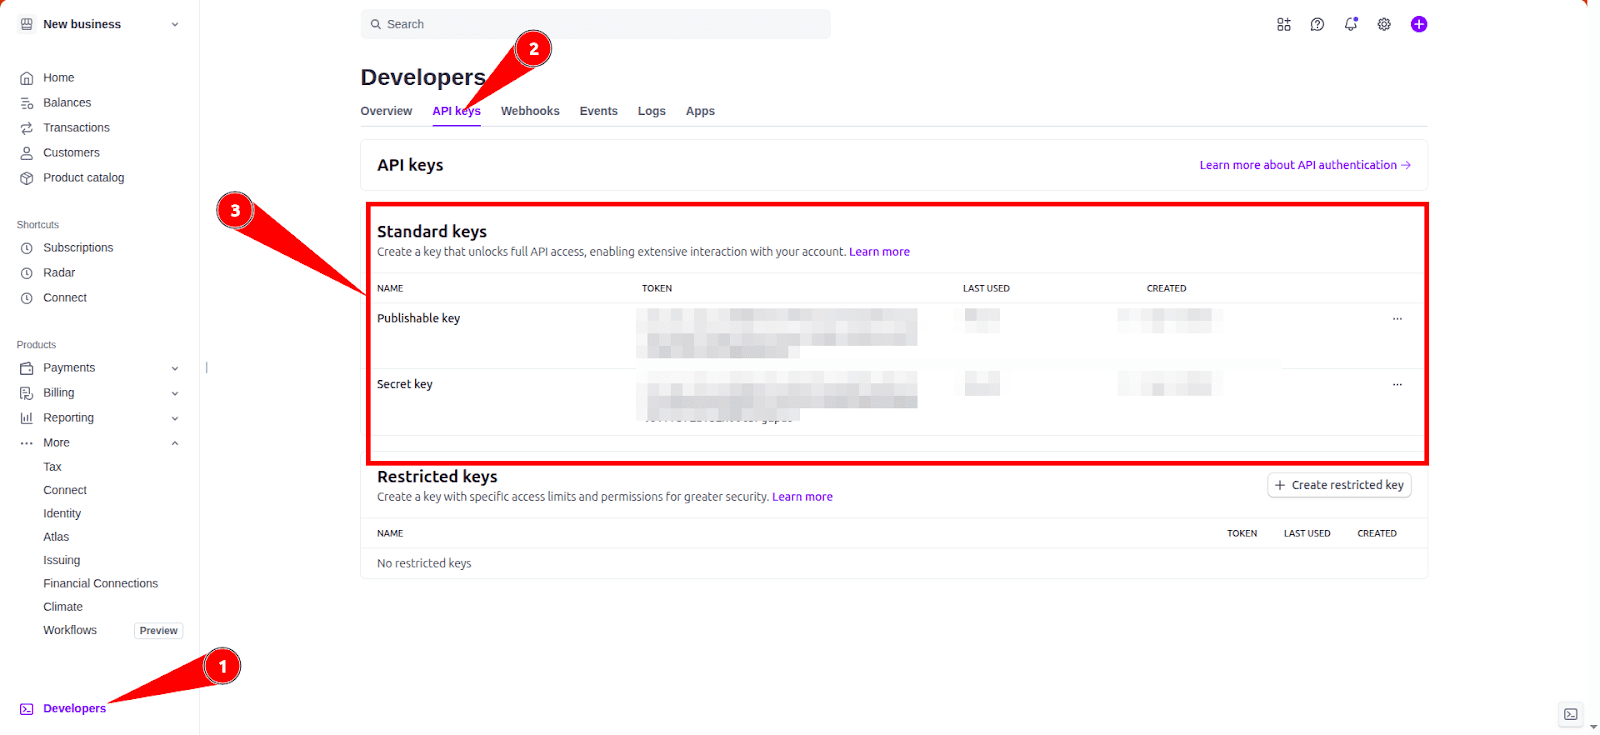
🔐 Step 3: Get Your Paddle API Credentials
1. Log in to the Stripe Dashboard
👉 https://dashboard.stripe.com
Once logged in, you’ll land on the dashboard.
2. Get Test API Keys (for development)
- In the left sidebar, go to:
Developers → API keys
- You’ll see:
- Publishable key (starts with pk_test_)
- Secret key (starts with sk_test_)
🔒 Secret key is hidden by default — click “Reveal test key” to view.
🔧 Step 4: Finalize the Integration
- Copy your live credentials from Stripe.
- Paste them into the FullStro Stripe Addon configuration section.
🧾 Step 5: Start Accepting Payments
Once the integration is complete, you can start collecting payments from customers via Stripe after creating an invoice.
✅ You’re All Set!
Stripe is now successfully integrated with FullStro. Enjoy secure, smooth, and automated payment processing for your business!
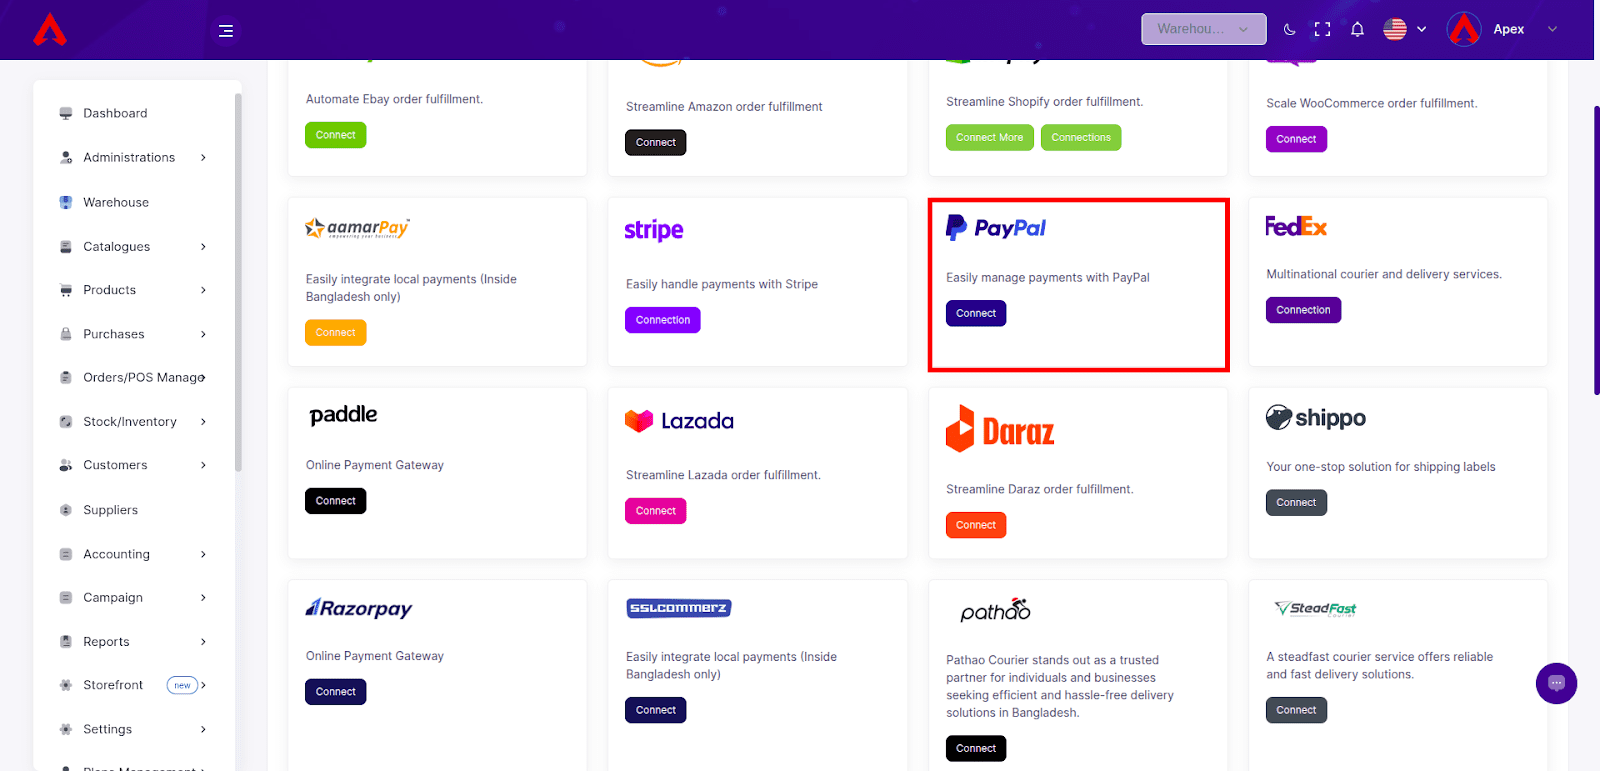
Integrating PayPal with FullStro’s API is a straightforward process. Follow these steps to enable seamless payment collection through PayPal.
🔌 Step 1: Start the Connection
- Log in to your FullStro account.
- Navigate to Addon > Addon Integration from the left sidebar.
- On the Addon Integration page, locate PayPal and click the “Connect” button.
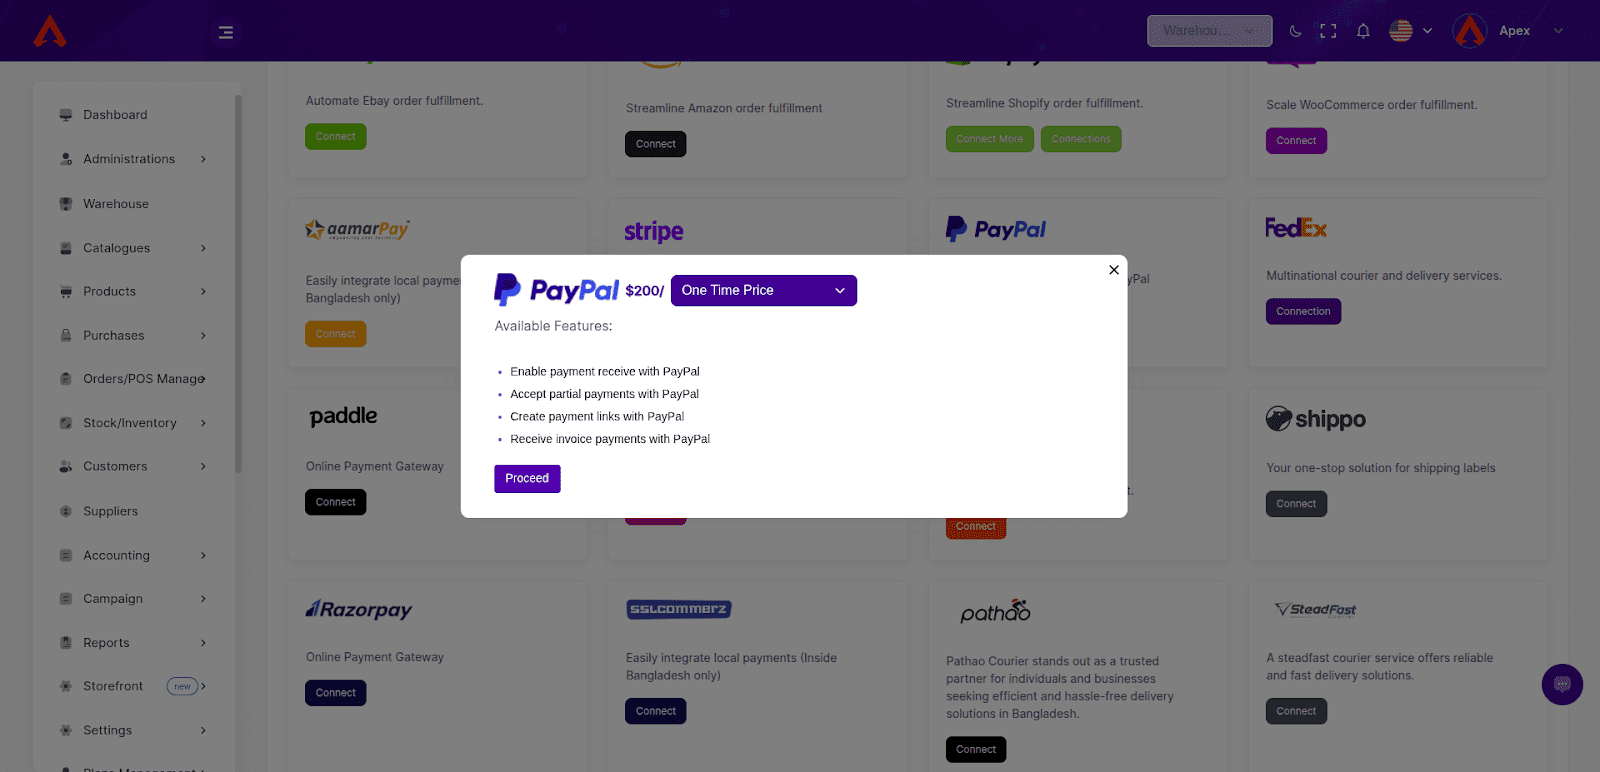
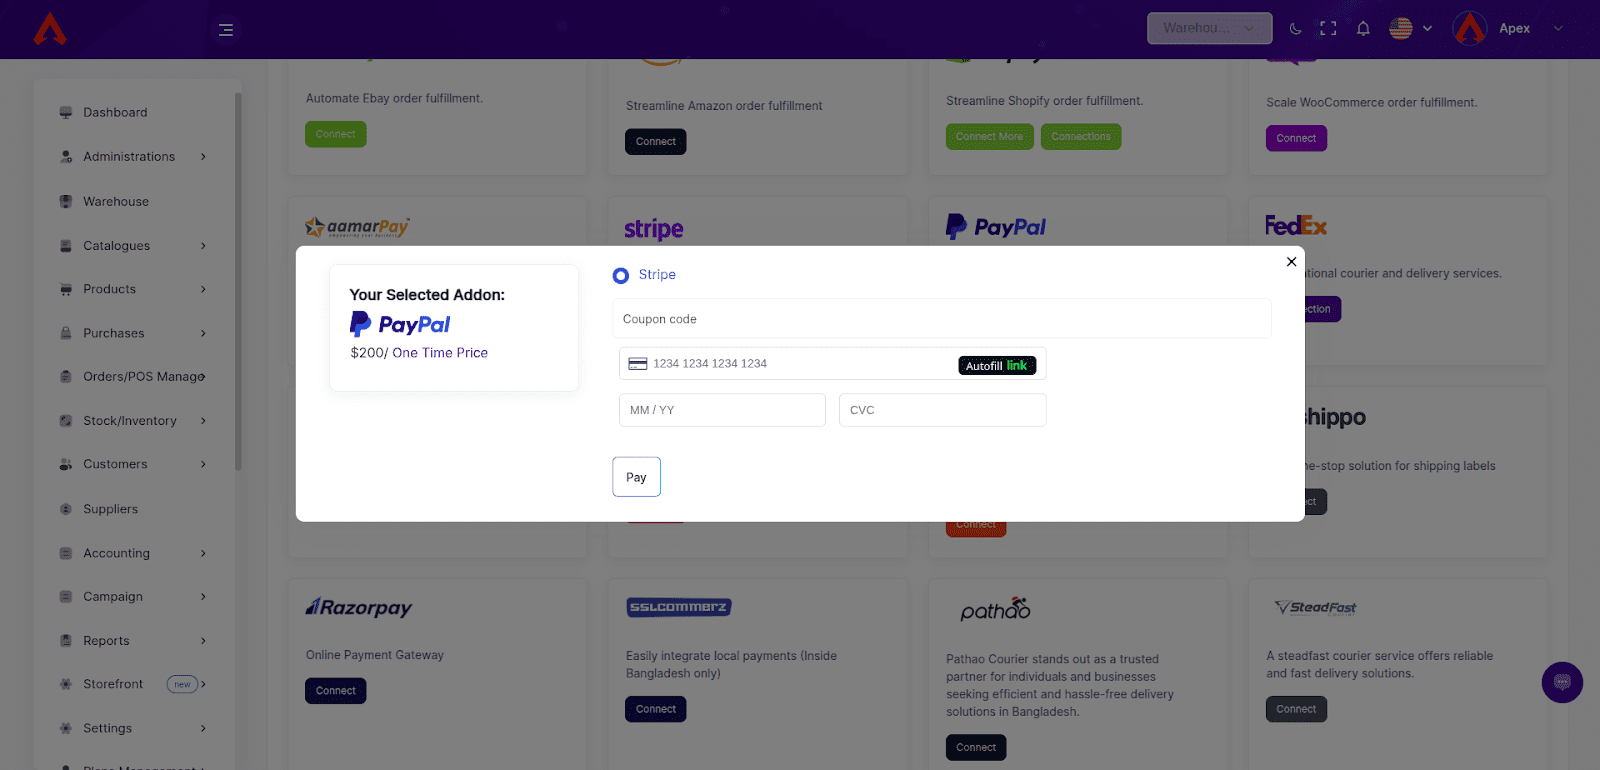
💳 Step 2: Make the Payment
- A pop-up will appear prompting you for payment.
- Click “Proceed” to view the payment details.
- Enter your payment information and complete the transaction for the PayPal Addon.
🔐 Step 3: Get Your Paddle API Credentials
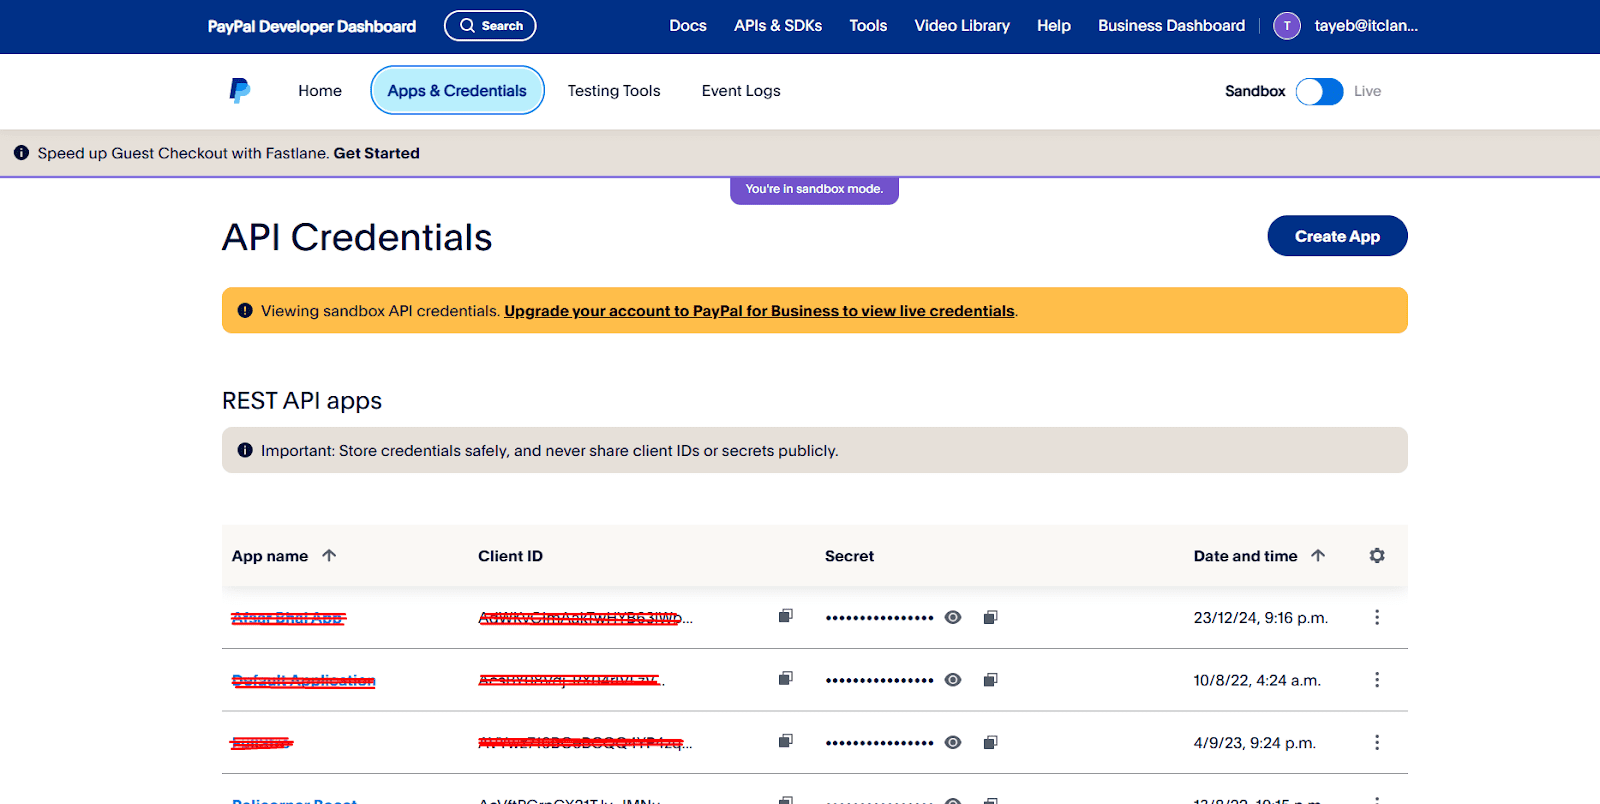
1. Go to PayPal Developer Dashboard
🔗 https://developer.paypal.com/dashboard
2. Log In
- Use your PayPal account credentials.
- For sandbox testing, you can log in with your developer account or create a new one.
3. Go to My Apps & Credentials
You’ll see two sections:
- Sandbox (for testing)
- Live (for production)
4. Create an App
- Click “Create App” under the Sandbox or Live section.
- Enter an app name (e.g., fullstroApp)
- Choose a sandbox business account (if creating a sandbox app)
5. Get Your API Keys
Once the app is created, you’ll see:
These are your API credentials.
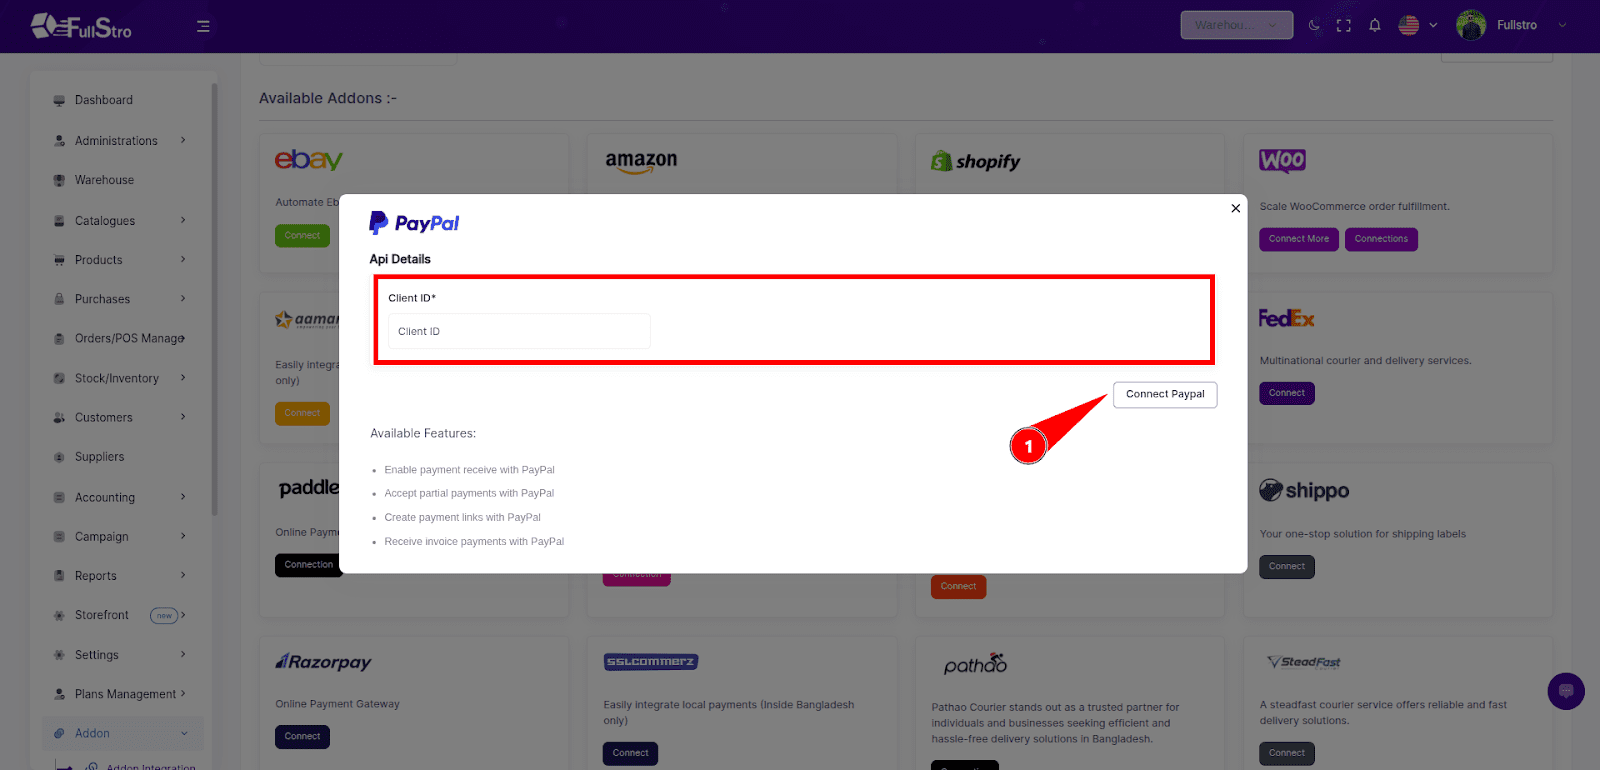
🔧 Step 4: Finalize the Integration
- Copy your live credentials from PayPal.
- Paste them into the FullStro PayPal Addon configuration section.
🧾 Step 5: Start Accepting Payments
Once the integration is complete, you can start collecting payments from customers via PayPal after creating an invoice.
✅ You’re All Set!
PayPal is now successfully integrated with FullStro. Enjoy secure, smooth, and automated payment processing for your business!
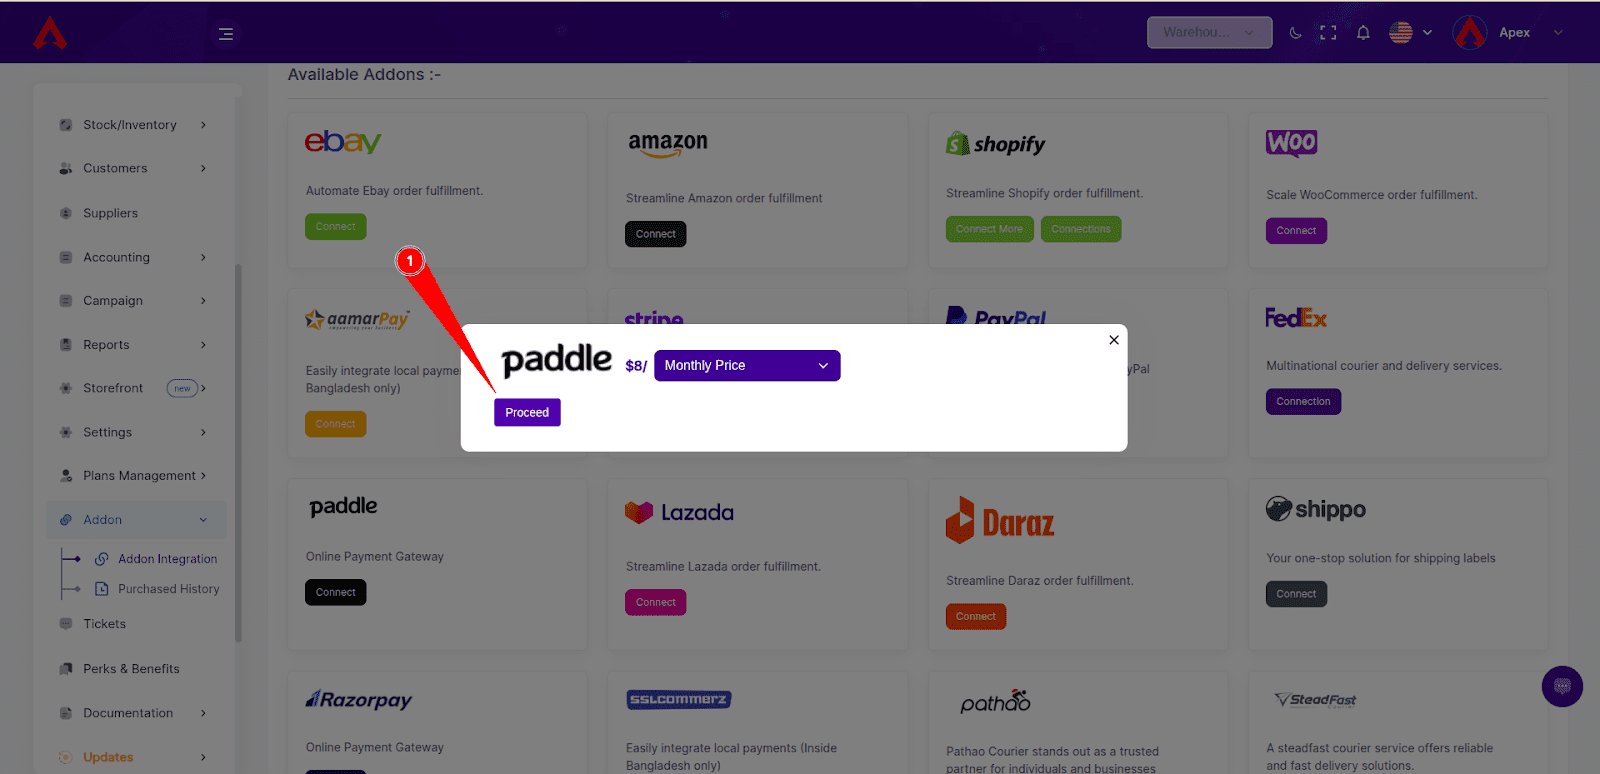
Integrating Paddle with FullStro’s API is a straightforward process. Follow these steps to enable seamless payment collection through Paddle.
🔌 Step 1: Start the Connection
- Log in to your FullStro account.
- Navigate to Addon > Addon Integration from the left sidebar.
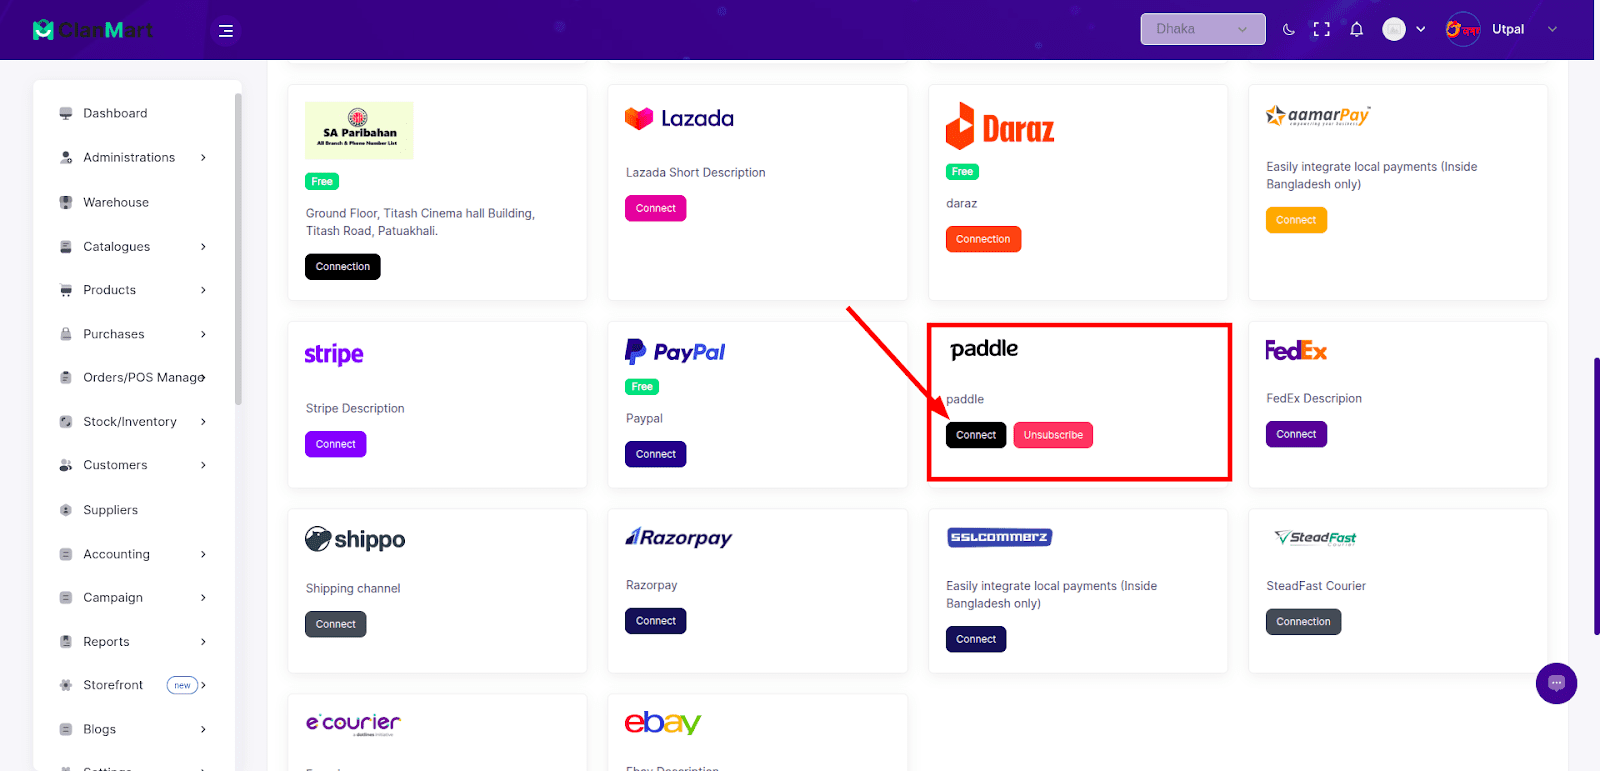
- On the Addon Integration page, locate Paddle and click the “Connect” button.
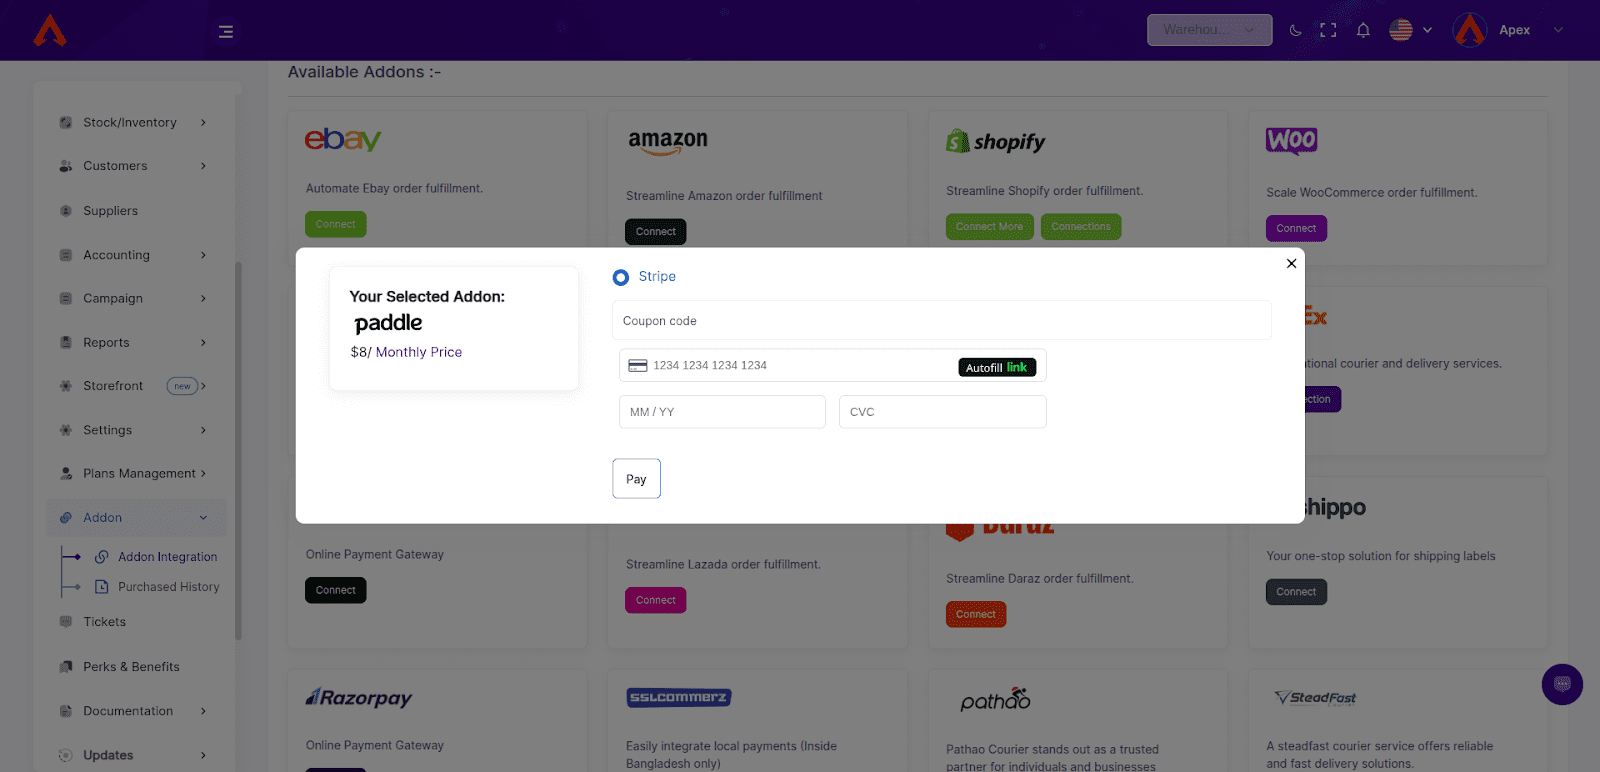
💳 Step 2: Make the Payment
- A pop-up will appear prompting you for payment.
- Click “Proceed” to view the payment details.
- Enter your payment information and complete the transaction for the Paddle Addon.
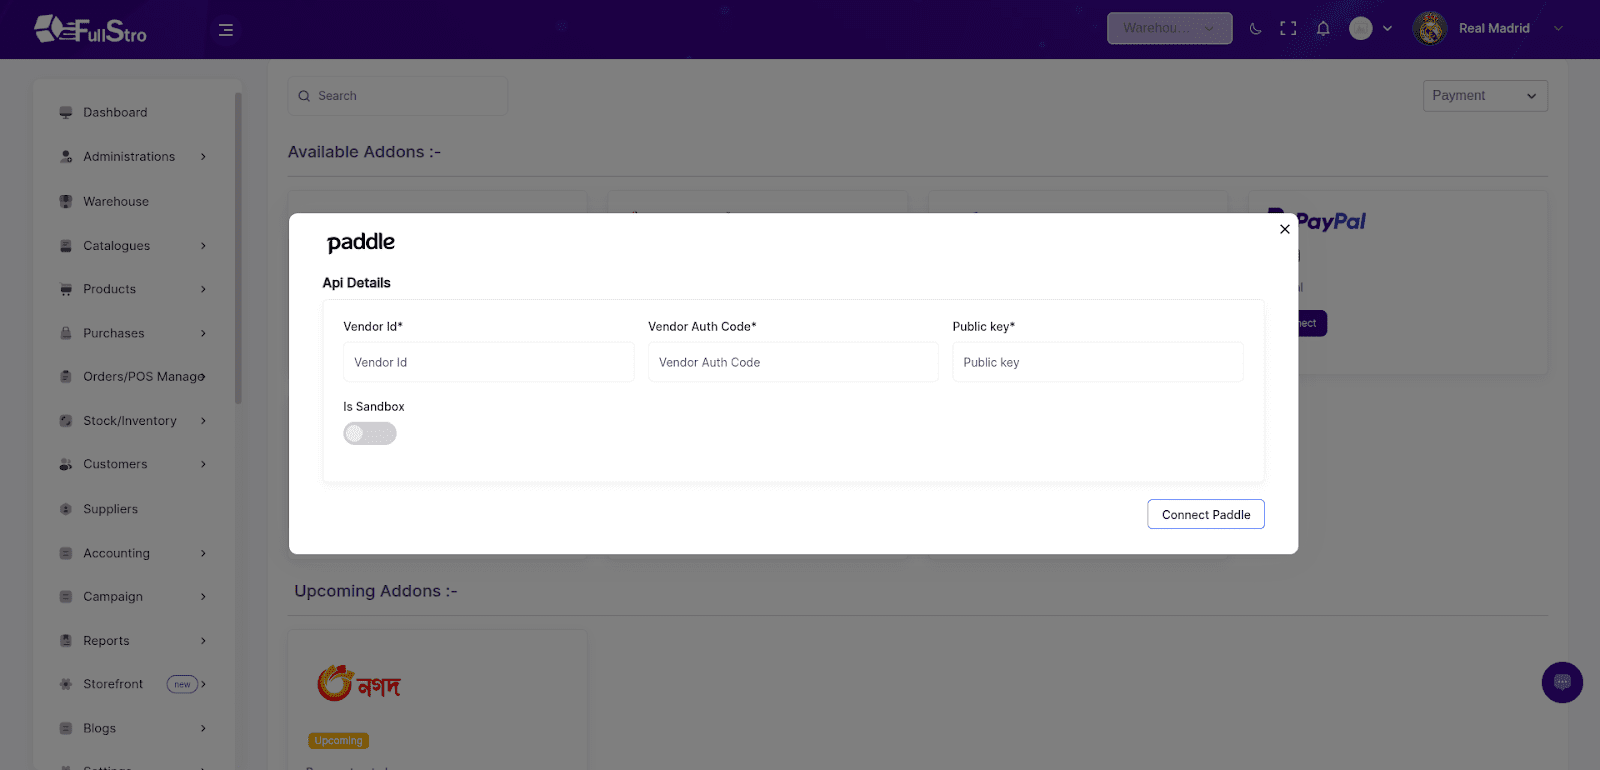
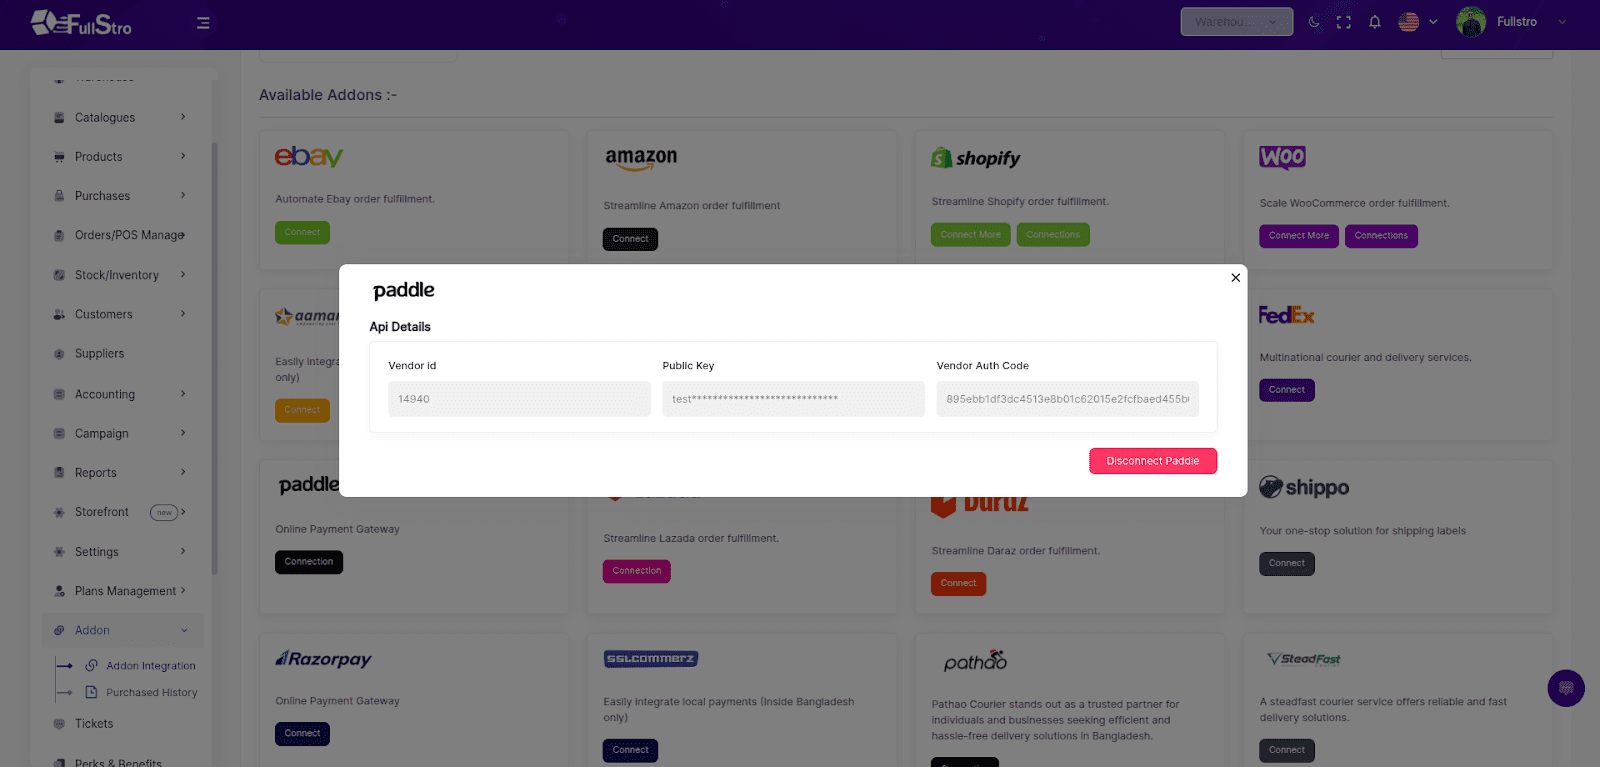
🔐 Step 3: Get Your Paddle API Credentials
For Live Credentials:
- Visit: https://vendors.paddle.com
For Sandbox/Test Credentials:
From your Paddle dashboard:
- PADDLE_VENDOR_ID:
Go to Developer Tools > Authentication. Your Vendor ID is shown there.
- PADDLE_VENDOR_AUTH_CODE:
Also under Authentication, copy your API Key.
- PADDLE_PUBLIC_KEY:
Go to Developer Tools > Public Key and copy the entire key string.

🔧 Step 4: Finalize the Integration
- Copy your live credentials from Paddle.
- Paste them into the FullStro Paddle Addon configuration section.
🧾 Step 5: Start Accepting Payments
Once the integration is complete, you can start collecting payments from customers via Paddle after creating an invoice.
✅ You’re All Set!
Paddle is now successfully integrated with FullStro. Enjoy secure, smooth, and automated payment processing for your business!
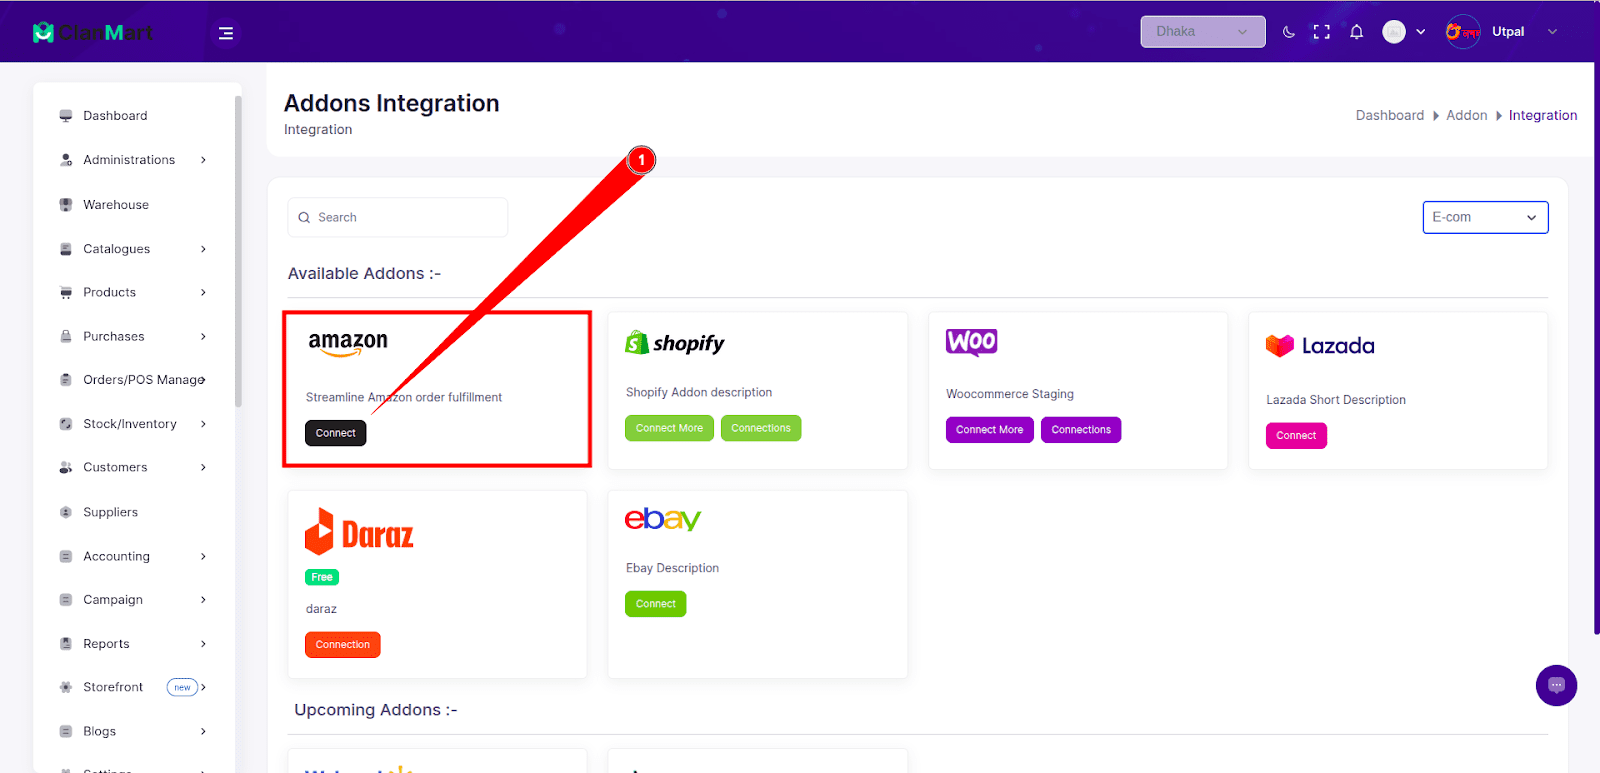
Integrating Amazon with FullStro is a straightforward process. Follow these steps to enable a seamless eCommerce channel with Amazon.
🔌 Step 1: Start the Connection
- Log in to your FullStro account.
- Go to Addon > Addon Integration from the left panel.
On the Addon Integration page, locate Amazon and click the “Connect” button.
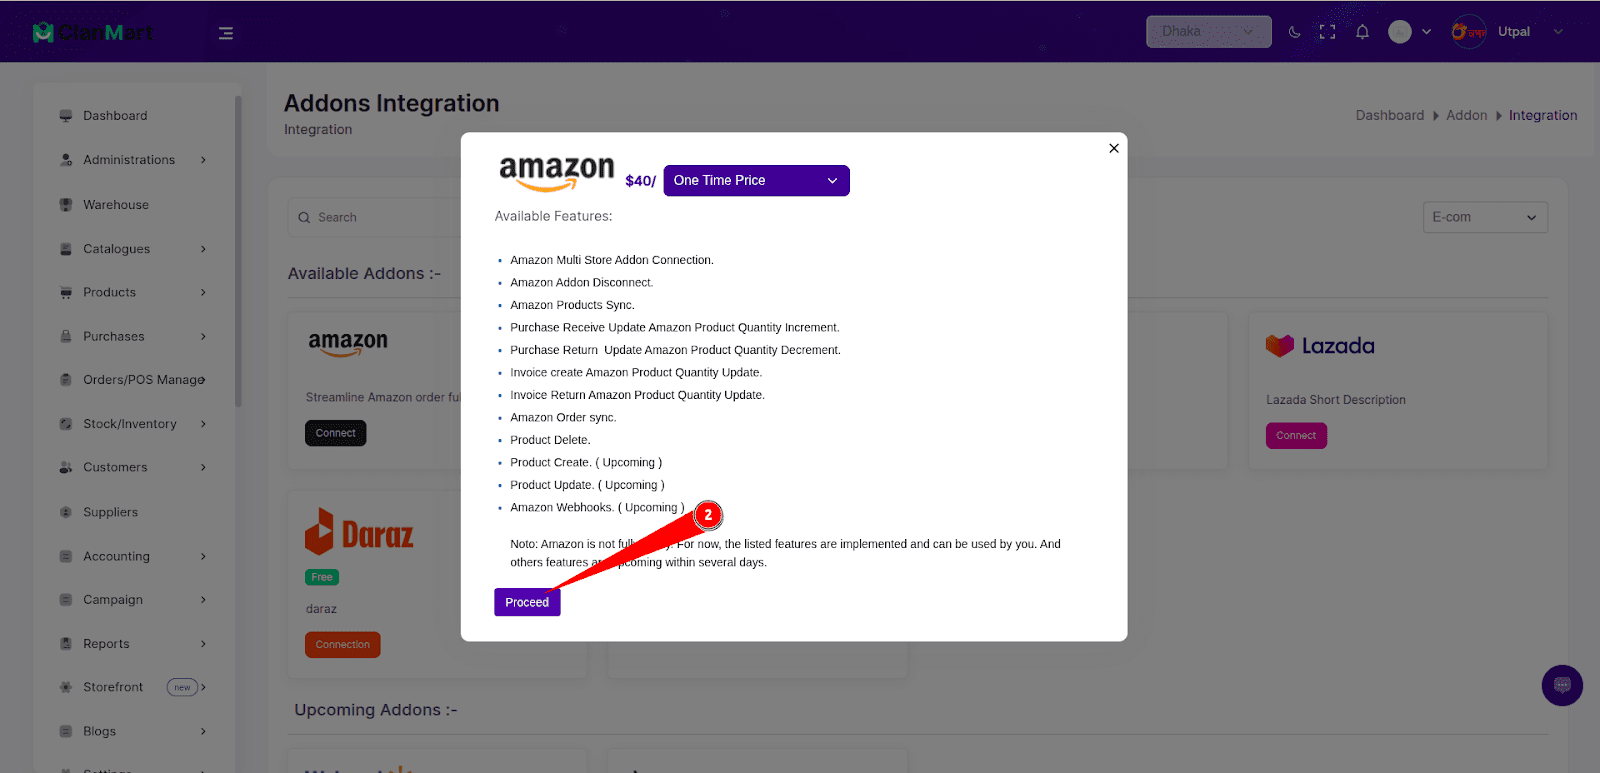
💳 Step 2: Make the Payment
- A pop-up will appear prompting you for payment.
- Click “Proceed” to view the payment details.
Enter your payment information and complete the transaction for the Amazon Addon.
🔐 Step 3: Enter API Credentials
After completing the payment, you’ll be prompted to enter your Amazon API credentials.
To get your API Key:
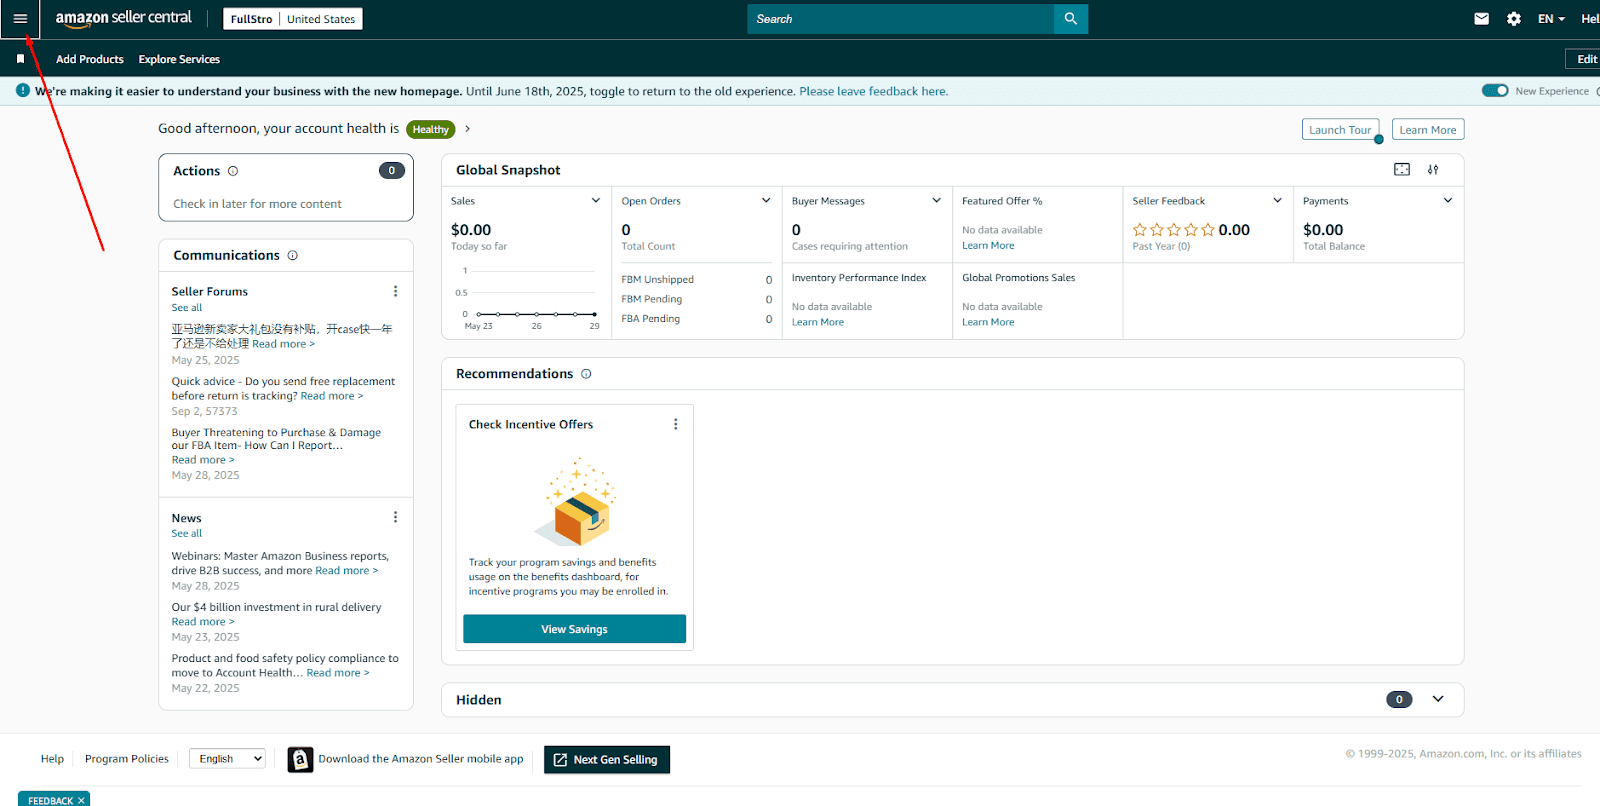
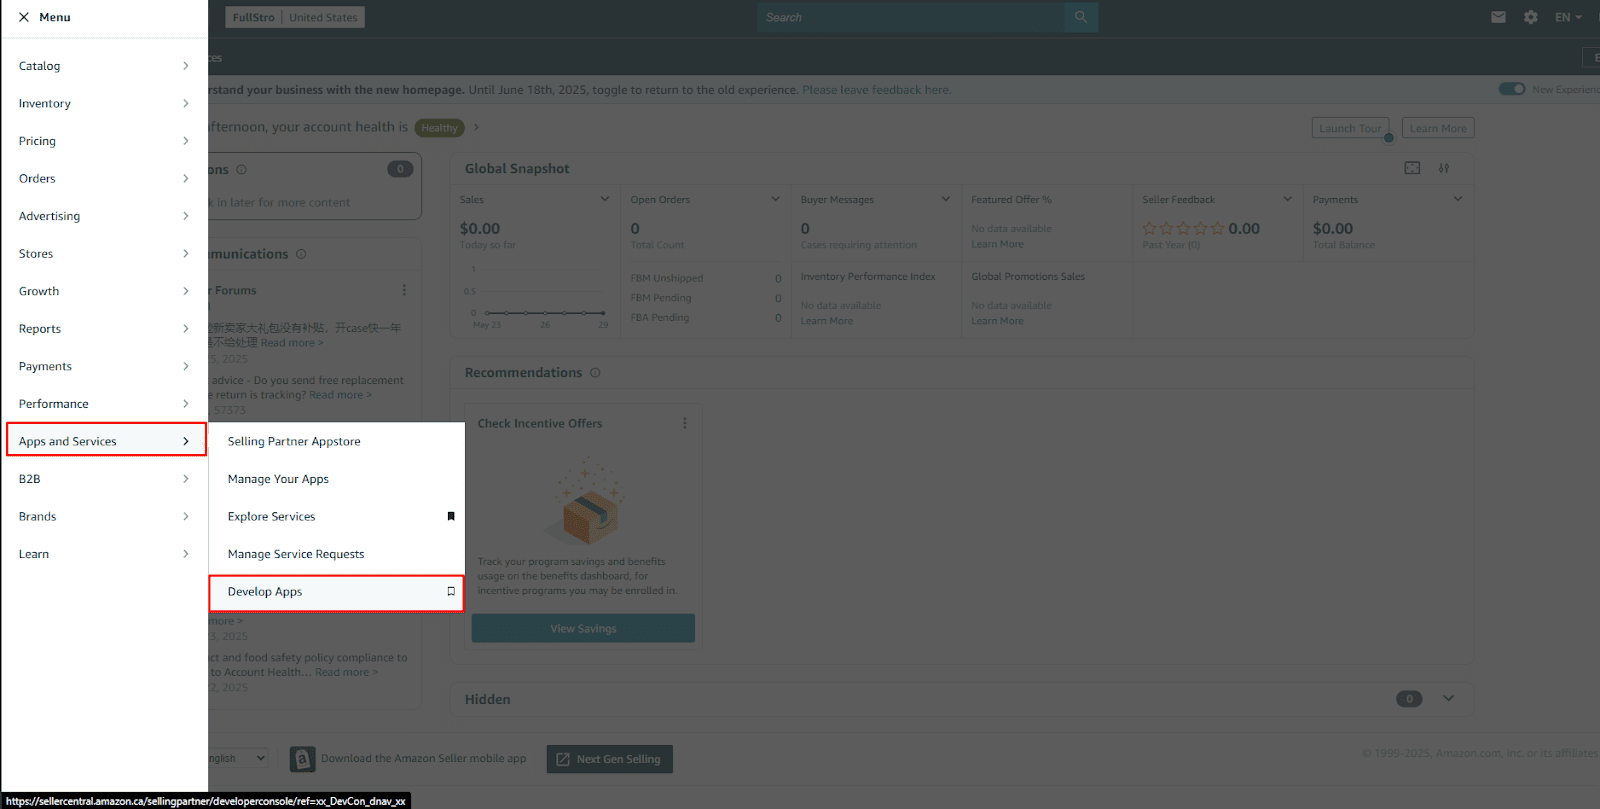
- Log in to your Amazon Seller Center account.
- Navigate to:
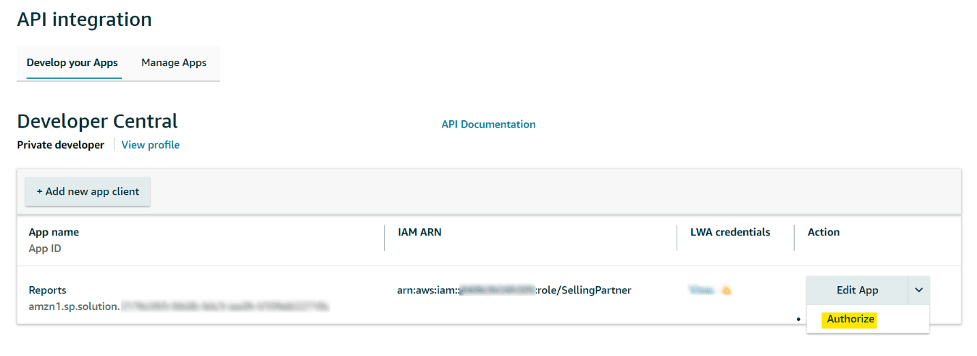
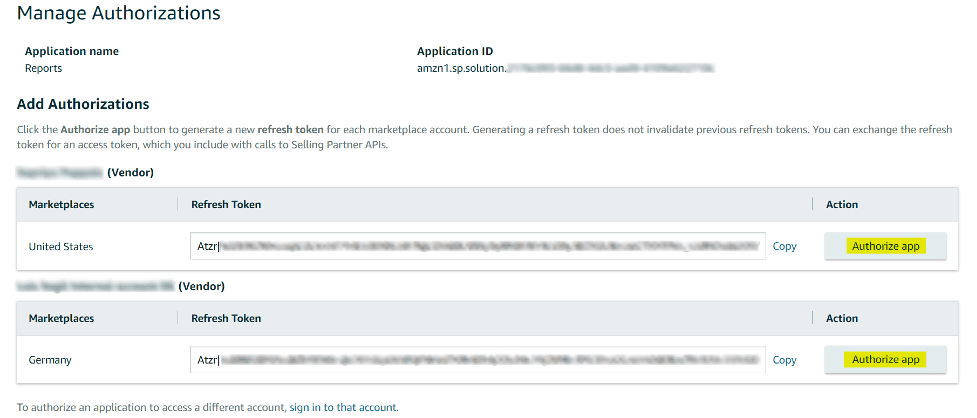
Apps and Services > Develop Apps > Add New App Client
- Click on Authorize.
For detailed steps, follow the Amazon documentation:
👉 Amazon SP API Docs
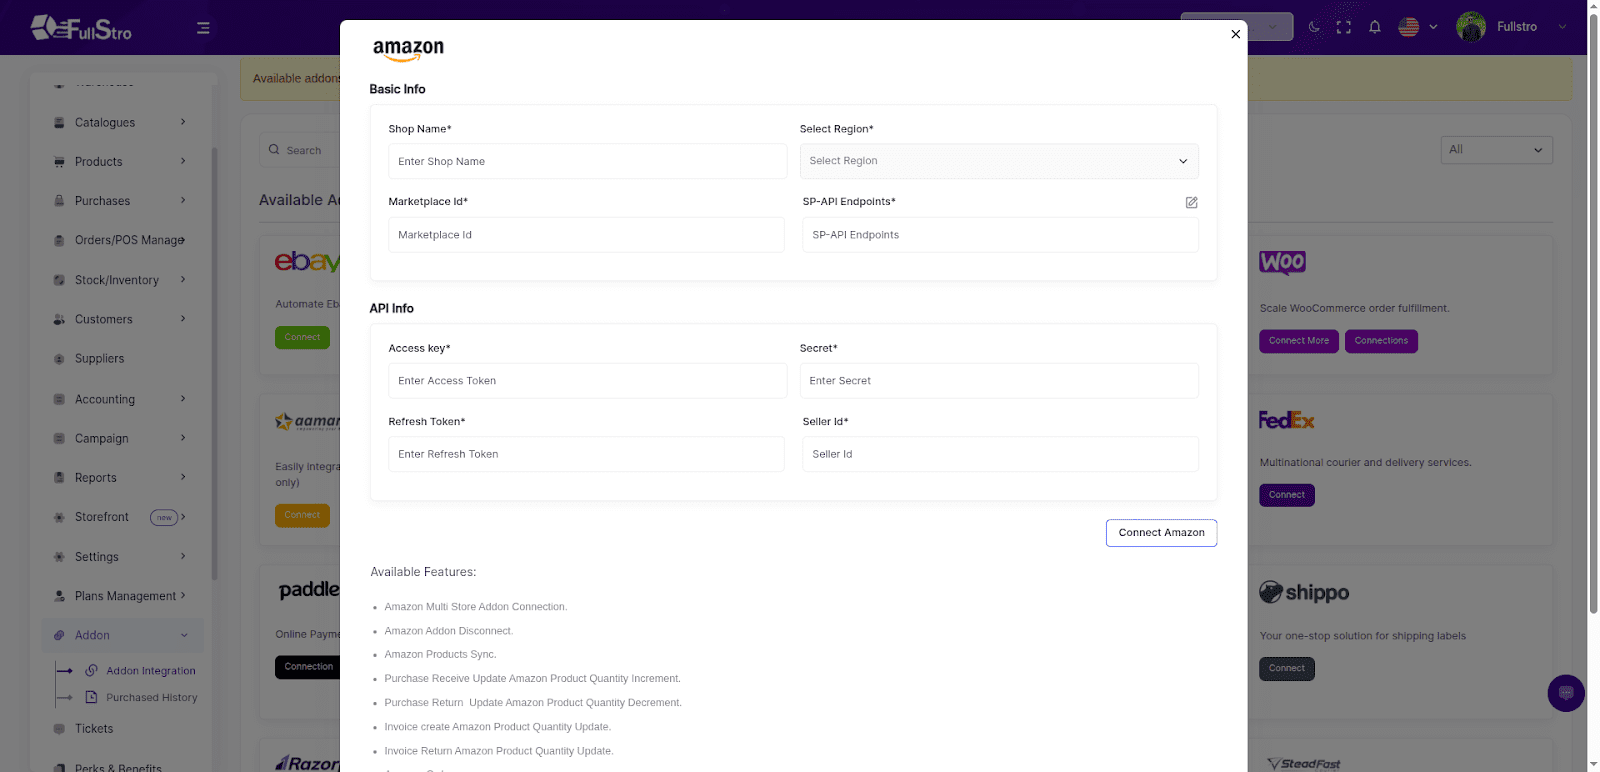
🔧 Step 4: Finalize the Integration
- Copy your live API credentials from Amazon.
- Paste them into the FullStro Amazon Addon configuration section..
🔄 Step 5: Sync Required Data
Once your shop is connected, sync the following:
This ensures your product listings are accurate and properly categorized.
🛠️ Step 6: Manage Amazon Products
With the integration complete, you can now:
- ➕ Create new products on Amazon
- 🔄 Sync existing products from FullStro
- 📦 Manage stock levels
- ⚙️ Handle other product operations with ease
✅ That’s it! Your Amazon store is now integrated with FullStro, enabling you to streamline operations and grow your online sales.