Now that you are done with configuring your store, you can go ahead to setup your store to start selling right away.
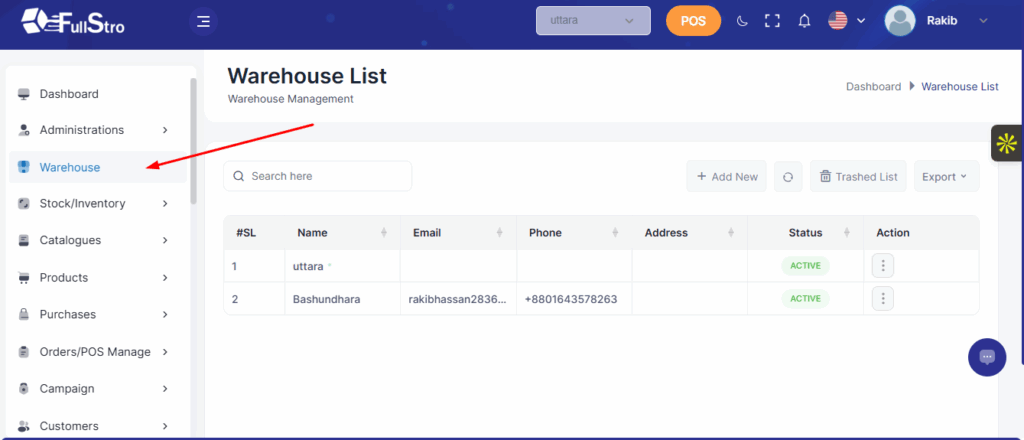
- Now you can go to the warehouse module and create the warehouses you have. As a business, you might have multiple locations where you store your products, you will need to create those warehouses with proper information.
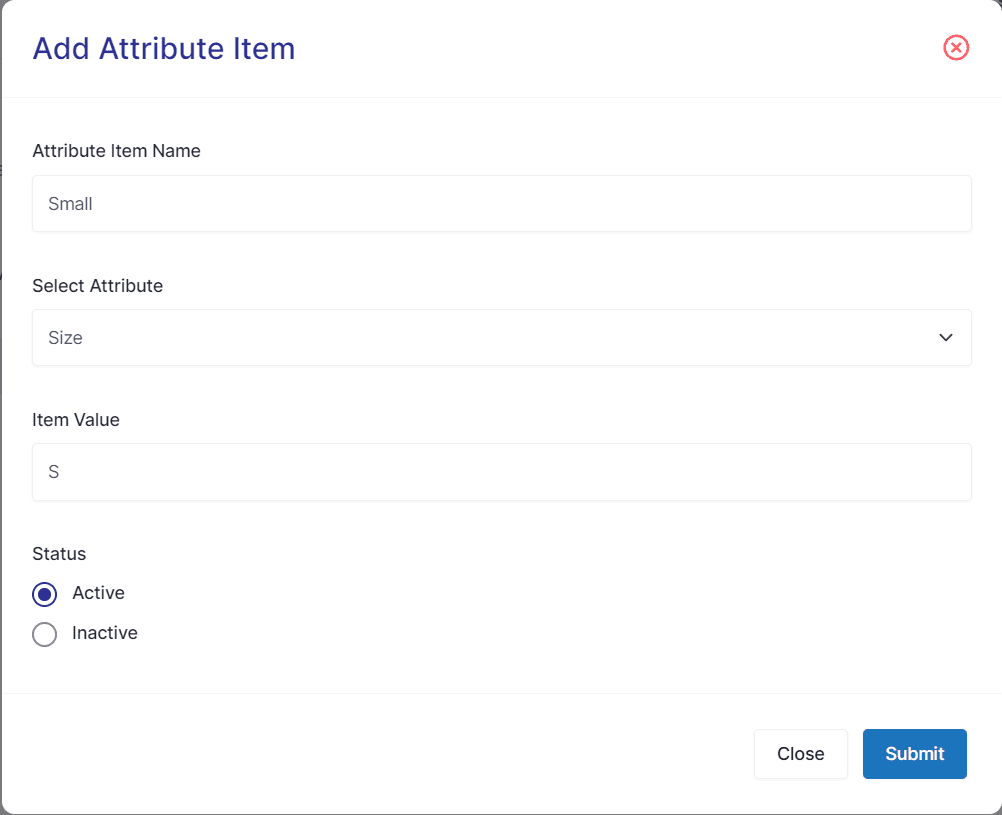
2. Now you can go to the catalogue module and create the pre-requisites such as weight unit, measurement unit, attribute and attribute items.
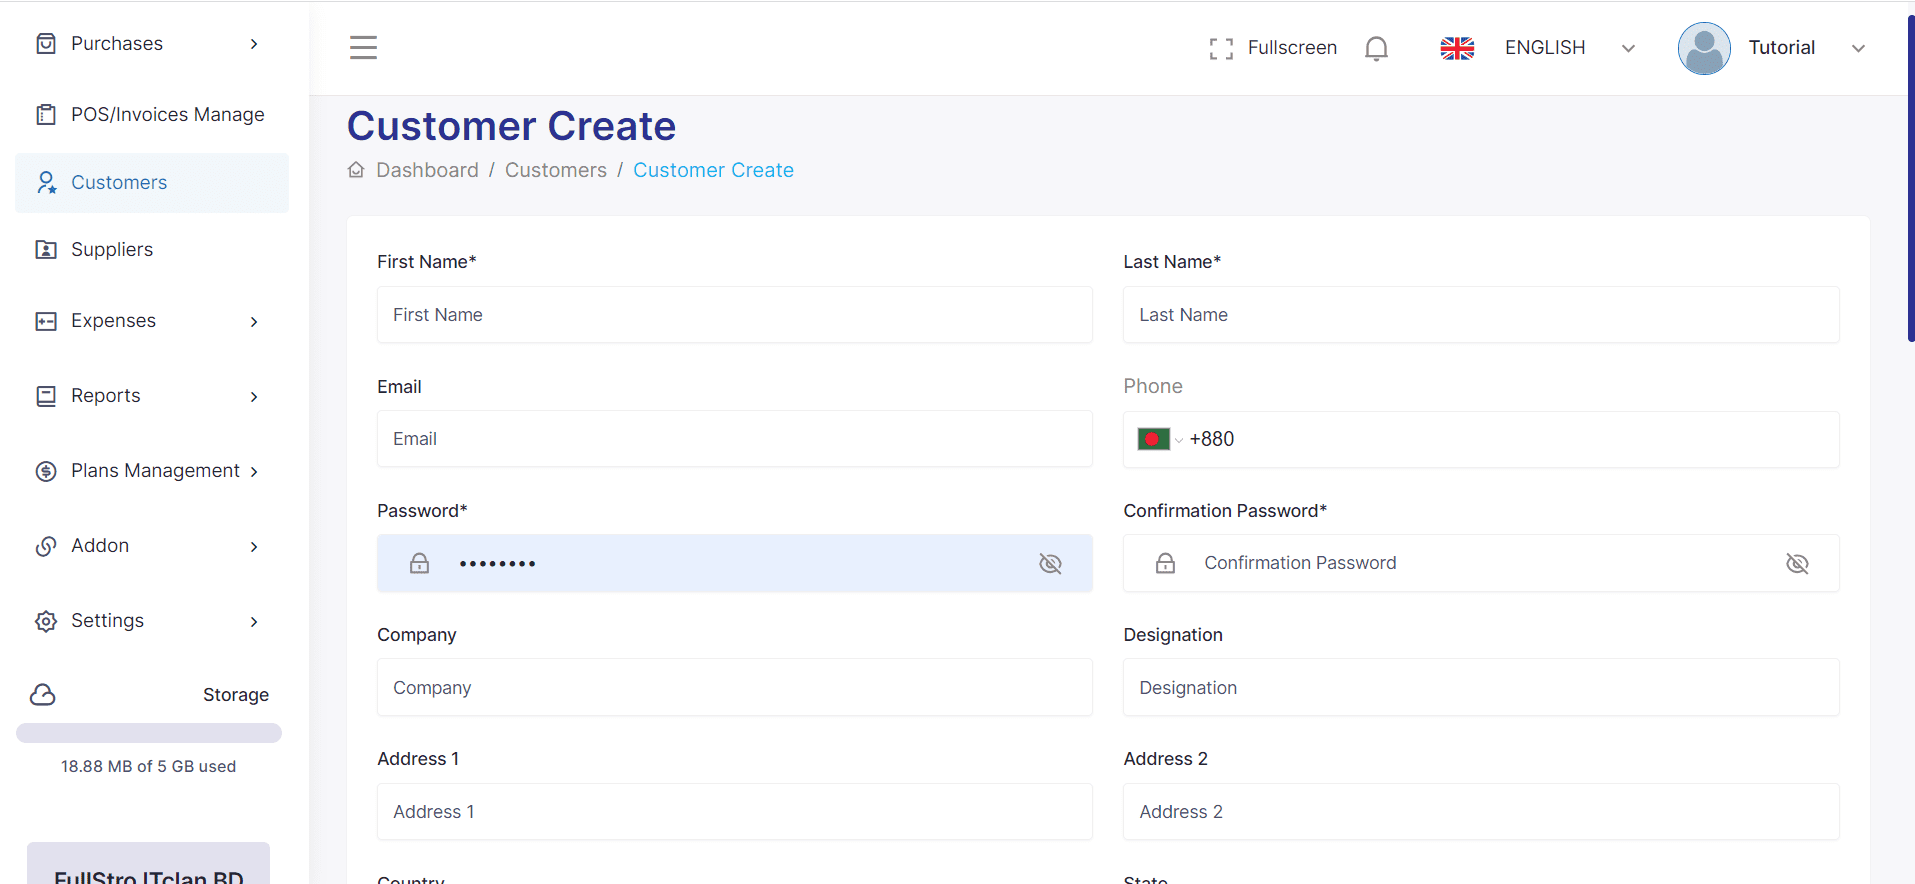
3. Now you can move on to the Customer module where you can add your existing customers. There is also option to bulk import all existing customers from your previous system.
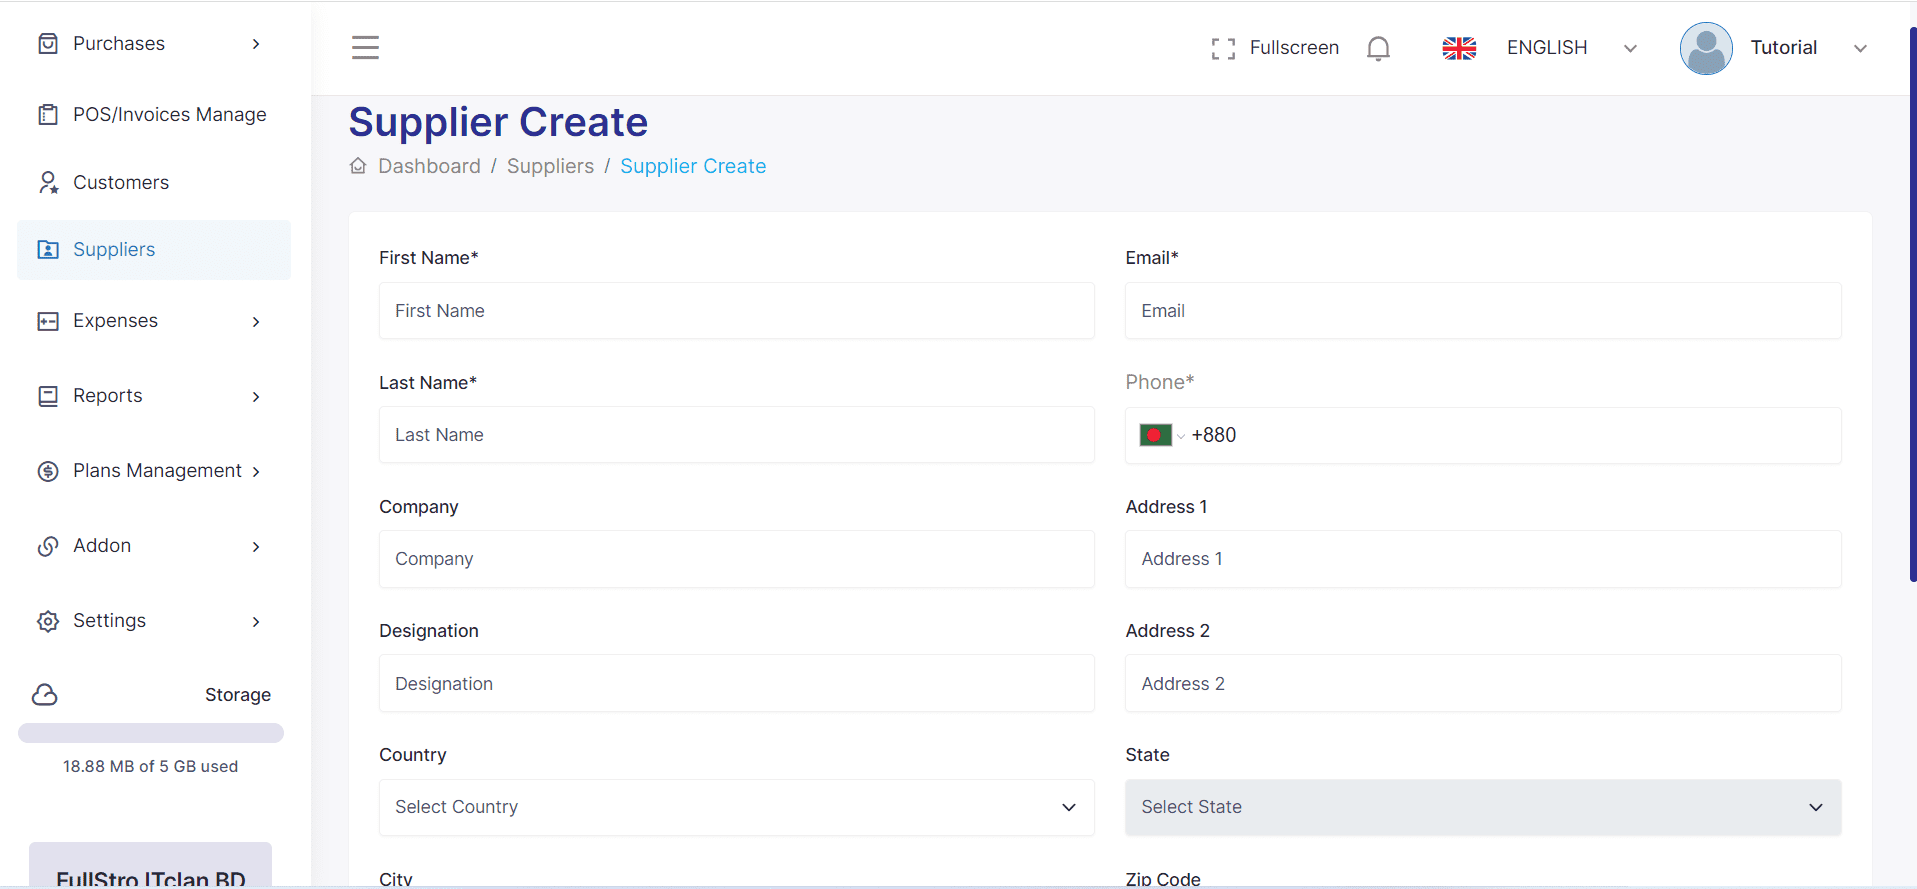
4. From the Supplier module, you can add suppliers as well as import suppliers with CSV file
FullStro allows you to customize your dashboard to suit your preferences. Follow these simple steps:
Step 1: Click on the Rearrange Section
Log in to your dashboard and click on the Rearrange Section option. This will enable the customization mode.
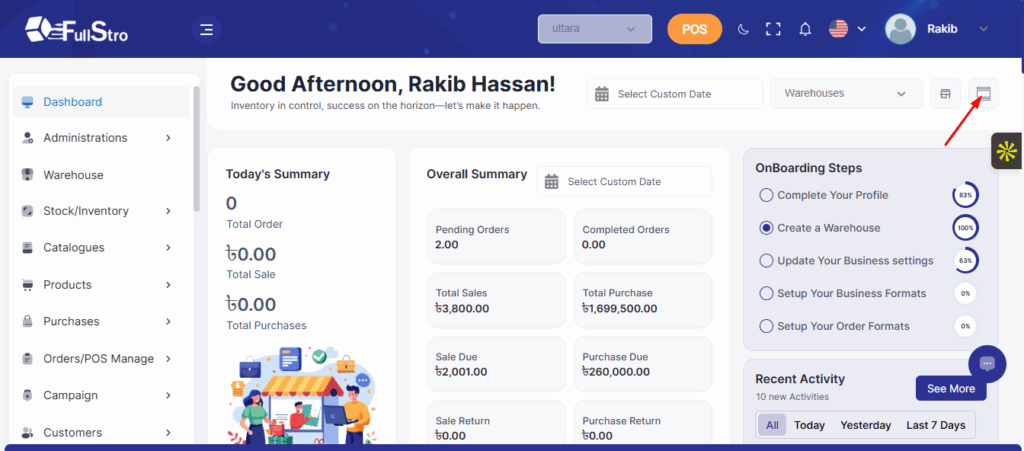
Step 2: Rearrange the Sections
You can now drag and drop the different sections of your dashboard to arrange them the way you like.
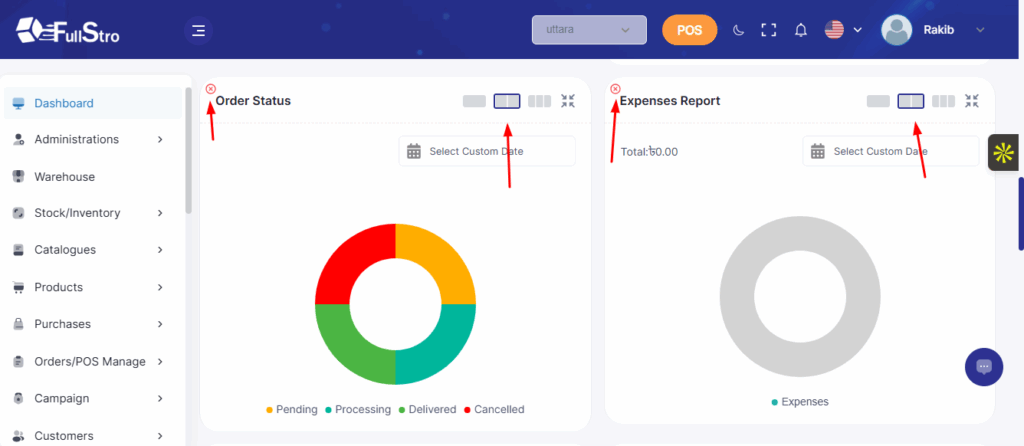
Step 3: Save Your Changes
Once you are satisfied with the layout, click Save to apply your changes. Your dashboard will now reflect your customized setup.

Warehouse Documentation
FullStro allows you to manage your warehouses efficiently. Follow these steps to add a new warehouse:
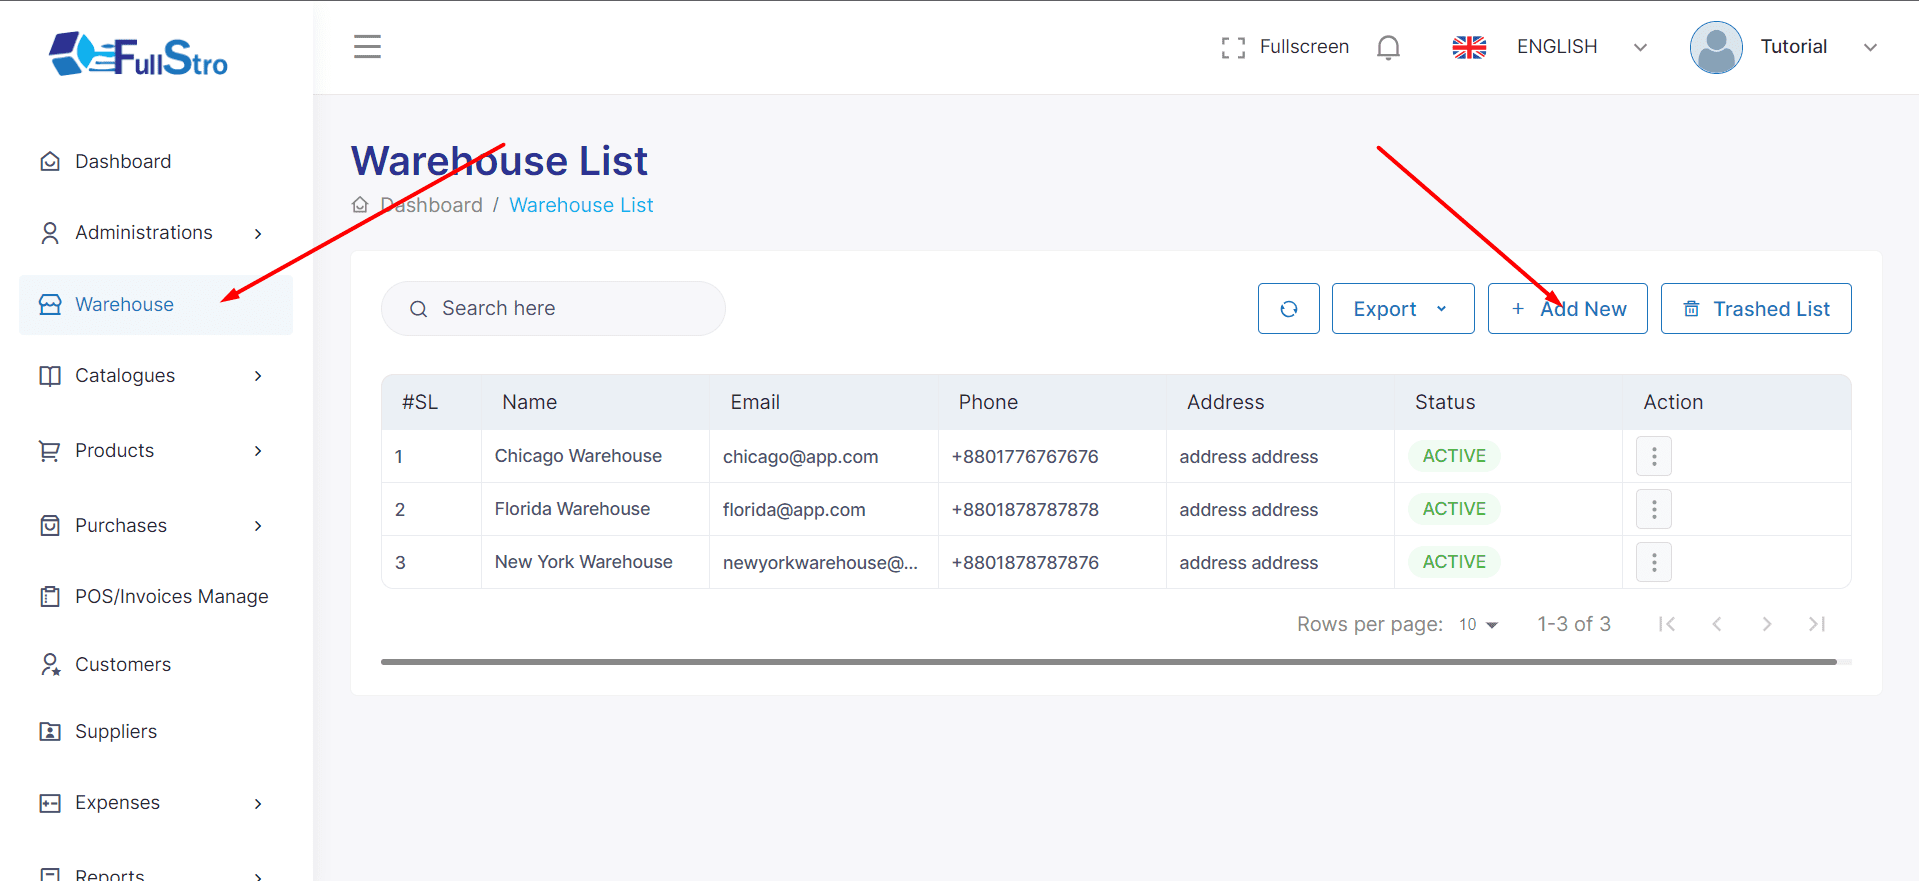
Step 1: Go to the Warehouse Section
Log in to your FullStro account and click on Warehouse from the main menu.
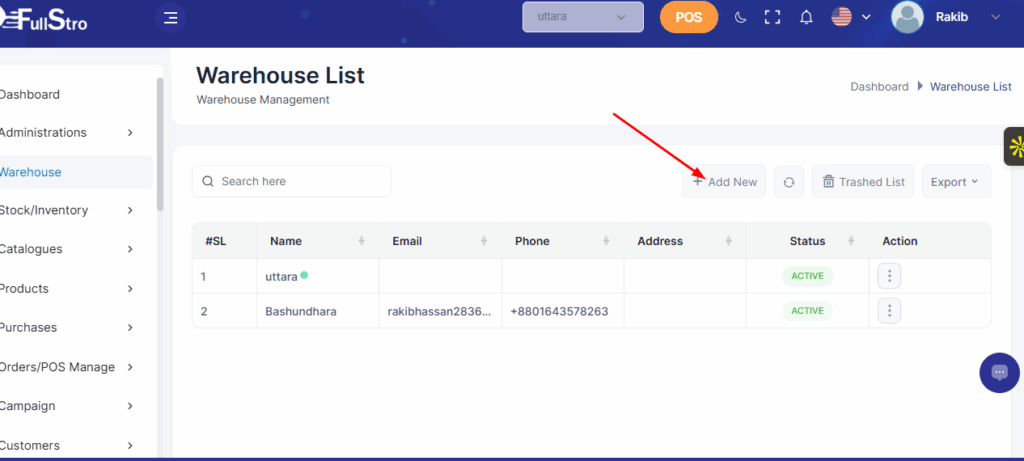
Step 2: Add a New Warehouse
Click on the Add New button to create a new warehouse entry.
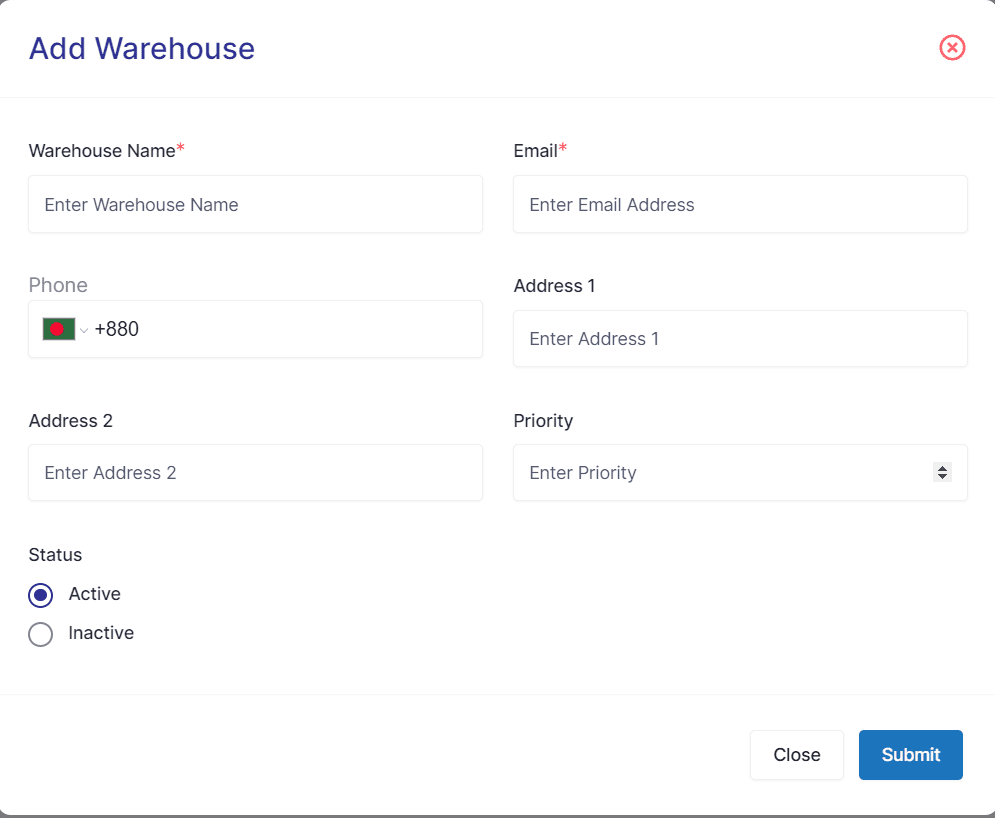
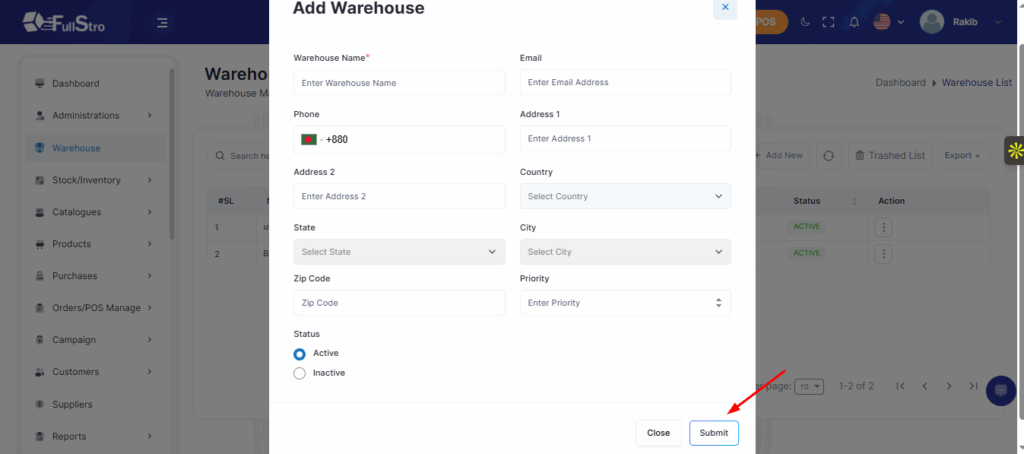
Step 3: Enter Warehouse Information
Fill in all the required details for the warehouse, such as name, location, and any other relevant information. Once completed, click Submit to save the new warehouse.
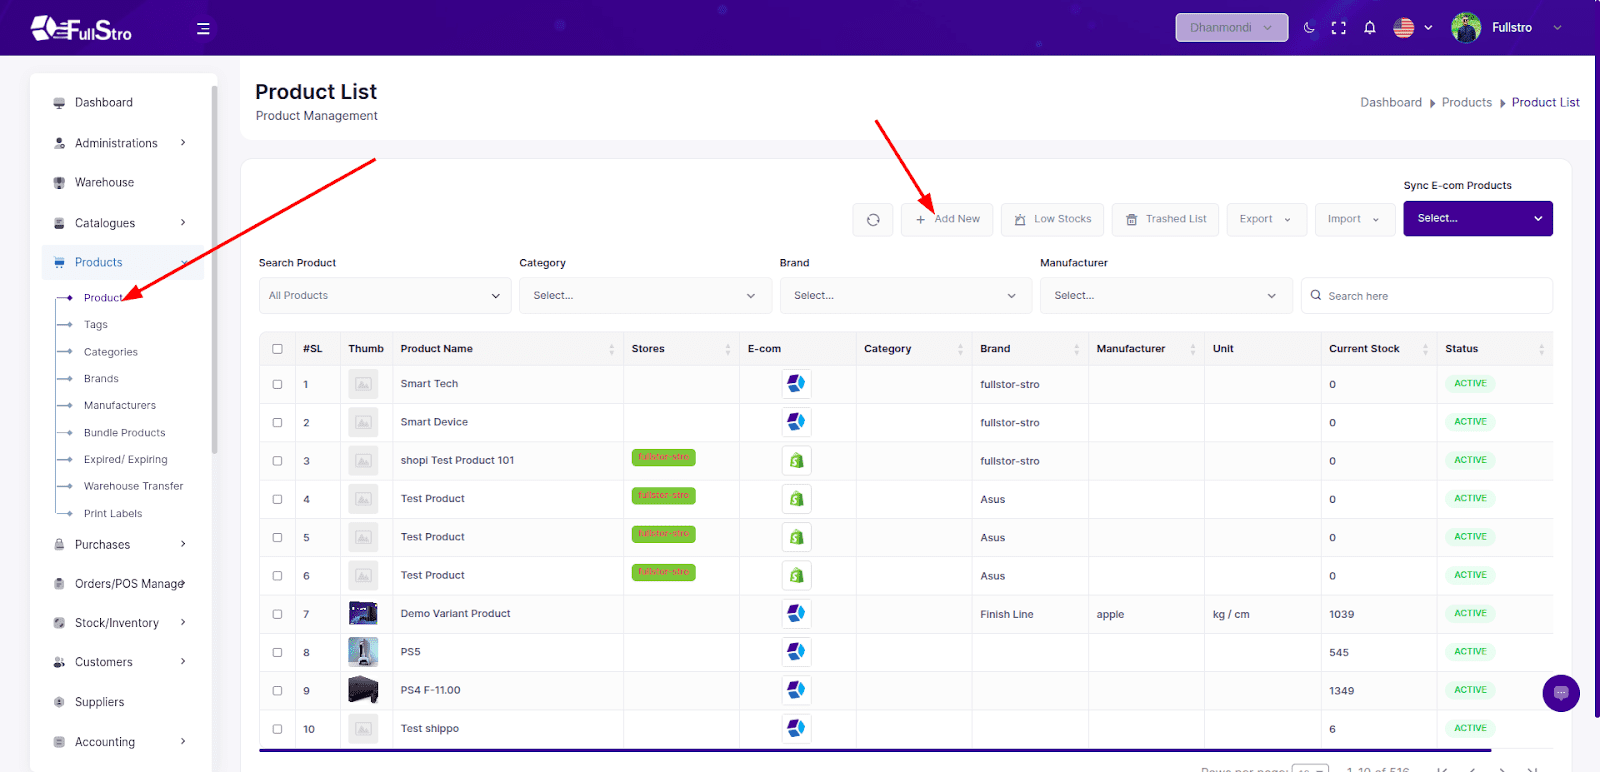
Fullstro’s Product Management module enables efficient organization and monitoring of products, brands, and manufacturers. This tutorial covers key functionalities, including listing products, creating new entries, editing, deleting, managing barcodes, and tracking low-stock products.
Step-by-Step Guide:
Navigate to the Purchase Module
- Log in to your FullStro account. From your FullStro dashboard.
- Go to Products > Product Integration from the left panel.
- Click the “Add New” button to start a new product.
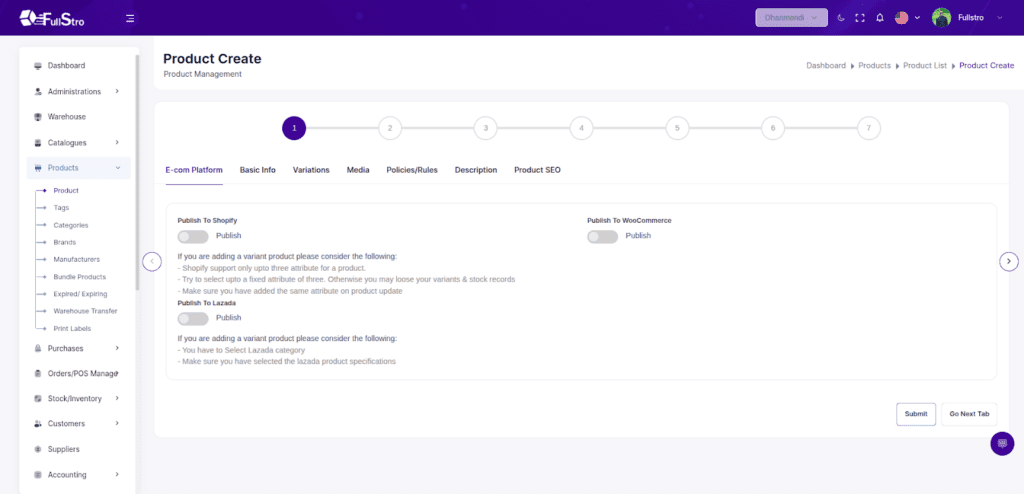
Step 1: E-Com Platform (Optional)
If you’ve purchased the eCommerce Addon, you’ll see an E-com Platform tab.
- Enable product sync with third-party platforms like Shopify, WooCommerce, Lazada, eBay, Amazon, etc.
This step is only applicable if the addon is installed.
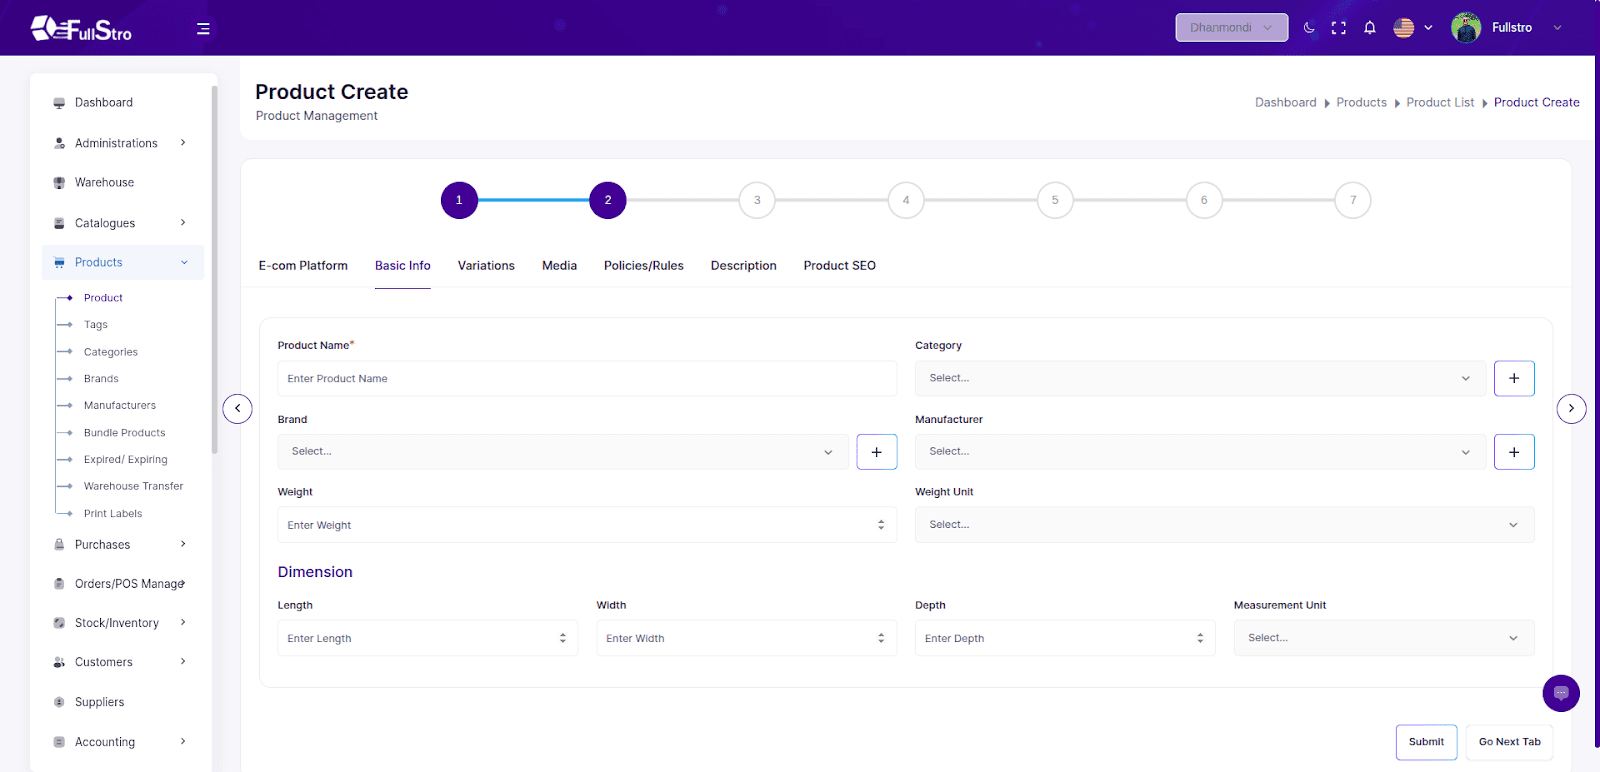
Step 2: Basic Info
- Go to Product Module > Add New.
- Under the Basic Info tab, fill in:
- Product Name
- Category
- Brand
- Weight
- Dimensions
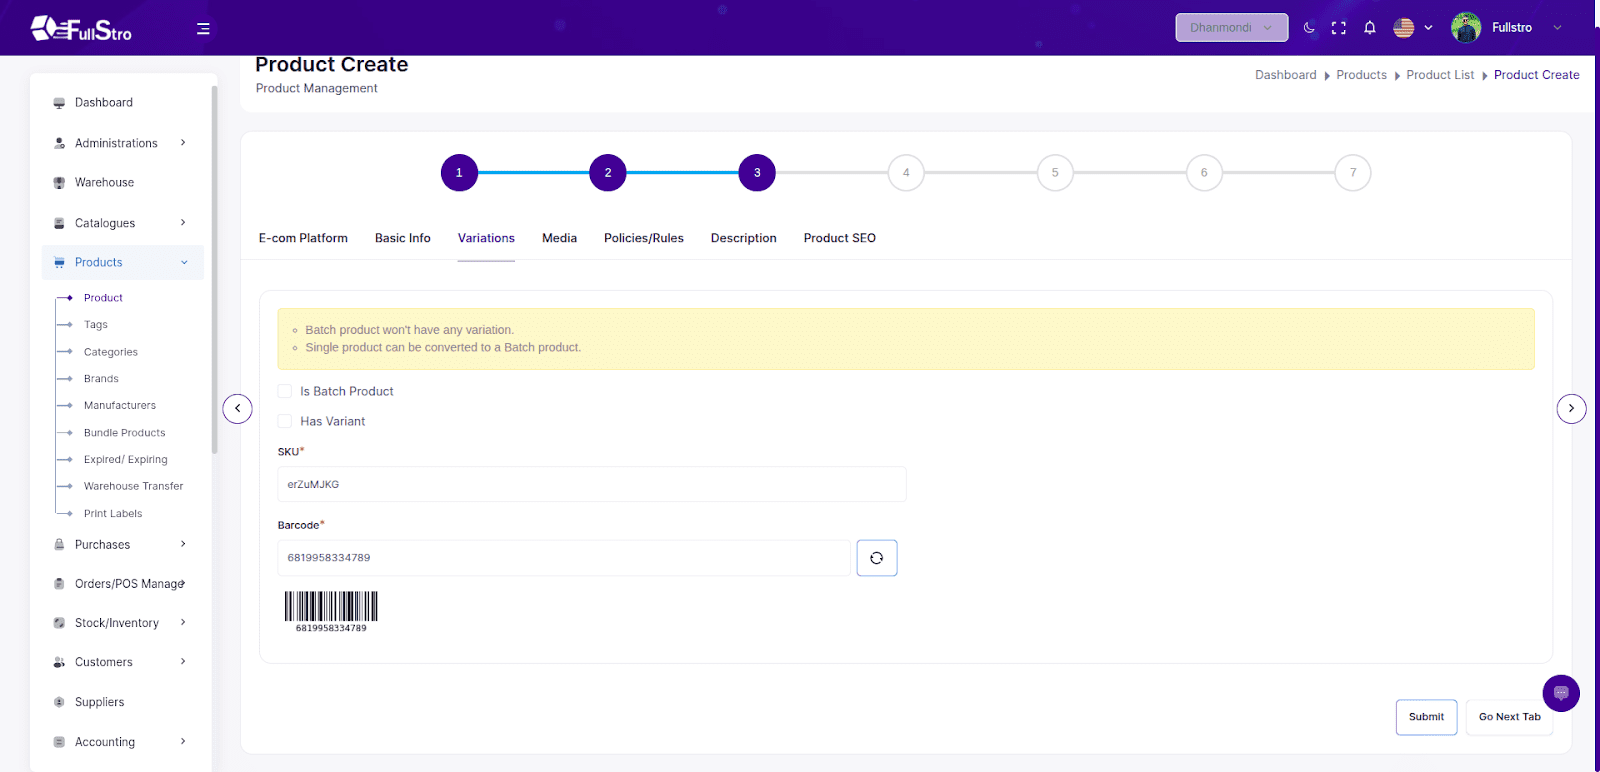
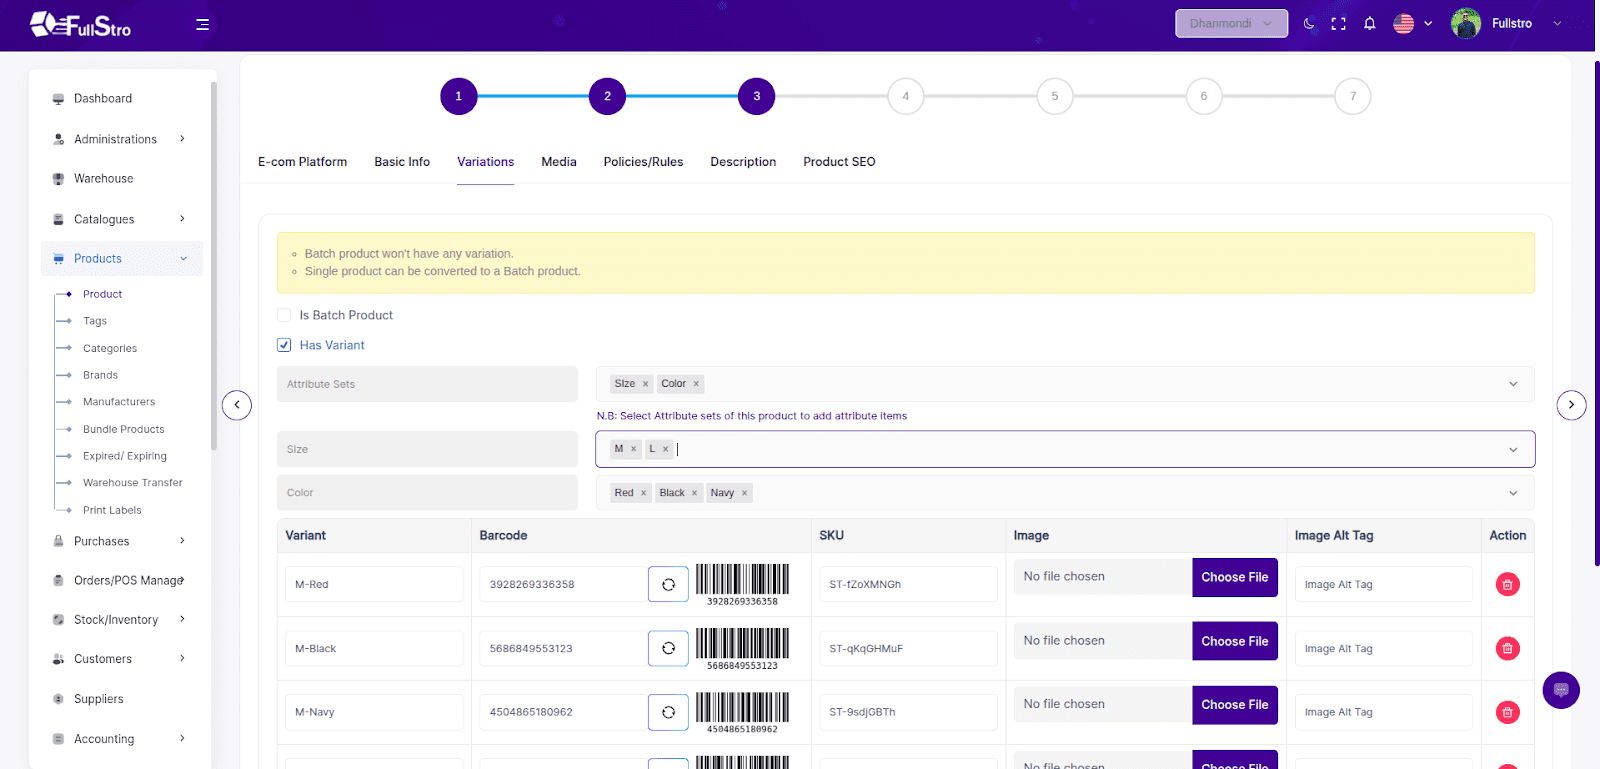
Step 3: Variations / Batch
- Go to the Variations tab.
- Edit:
- For variant products, enable the variant toggle and select:
- Attributes (e.g., Color, Size)
- Attribute Items (e.g., Red, Blue, S, M, L)
- For batch product, just enable the Is Batch Product checkbox
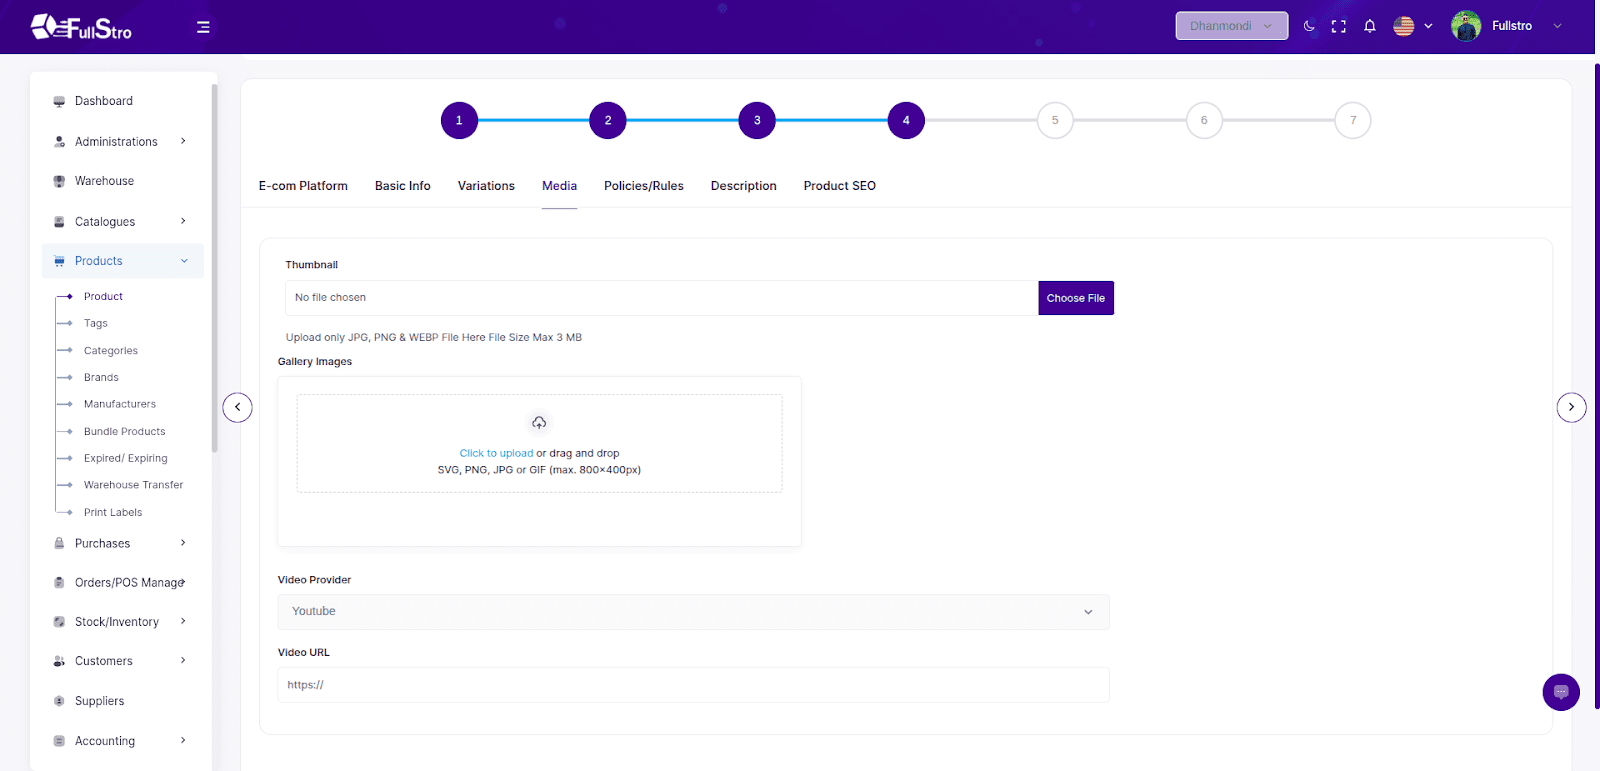
Step 4: Media
Upload product photos and videos in the Media tab.
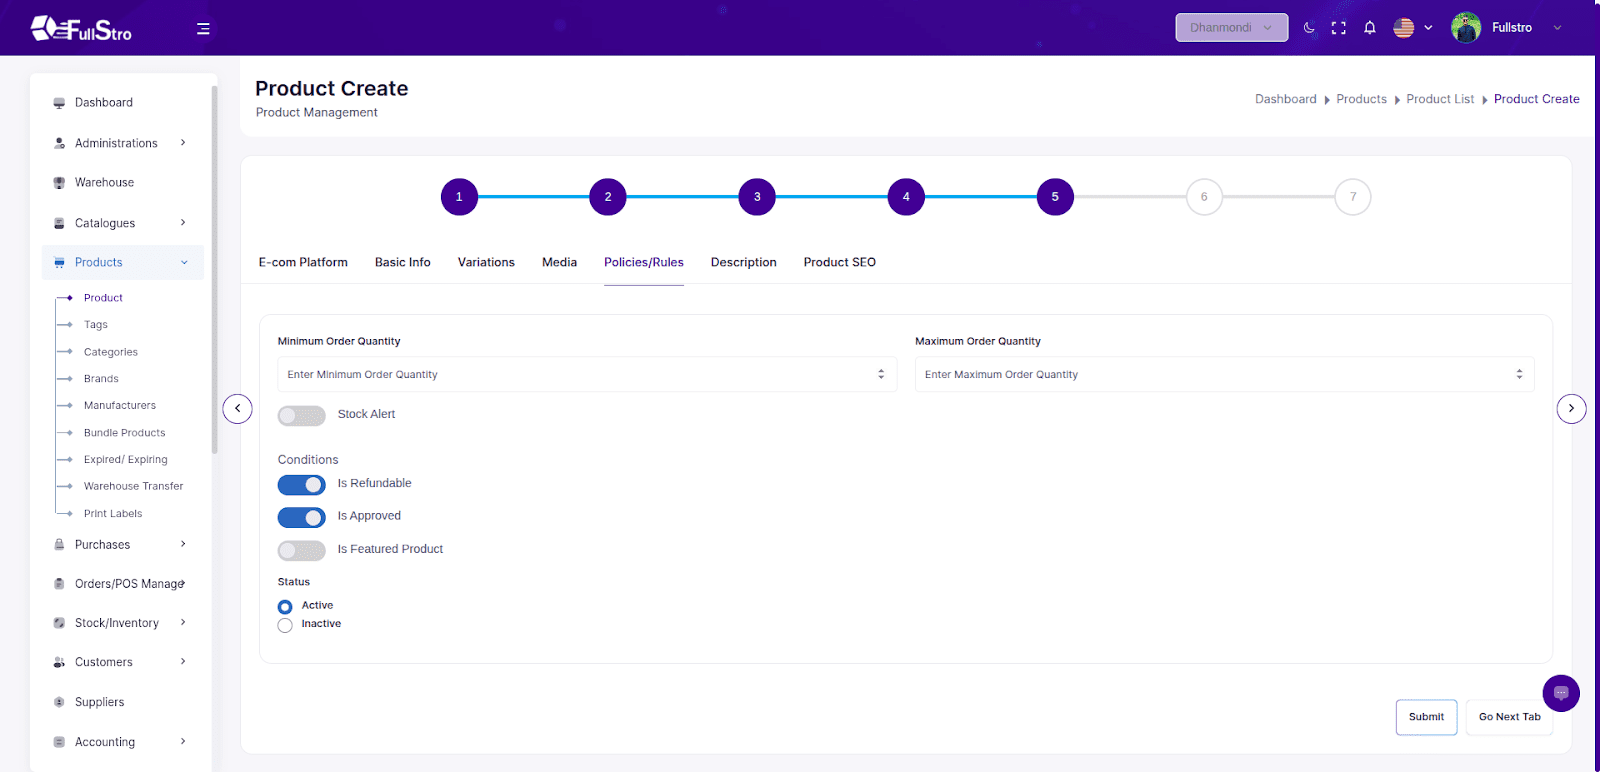
Step 5: Policies / Rules
- Set the following in this tab:
- Minimum & Maximum Order Quantity
- Stock Alert Settings
- Refundable or Not
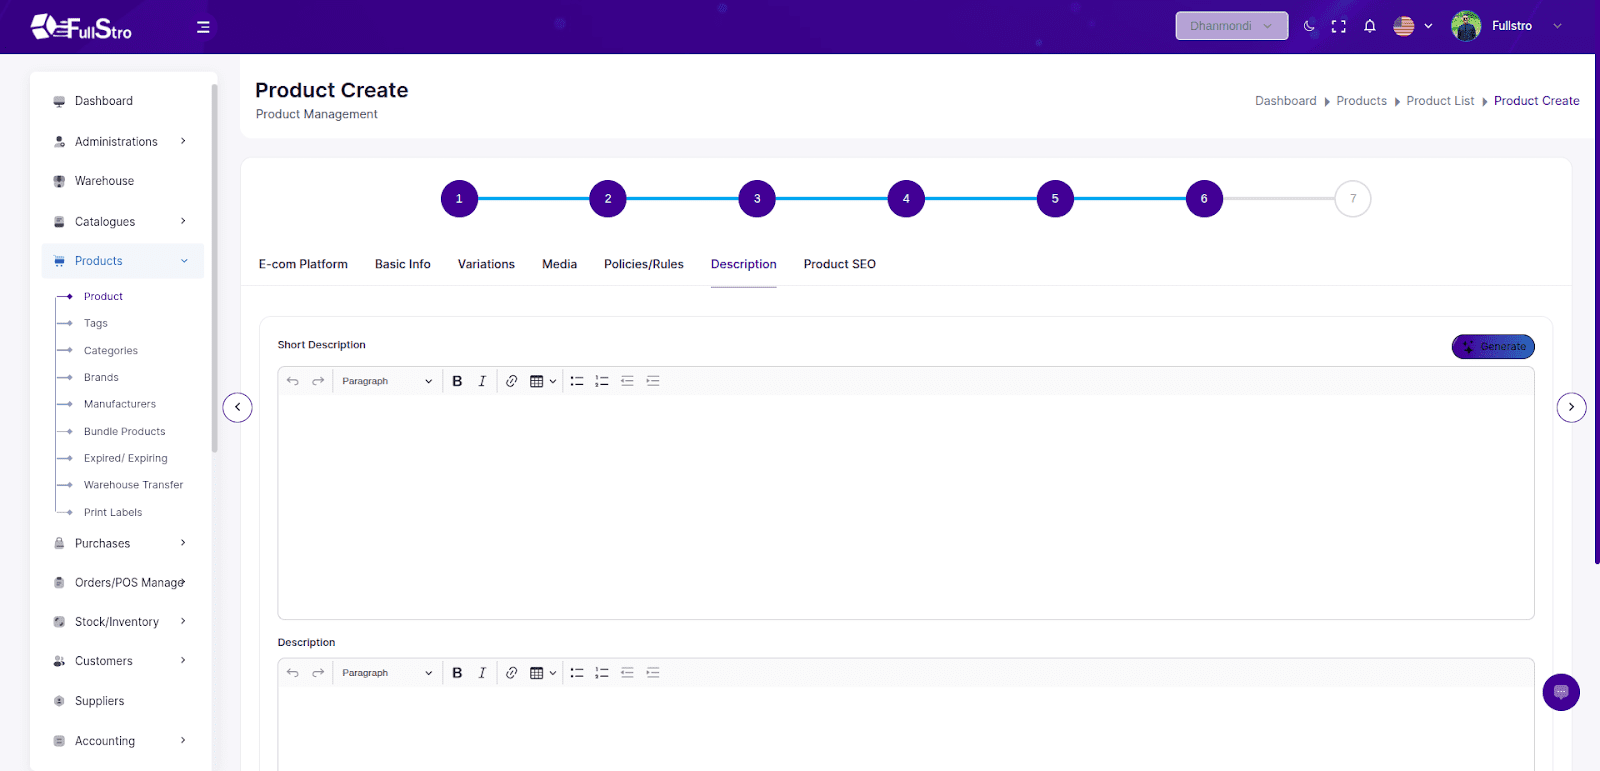
Step 6: Description
Full Description
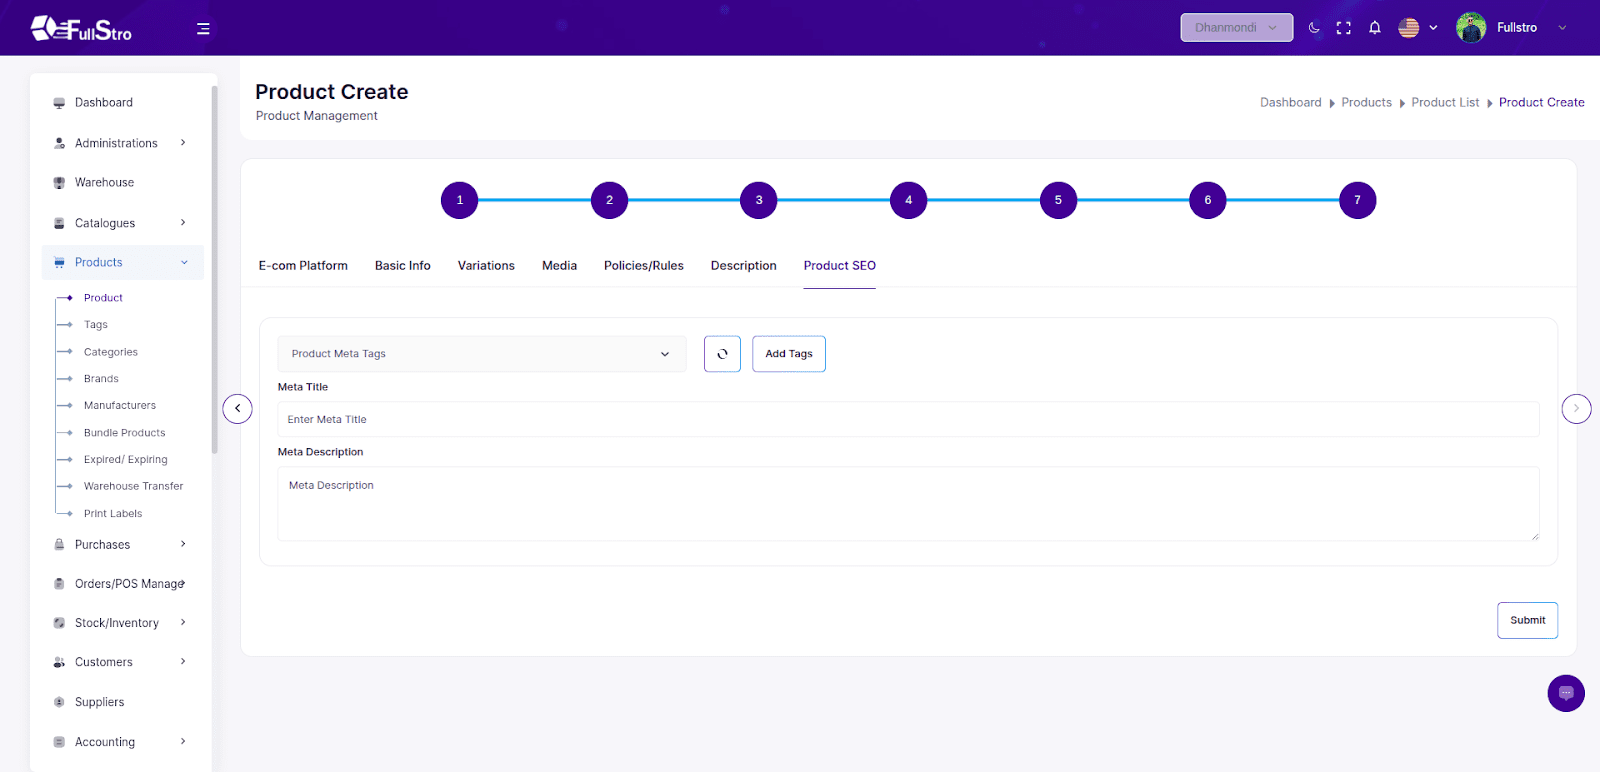
Step 7: Product SEO
Boost your product’s visibility by entering SEO metadata:
- Meta Title
- Meta Tags
- Meta Description
Video Tutorial
Master FullStro Product Management: Easy Guide to Organize, Track & Manage Products
Watch Now on YouTube
Your product is now added and ready for purchasing, inventory management, and POS selling.
Before you can sell products through the POS, you must first create a purchase. This ensures accurate inventory tracking and warehouse management.
Step-by-Step Guide:
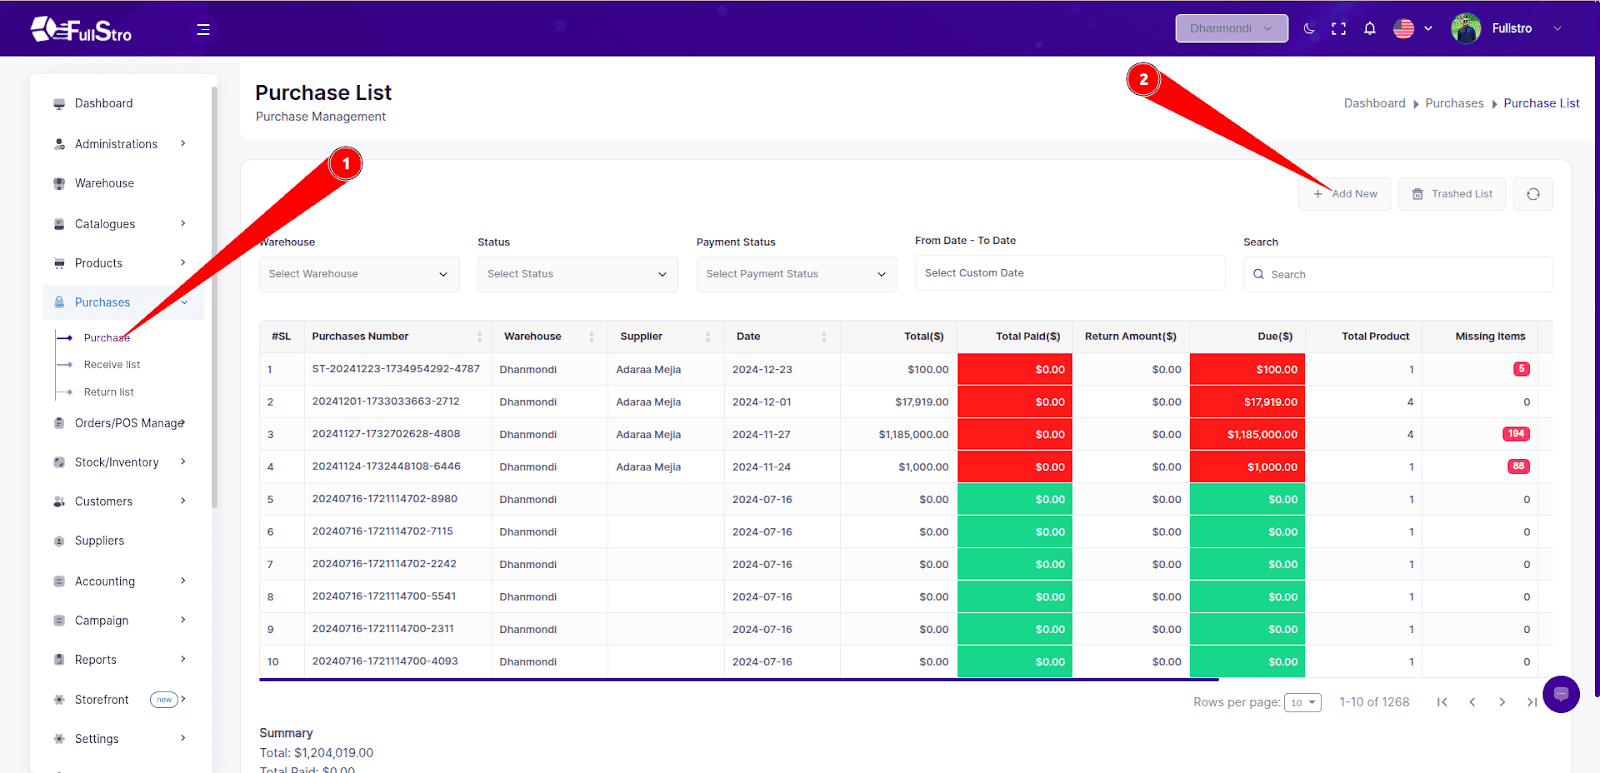
1. Navigate to the Purchase Module
- Log in to your FullStro account. From your FullStro dashboard.
- Go to Purchases > Purchase Integration from the left panel.
Click the “Add New” button to start a new purchase.
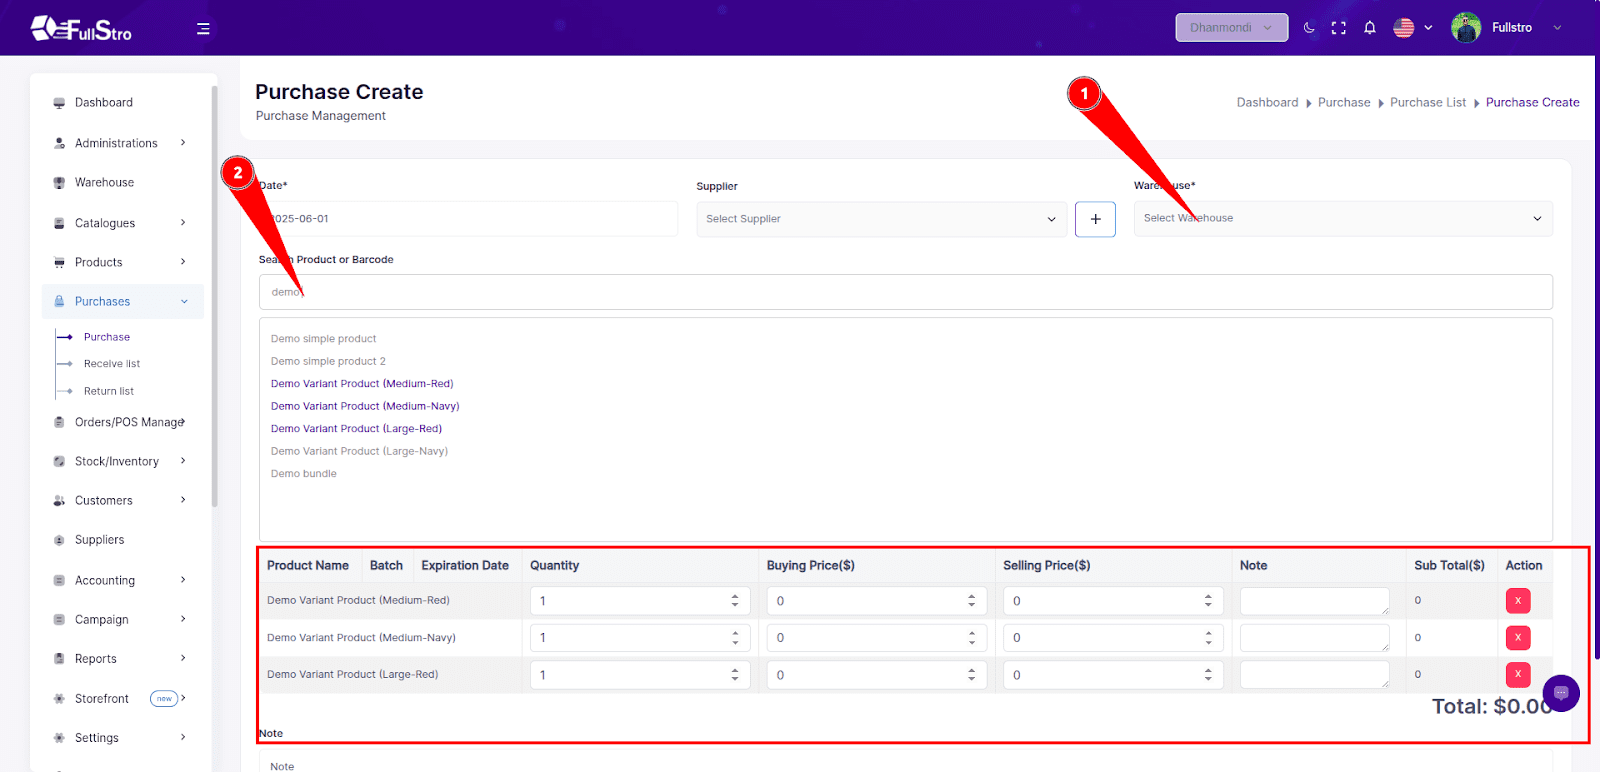
2. Fill Out Purchase Details
- Use the product search bar to find and select the products you’ve previously added via the Product Module.
- Enter the following required information:
- Purchase Date
- Supplier
- Warehouse where the items will be stored
- Quantity
- Buying Price
Selling Price
3. Save the Purchase
- Once you’ve entered the product and purchase details, save the purchase.
Important: At this stage, the products are not yet available for sale in the POS. This is because you’ve only placed the order — the goods haven’t been marked as received.
4. Manage Purchase Actions
- From the Action dropdown in the Purchases list, you can:
- Receive Products
- Edit the purchase
Cancel or Delete the purchase
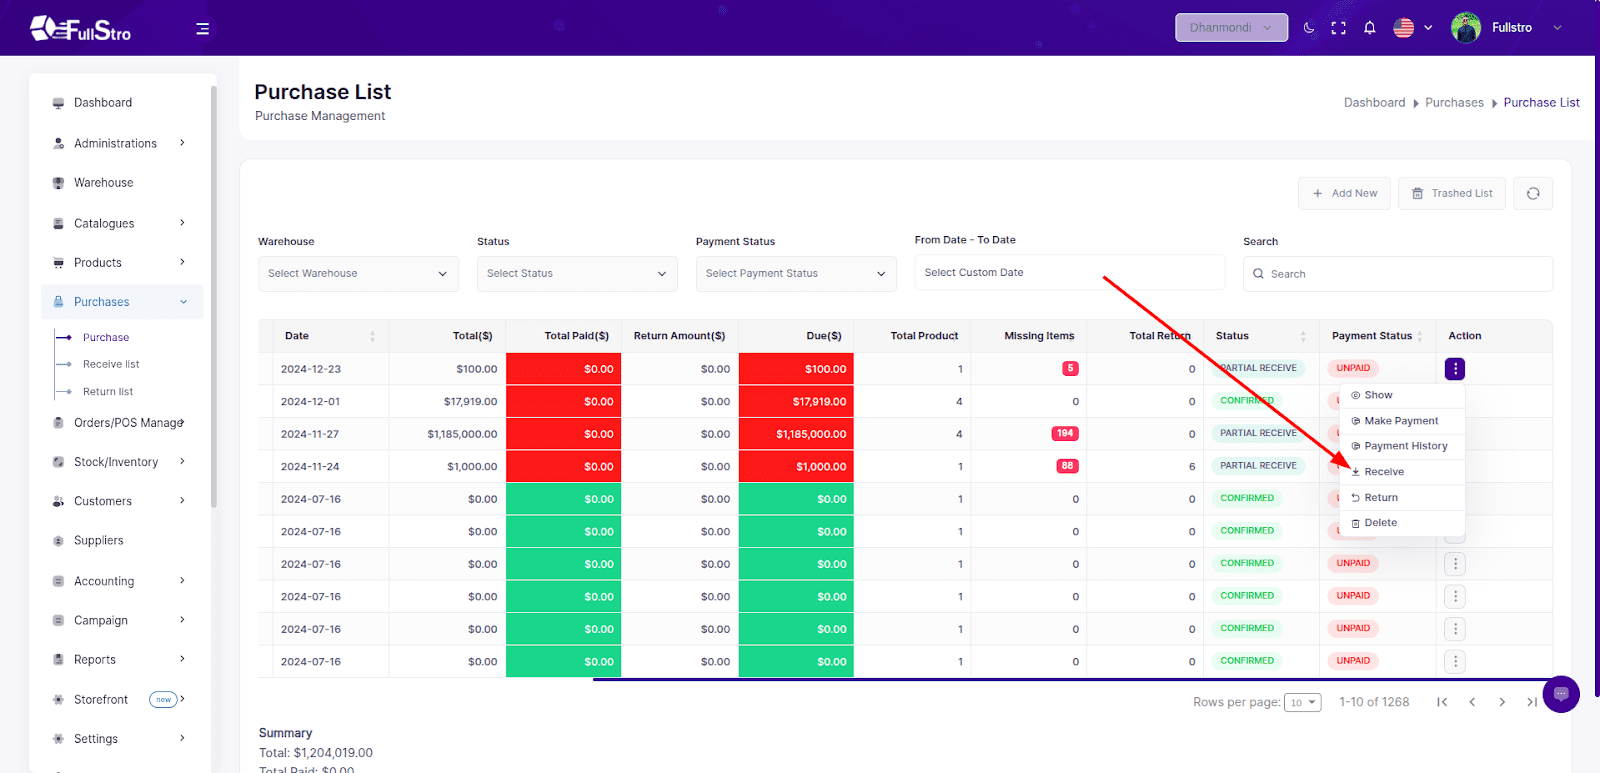
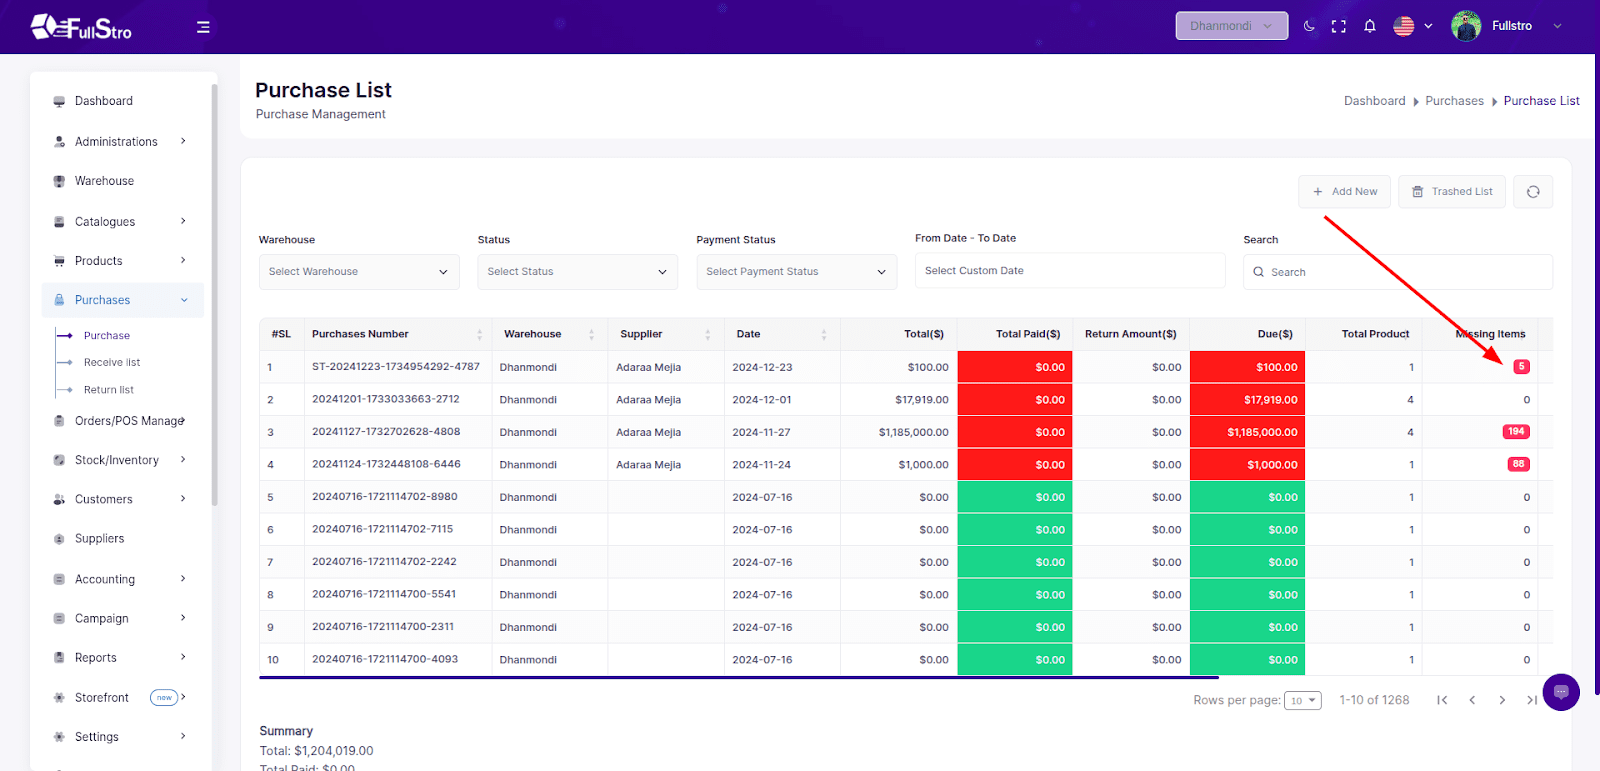
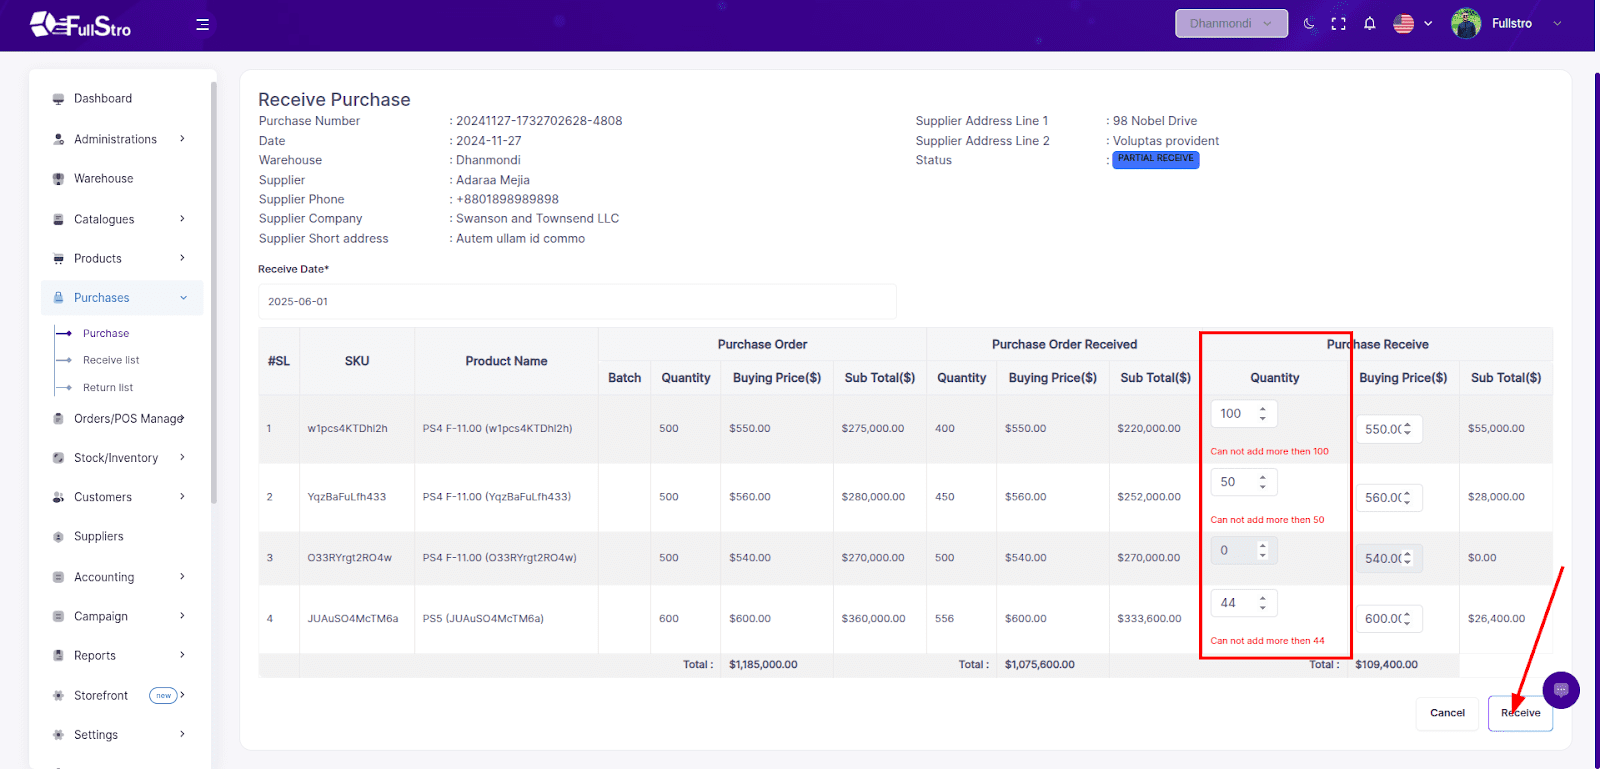
5. Receive the Products
- Click Receive to mark the products as received in your warehouse.
- On the receive page:
- Specify the quantity of each product that has been received.
- You can partially receive items — FullStro will track:
- Fully Received
- Partially Received
- Missing Items
Once complete, press “Receive” to finalize the reception.
Video Tutorials
Watch and Learn for hands-on guidance:
- FullStro Purchase Management Tutorial: Streamline Your Purchases Easily!
Watch now
- Guide for FullStro’s Purchase Receive List: Track, Update & Optimize!
Watch now
- Know Everything about The Purchase Return List for Seamless Inventory Management
Watch now
Now You Can Sell!
Once products are received, they become available in the POS for selling.
This ensures your stock levels remain accurate and prevents selling items that haven’t been physically received yet.
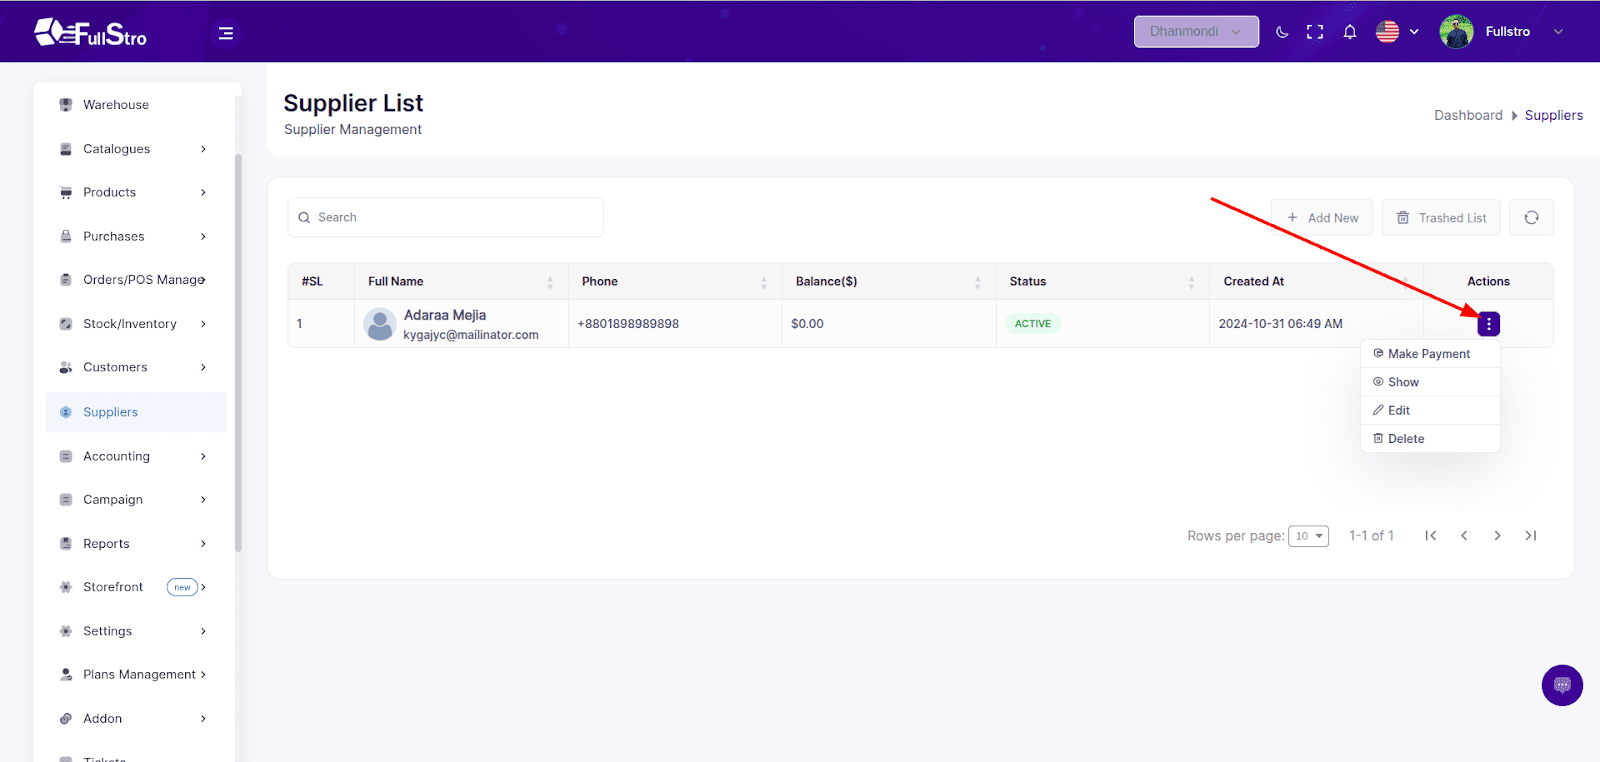
This section covers how to manage suppliers, including creating, listing, editing, deleting, making payments, and viewing detailed records and transaction histories.
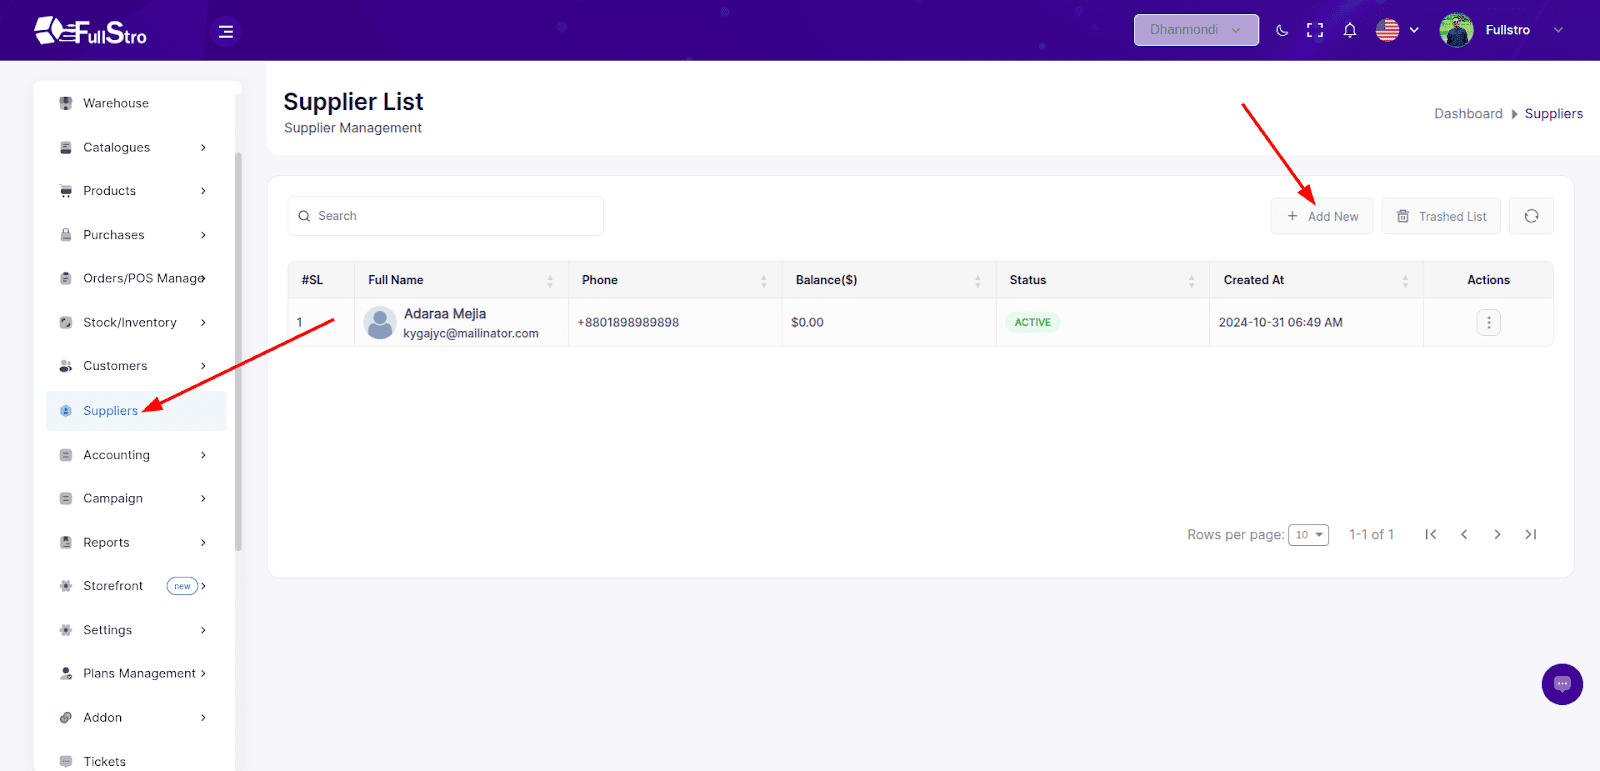
1. Accessing Supplier Management
- Navigate to Supplier from the left sidebar.
- You’ll be redirected to the Supplier List page.
- Use the “Add New” button to create a new supplier.
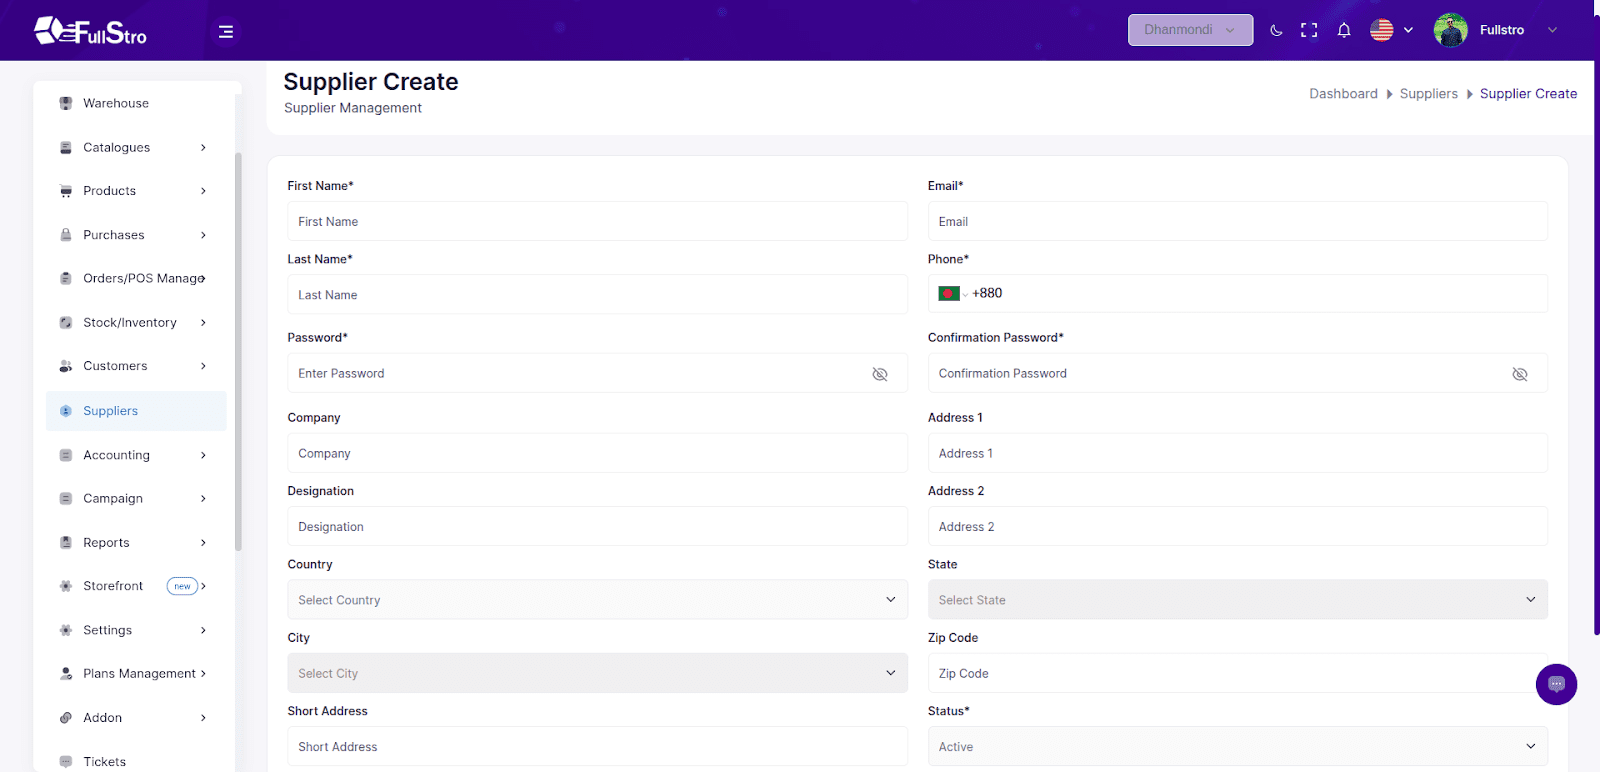
2. Creating a New Supplier
On the Create Supplier page, fill out the following fields:
| Field | Required | Description |
| First Name | ✅ | Supplier’s first name |
| Last Name | ✅ | Supplier’s last name |
| Email | ✅ | Must be unique and valid |
| Phone | ✅ | Contact number |
| Password | ✅ | Secure password |
| Confirm Password | ✅ | Must match the password |
| Company | ❌ | Company name (optional) |
| Designation | ❌ | Role or title |
| Address 1 | ❌ | Primary address |
| Address 2 | ❌ | Secondary address |
| Country, City, State, Zip Code | ❌ | Geographic details |
| Short Address | ❌ | Optional short label |
| Avatar | ❌ | Profile image |
| Status | ✅ | Active / Inactive |
Once filled, click “Submit” to create the supplier.
3. Supplier Actions
From the Supplier List, each row has an Actions menu where you can:
- Edit supplier details
- Delete (moves supplier to Trash)
- Make Payment
Show full supplier details
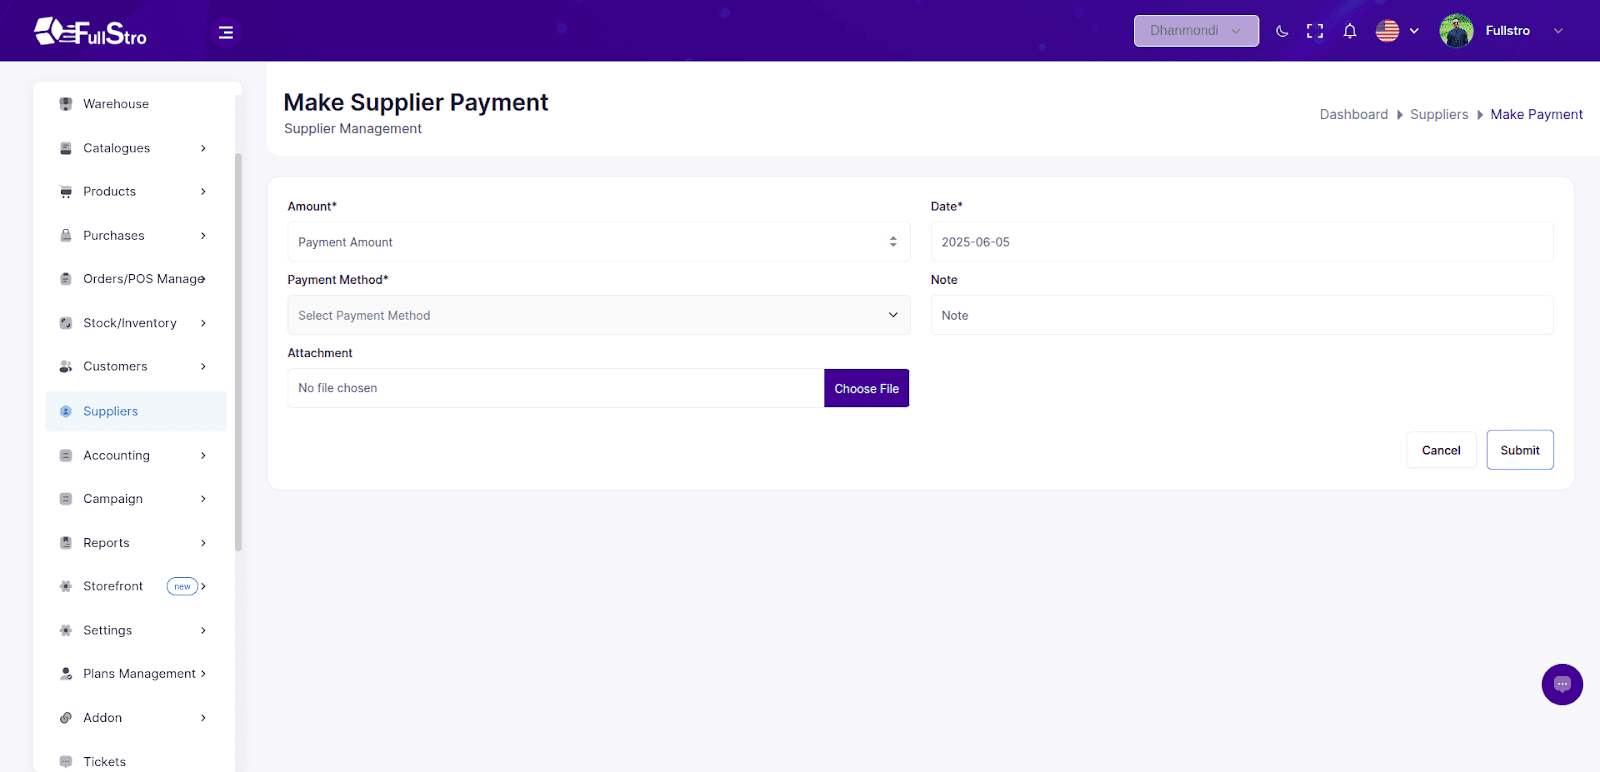
4. Making a Payment
- Click “Make Payment” from the Actions column.
- Fill in the payment form:
| Field | Required | Notes |
| Amount | ✅ | Enter payment amount |
| Date | ✅ | Payment date |
| Payment Method | ✅ | Choose from: CASH, ONLINE, BANK |
| Note | ❌ | Optional remarks |
| Attachment | ❌ | Upload a document or receipt |
Click “Submit” to process the payment.
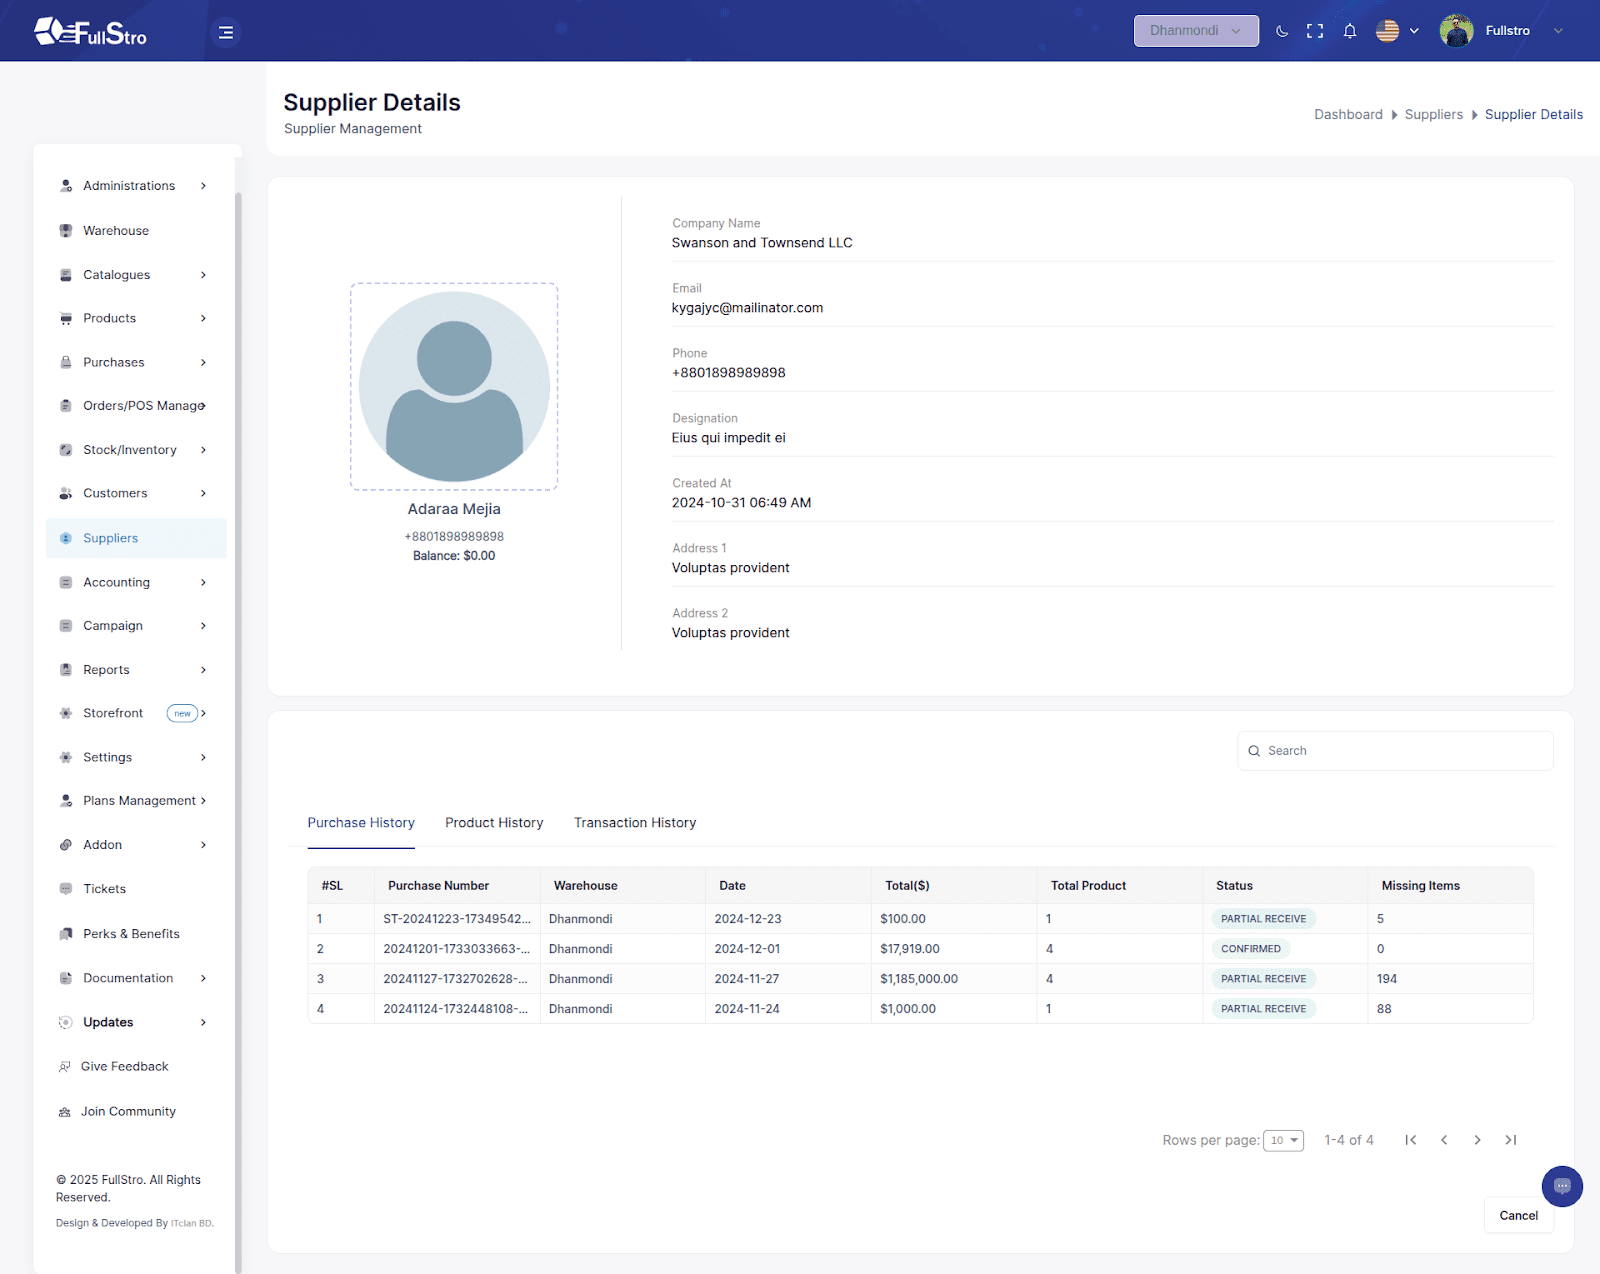
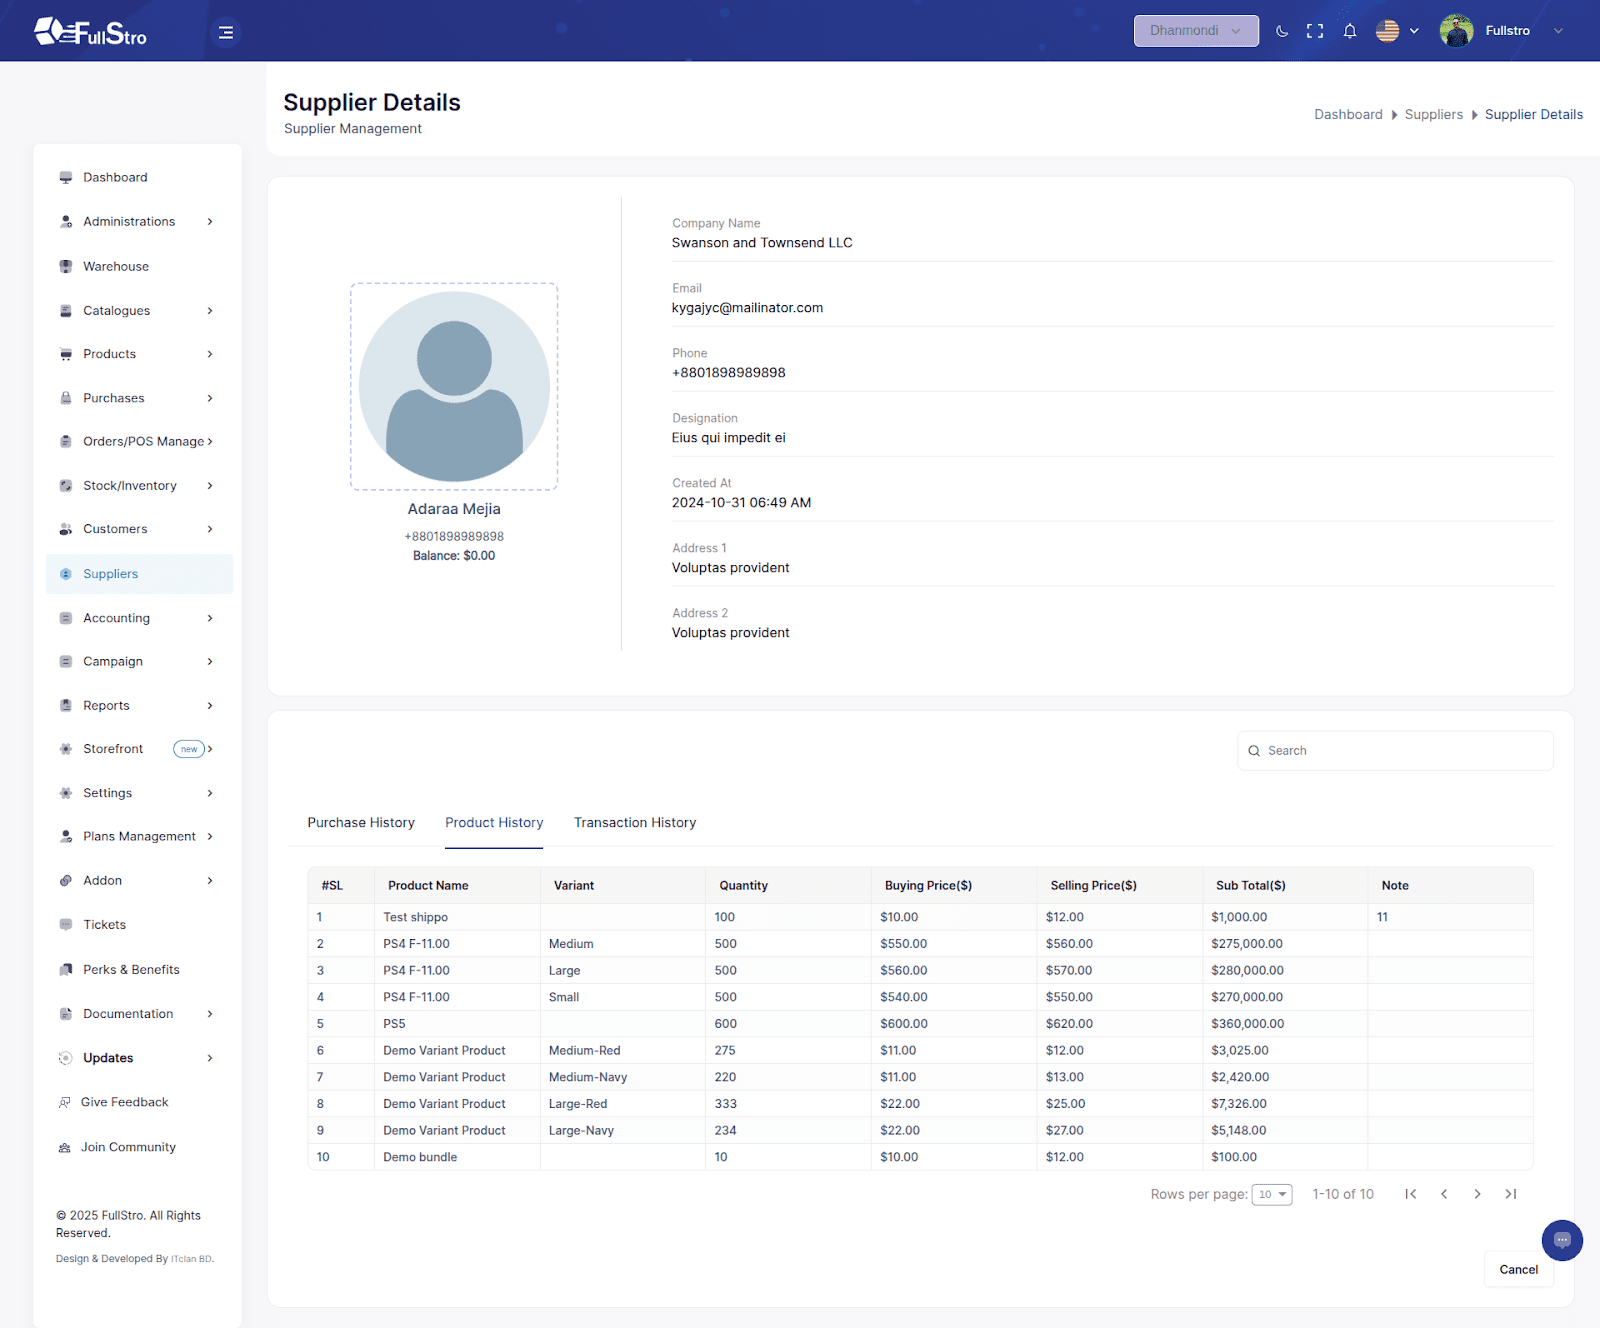
5. Viewing Supplier Details
Click the “Show” button in the Actions column to access:
- Basic Details (Name, Company, Contact, etc.)
- Current Balance
- Purchase History
- Product History
Transaction History

Addon Purchase Documentation
FullStro allows you to purchase and connect addons to enhance your store. Follow these steps:
Step 1: Go to Addon Integration
Log in to FullStro and click on Addon, then select Addon Integration.
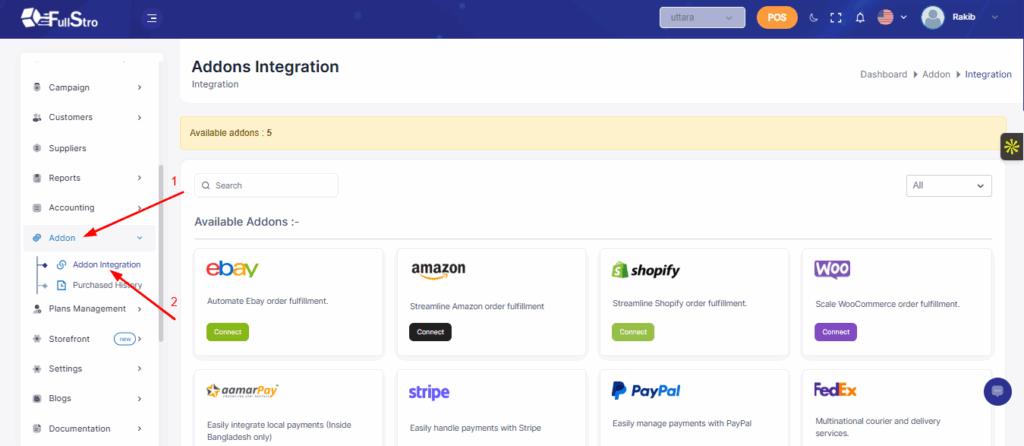
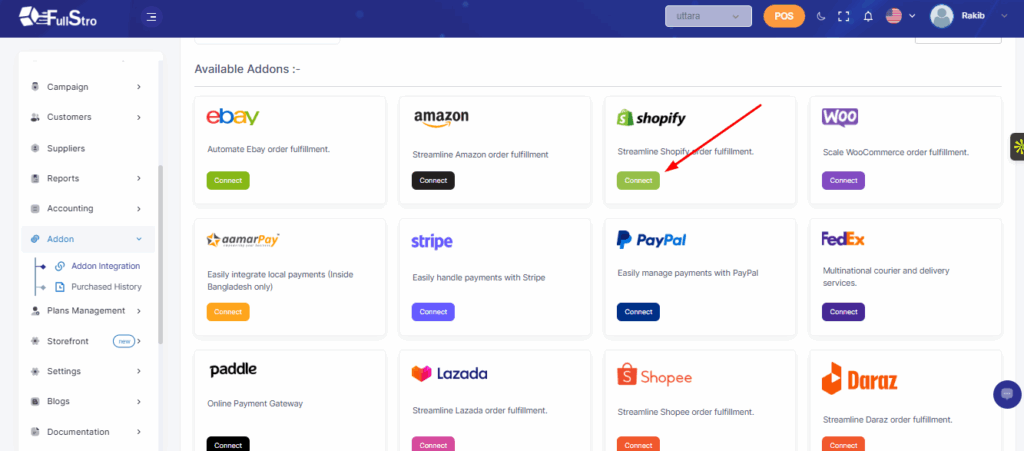
Step 2: Select an Addon
Click on the Connect button for the addon you want to purchase and integrate. As an example, we will try to connect to Shopify.
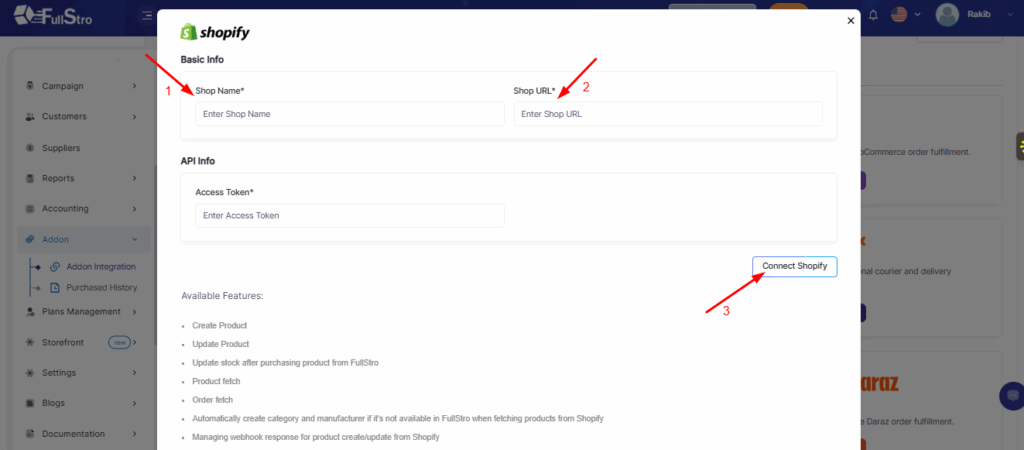
Step 3: Choose Pricing Option
Select One-Time Price and then click Proceed to continue with the purchase.

Step 4: Connect Your Shop
Enter your Shop Name and Shop URL, then click Connect Shopify to link your store with the addon.
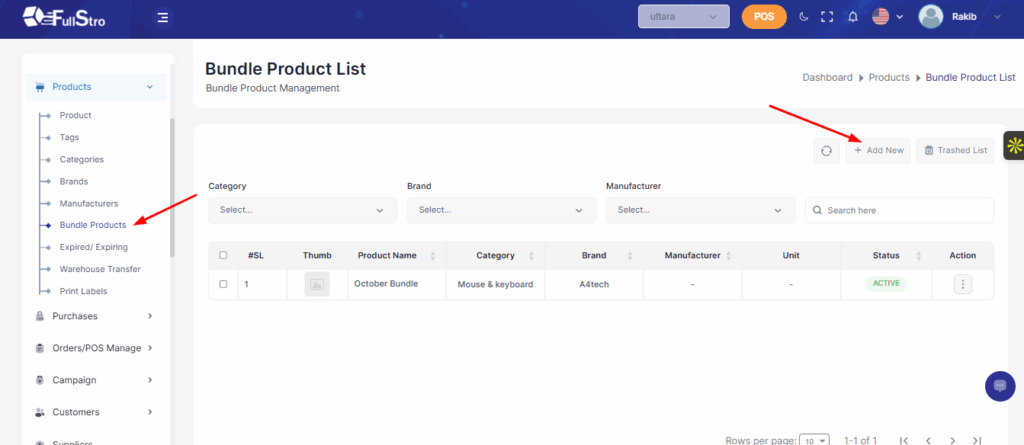
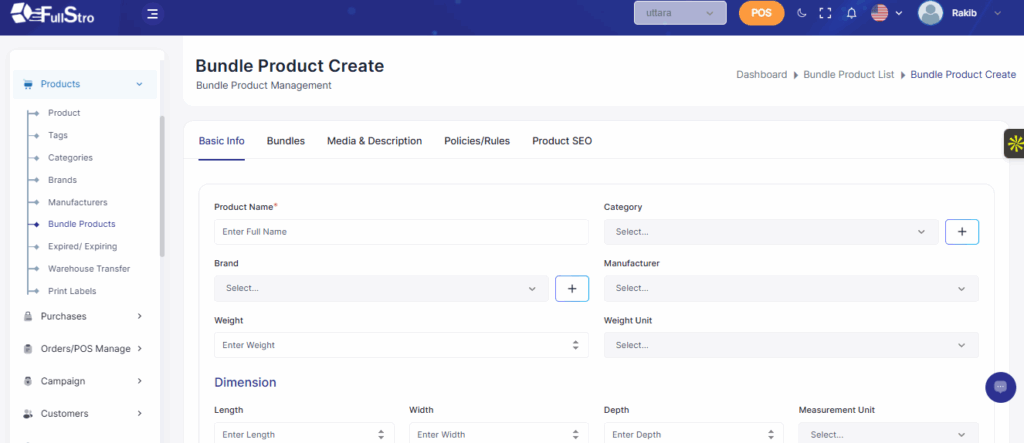
Bundle Products Documentation
FullStro allows you to create and manage bundle products efficiently. Follow these steps:
Step 1: Go to Bundle Products
Log in to FullStro and click on Bundle Product, then click Add New to create a new bundle.
Step 2: Fill in Basic Information
Enter all the basic details for your bundle, such as the product name, brand, category, and any other required information.
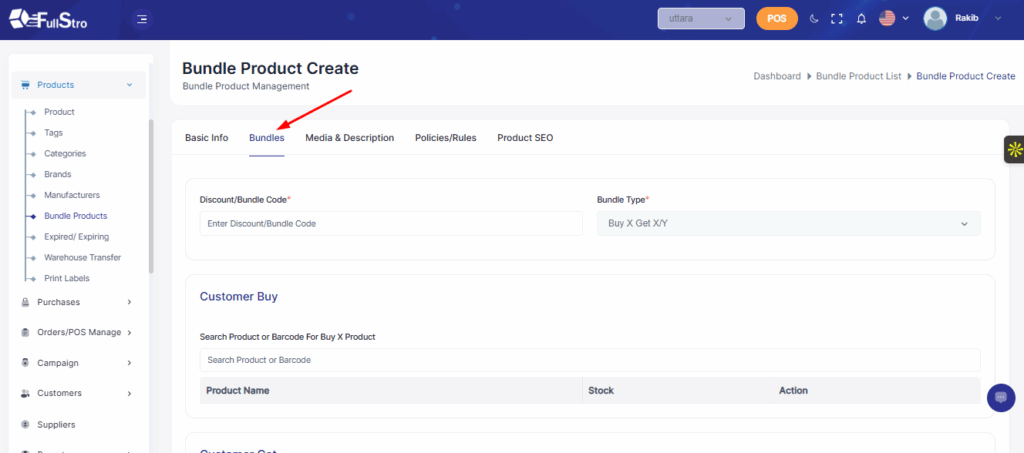
Step 3: Add Products to the Bundle
Click on the bundle section and add the required info that will be part of this bundle. Fill in all relevant details like Discount code, Bundle type, etc.
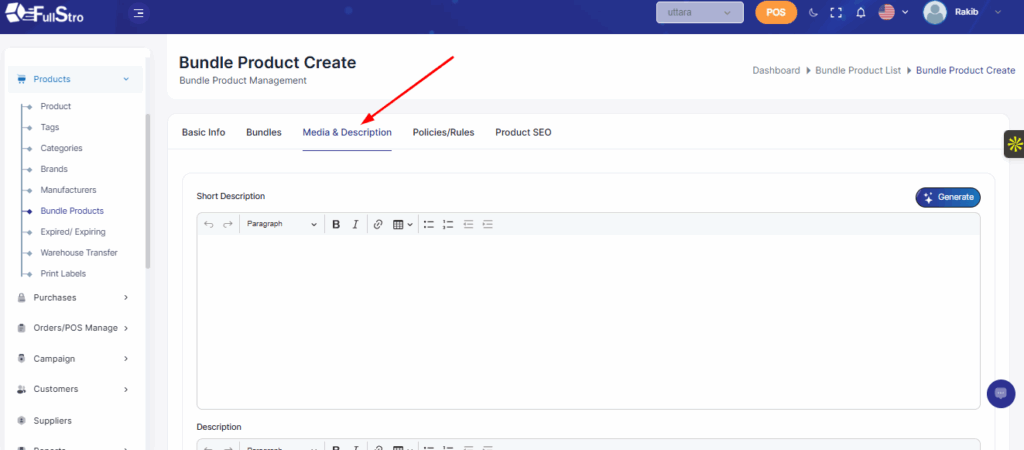
Step 4: Add Media & Description
Upload images, videos, or other media for the bundle product, and provide a detailed description to help customers understand the product better.
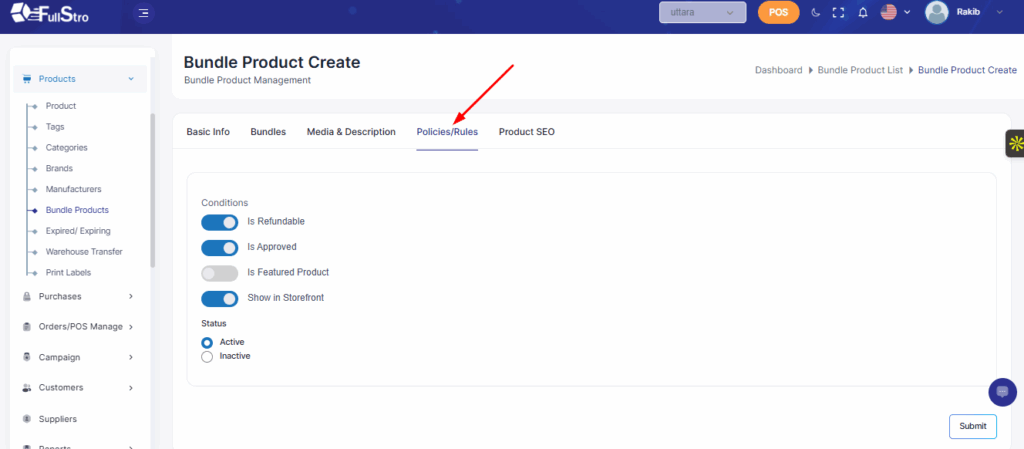
Step 5: Set Policies/Rules
Click on Policies/Rules and configure any conditions, restrictions, or rules for the bundle product.
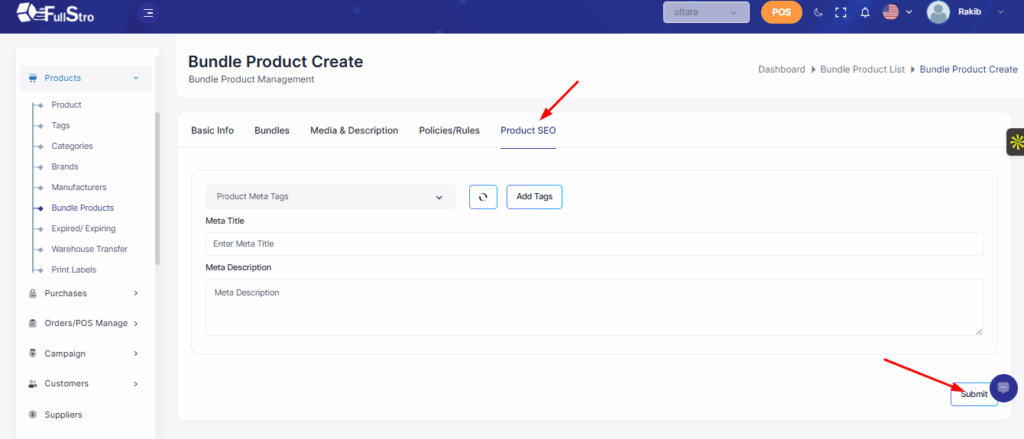
Step 6: Configure Product SEO
Click on Product SEO, fill in all relevant SEO information (meta title, description, keywords), and then click Submit to save your bundle product.
Settings Documentation
FullStro allows you to configure various application settings to suit your business needs. Follow these steps:
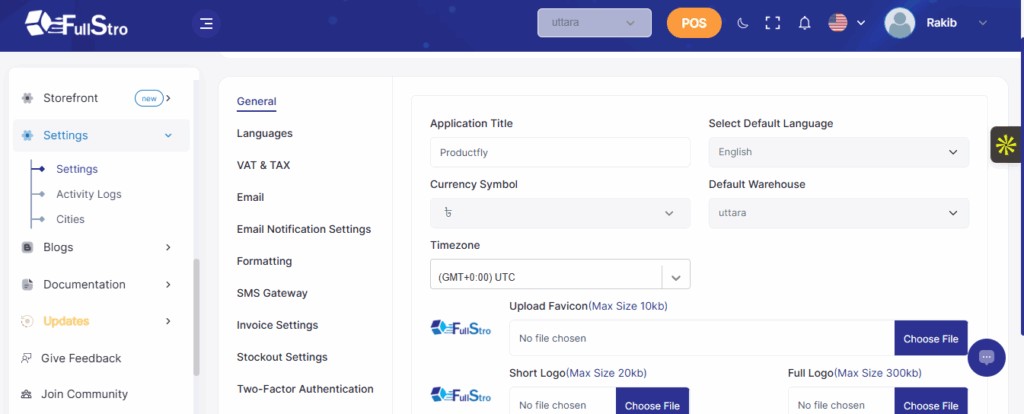
Step 1: General Settings
Click on Settings > General. Here you can change:
- Application Title
- Language
- Currency Symbol
- Default Warehouse
- Timezone
- Logo
- Favicon
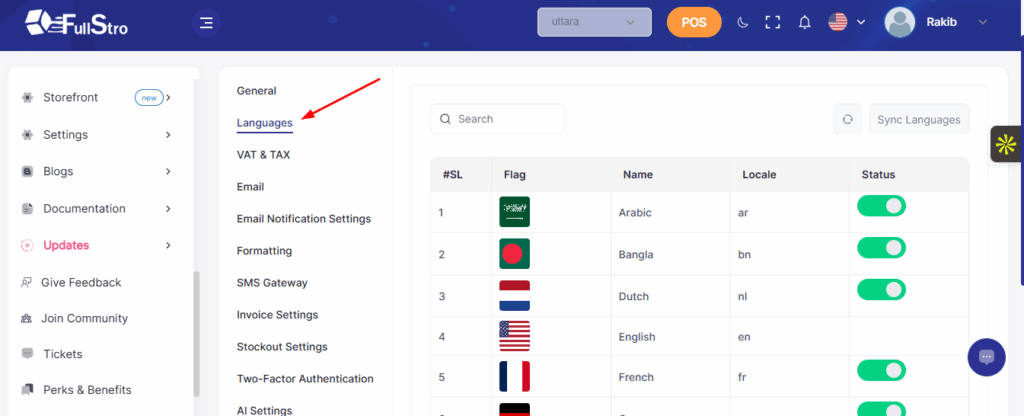
Step 2: Language Settings
In the Language section, you can view and manage all available languages.
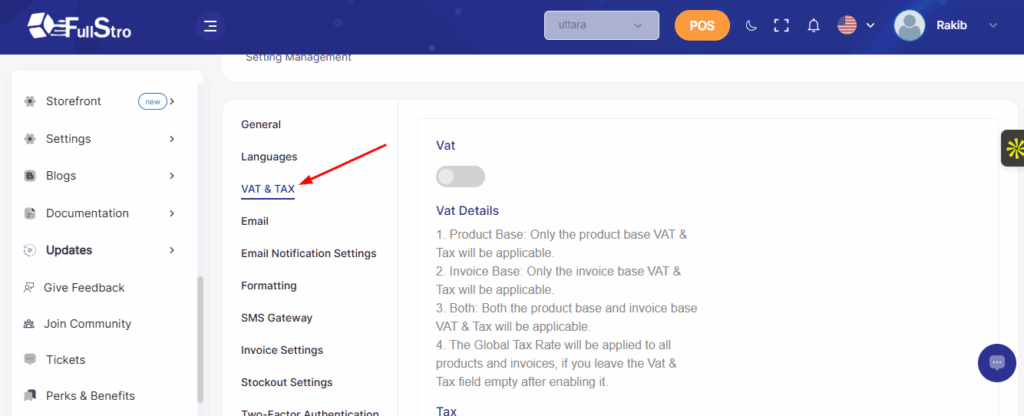
Step 3: VAT & Tax Settings
In the VAT & Tax section, you can add or update VAT and tax information for your store.
Step 4: Email Settings
In the Email section, configure your email settings to ensure proper communication with customers.

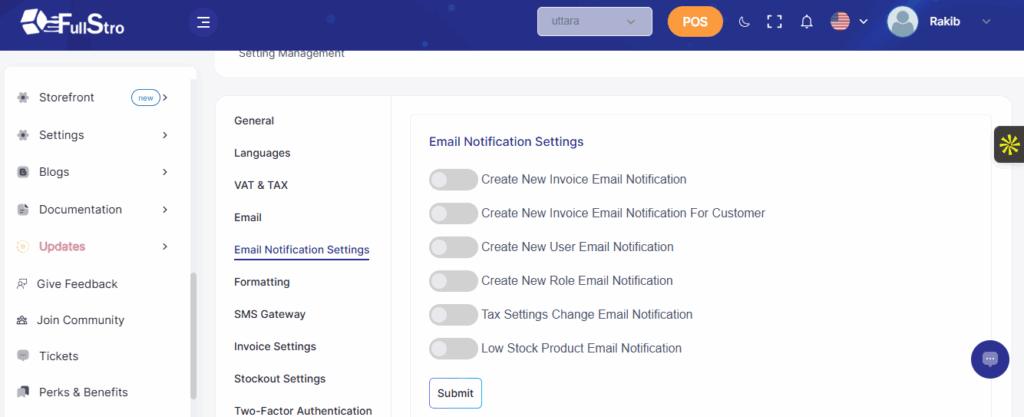
Step 5: Email Notification Settings
Control and manage your email notifications in the Email Notification section.
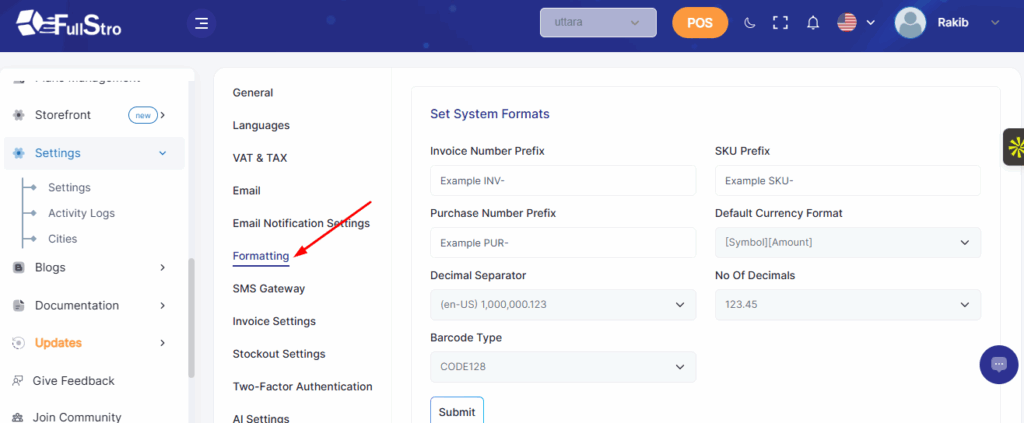
Step 6: Formatting Settings
In the Formatting section, you can configure:
- Invoice Number Prefix
- SKU Prefix
- Purchase Number Prefix
- Default Currency Format
- Barcode Type
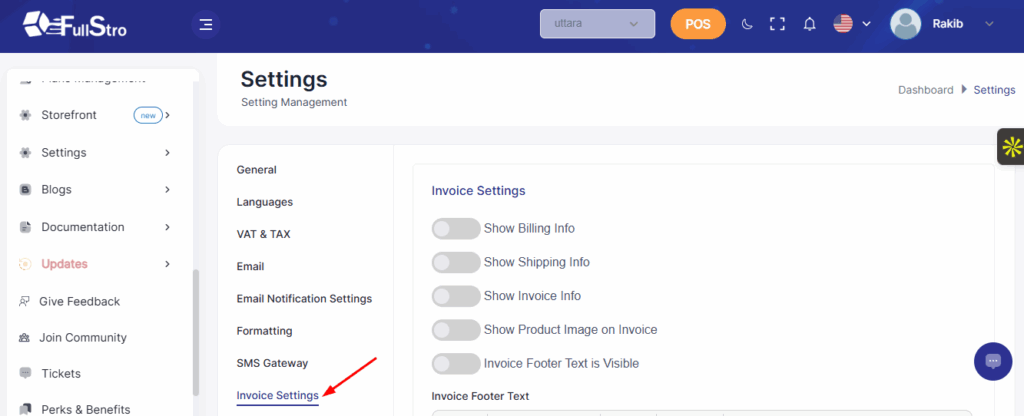
Step 7: Invoice Settings
Customize your printed invoice copies in the Invoice Settings section.
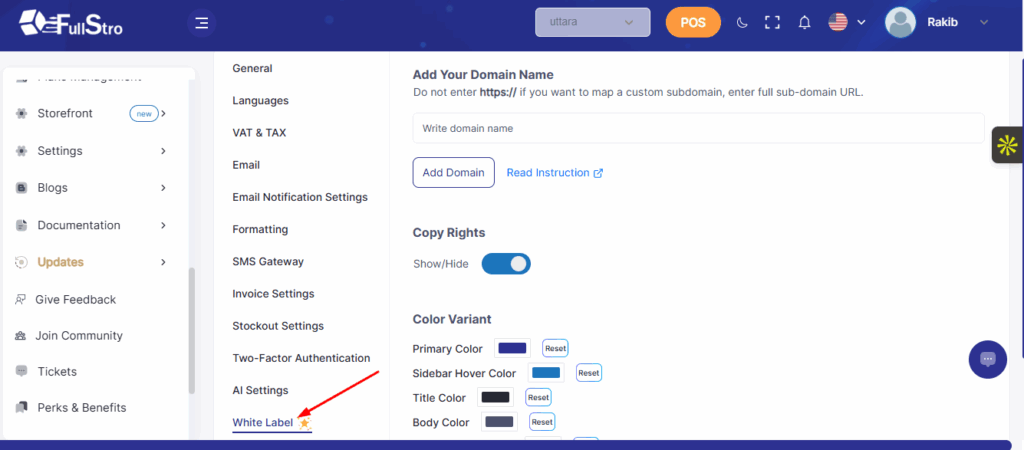
Step 8: White Label Settings
In the White Label section, you can add your own domain to brand the application as your own.