Shopee Integration with FullStro

Connecting Shopee and FullStro’s API is way simpler than you think. It’s just some easy steps that you need to follow. Below we share step by step process:

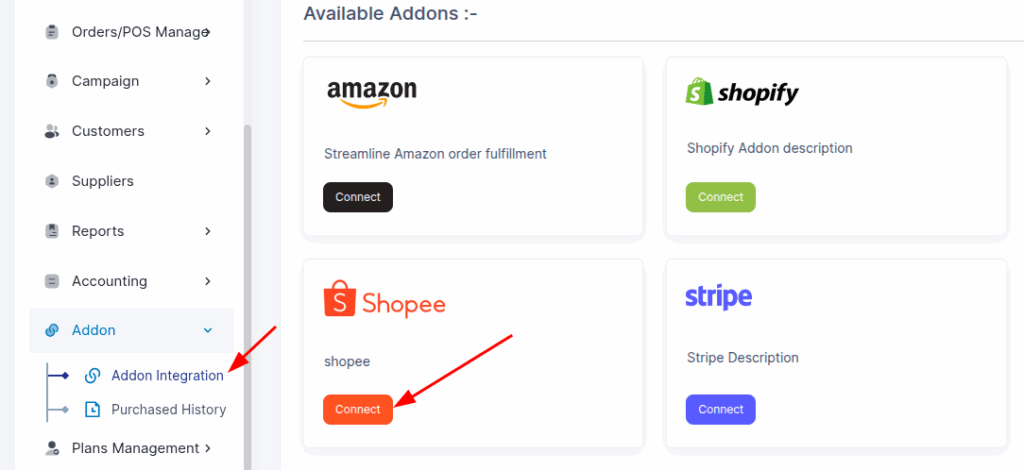
1. First, go to the right panel of your FullStro account, and click on Addon > Addon Integration on the left panel. You will see the Addon Integration dashboard showing available integrations. Click on the Shopee Connect button.

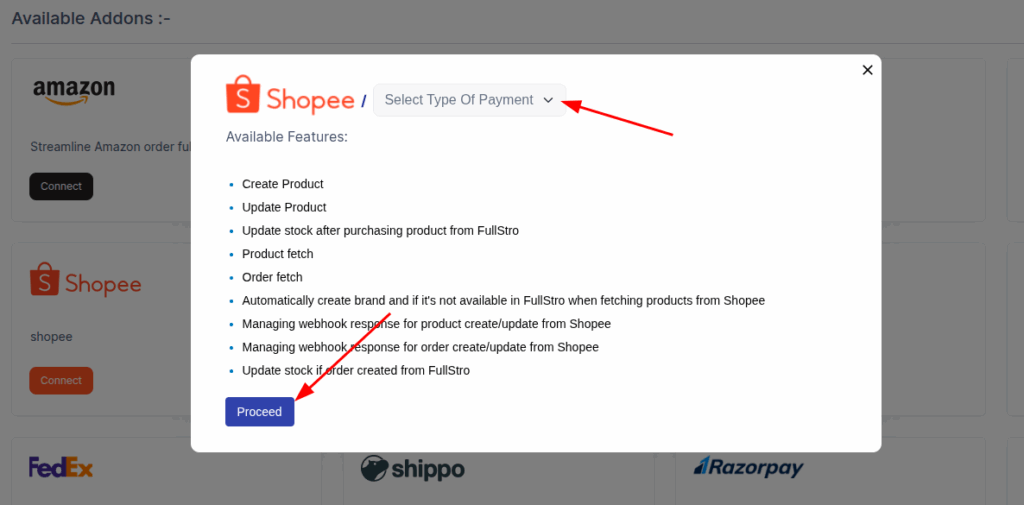
2. Now, a pop-up will appear on the screen asking for your payment details. Select your payment type and click “Proceed.”

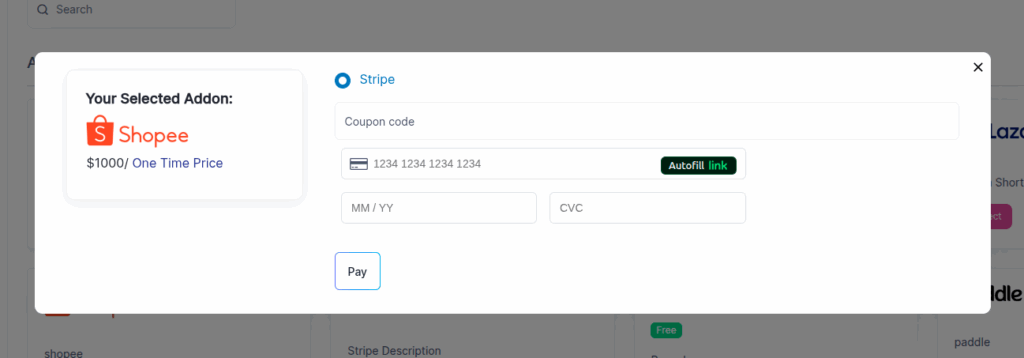
3. Now, enter your payment details and then press “Pay”.

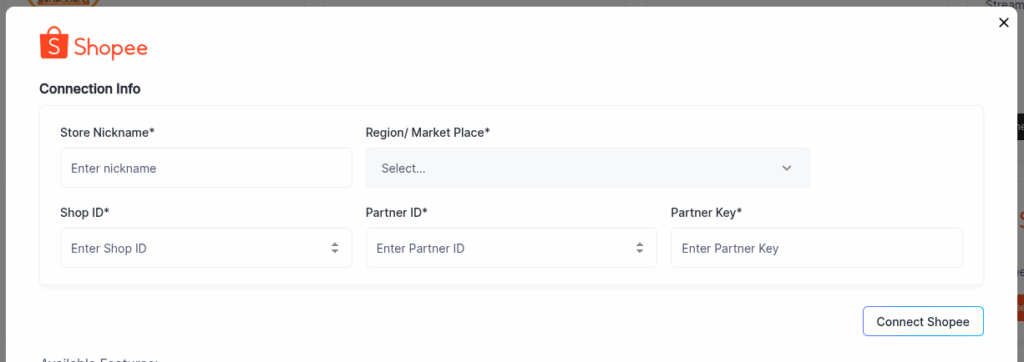
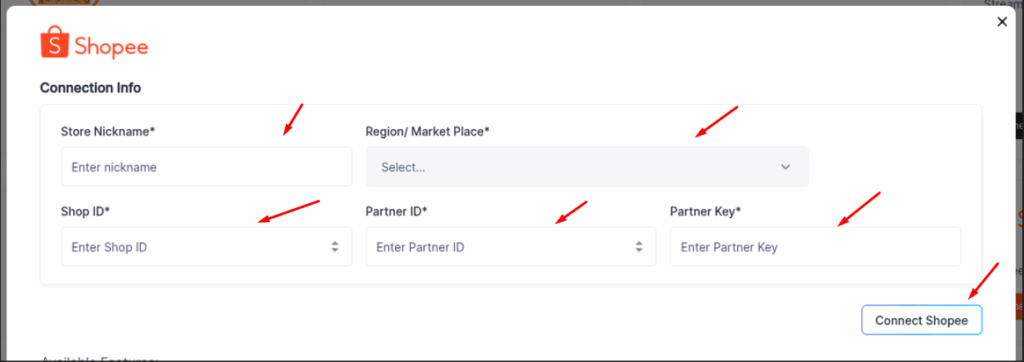
4. After you have made the payment, it’s time to connect the APIs. To connect, you will be asked to provide your Connection Info, including Store Nickname, Region/Market Place, Shop ID, Partner ID, and Partner Key.

To collect these info you have to login to your Shopee account.

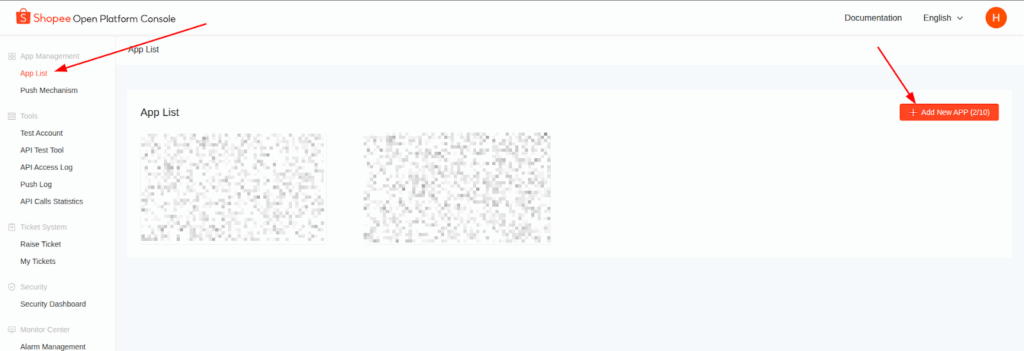
5. To get your API credentials from Shopee, log in to the Shopee Open Platform Console (open.shopee.com) and navigate to App Management > App List on the left panel. From there, press “Add New APP” on the right.

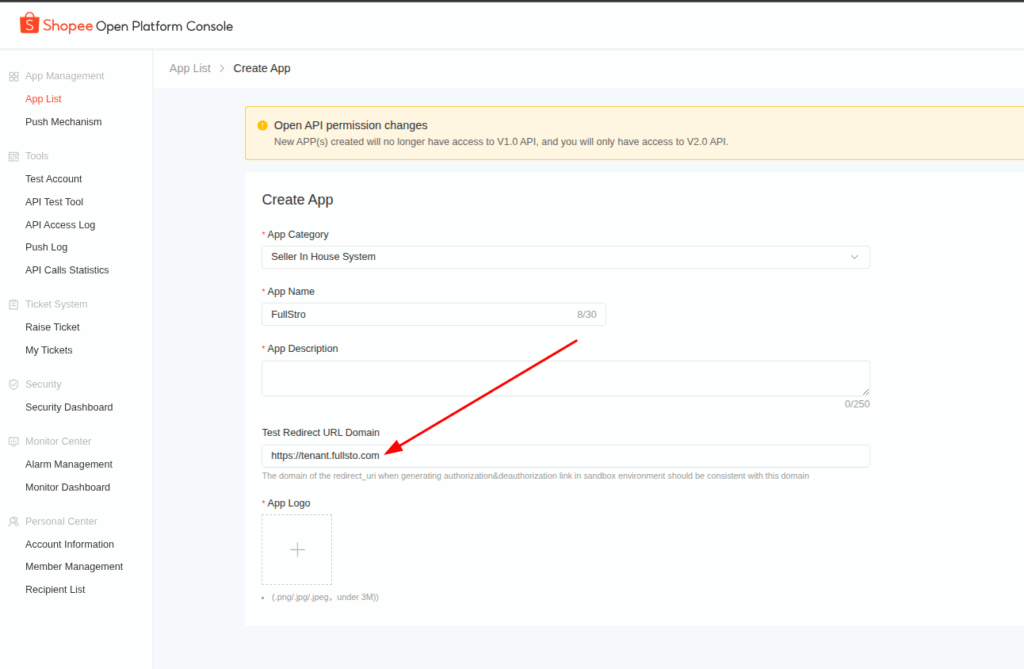
6. Fill in the app creation details just like below: Set App Category to “Seller In House System”, App Name to “FullStro”, add an App Description (e.g., “Integrating on the system as an addon.”), and set the Test Redirect URL/Domain to “https://tenant.fullstro.com”. Also, upload an App Logo. Then, create the app.

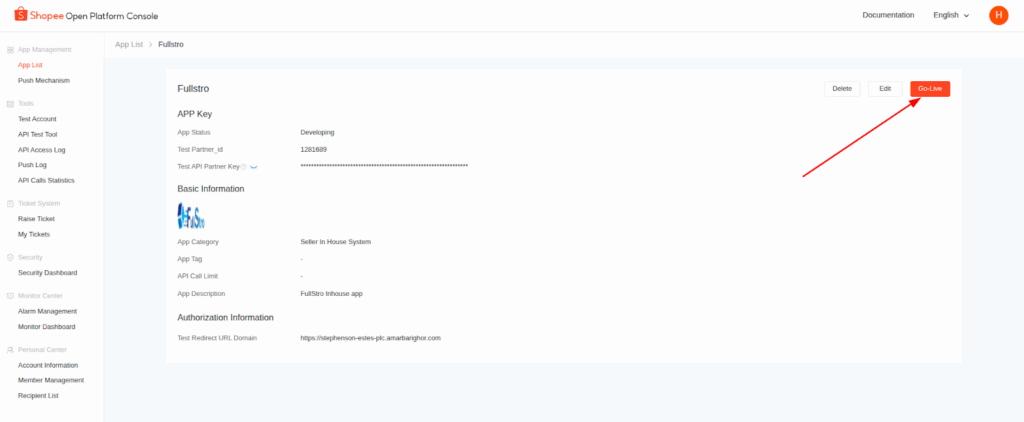
7. Once the app is created, here, you will find the required credentials: Test Partner ID, Test API Partner Key. For live environment access, click “Go Live” on the app page.

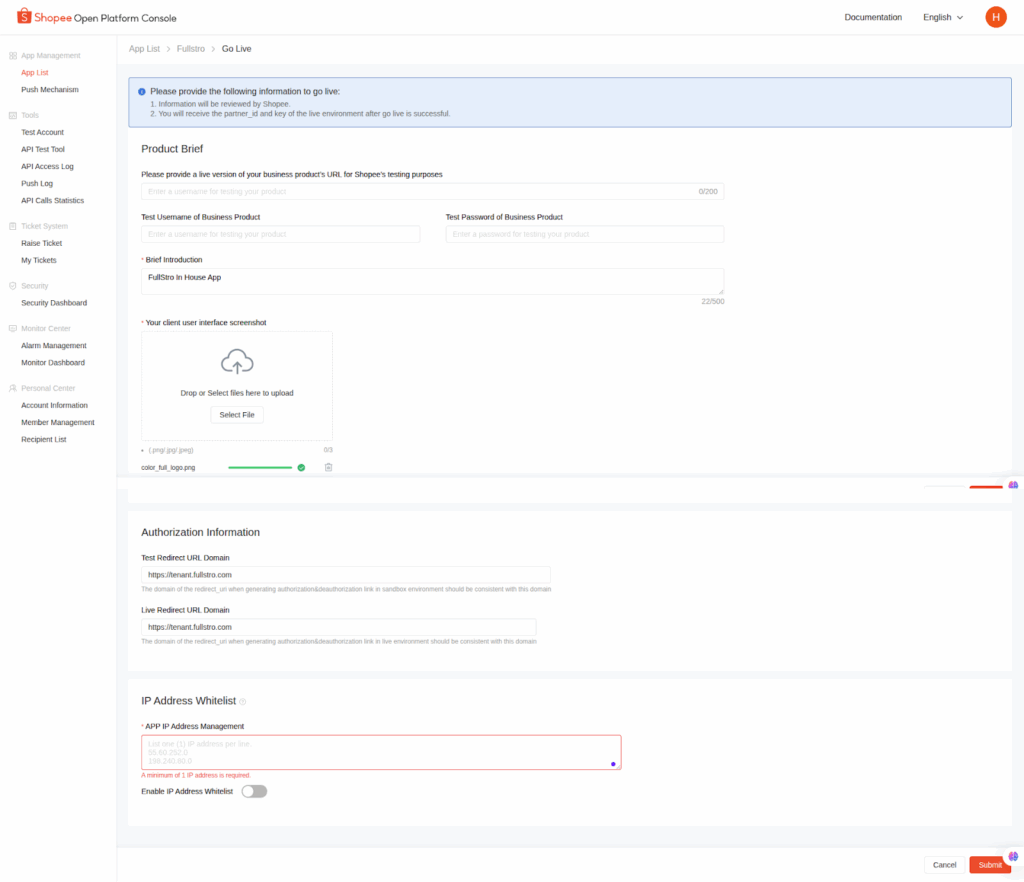
8. Now, provide the Product Brief details, such as a live version of your business product’s URL for Shopee’s testing purposes, Test Username of Business Product, Test Password of Business Product, Brief Introduction, and a client interface screenshot. Also, update the Live Redirect URL/Domain to match your production setup (e.g., “https://tenant.fullstro.com”). Plus, enable IP Address Whitelist and add IP addresses. Submit to go live.

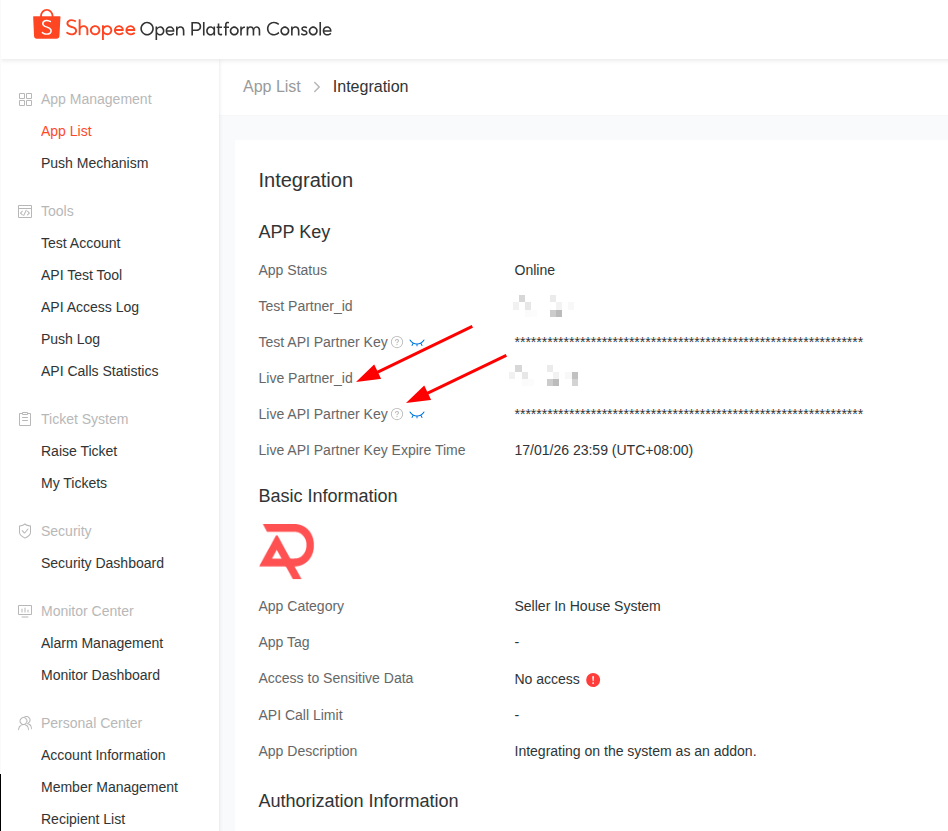
9. Once you go live, go to the app’s Integration page in the Shopee Open Platform Console. Here, you will find the required credentials: Test Partner ID, Test API Partner Key, Live Partner ID, and Live API Partner Key. Note the Live Partner Key Expire Time if applicable.

10. Obtain your Shop ID from your Shopee seller account dashboard, and your Store Nickname from your store settings. Now head back to your FullStro dashboard and add the required credentials: Enter the Store Nickname, select the Region/Market Place, enter the Shop ID, Partner ID (use the Live Partner ID), and Partner Key (use the Live API Partner Key). Once done, press “Connect Shopee”.

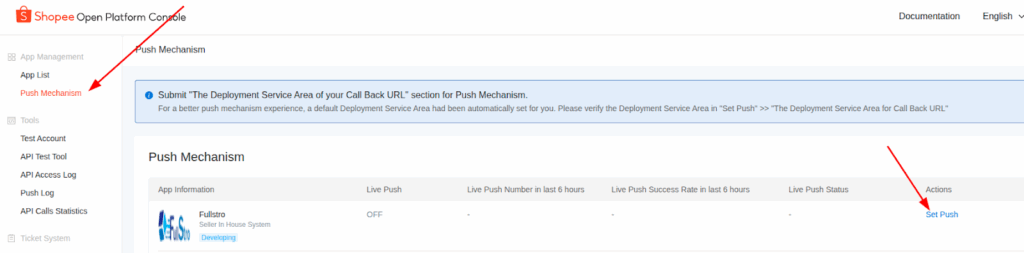
11. To enable push notifications, navigate to Push Mechanism in the console, locate your app (e.g., Fullstro), and click “Set Push” to configure and enable it (initially shown as OFF).

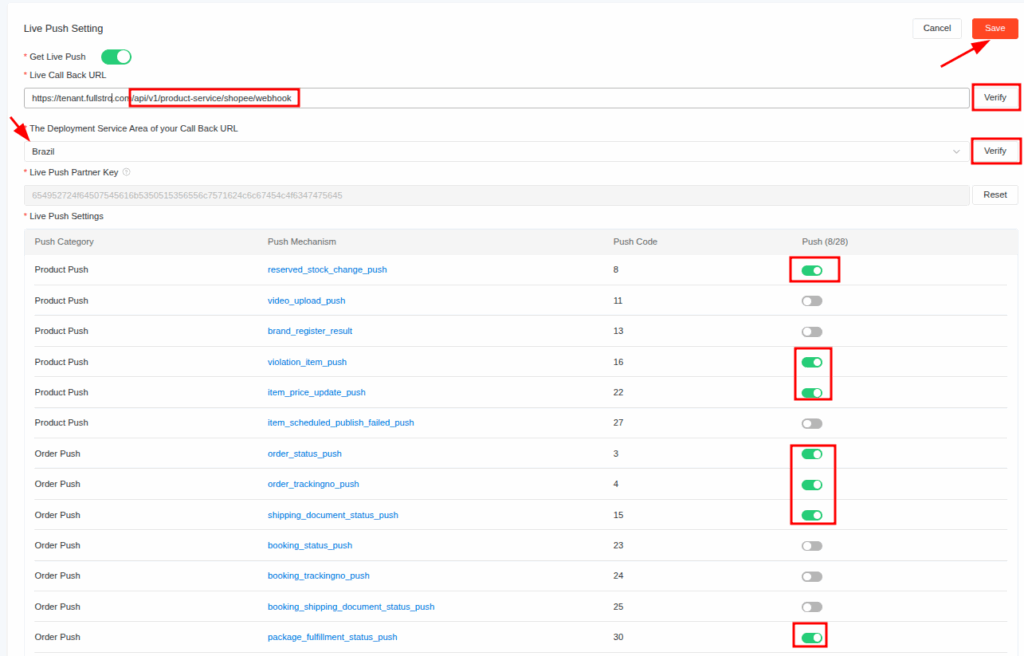
12. After connecting, configure the Live Push settings in the Shopee Open Platform Console under Push Mechanism. Enable Live Push, set the Live Call Back URL to “https://tenant.fullstro.com/api/v1/product/service/shopee/webhook” and verify it. Select the Deployment Service Area (e.g., Brazil) and verify. Set up Live Push Settings by enabling specific push categories such as Product Push (e.g., reserved_stock_change_push, video_upload_push, brand_register_result), Order Push (e.g., order_status_push, order_trackingno_push, package_fulfillment_status_push), and save the settings.

You are all set to connect Shopee with Fullstro.

Amazon Integration with FullStro

Integrating Amazon with FullStro is a straightforward process. Follow these steps to enable a seamless eCommerce channel with Amazon.

Step 1: Start the Connection

  1. Log in to your FullStro account.
  2. Go to Addon > Addon Integration from the left panel.

On the Addon Integration page, locate Amazon and click the “Connect” button.

Step 2: Make the Payment

  • A pop-up will appear prompting you for payment.
  • Click “Proceed” to view the payment details.

Enter your payment information and complete the transaction for the Amazon Addon.

Step 3: Enter API Credentials

After completing the payment, you’ll be prompted to enter your Amazon API credentials.

To get your API Key:

  1. Log in to your Amazon Seller Center account.
  2. Navigate to:
    Apps and Services > Develop Apps > Add New App Client
  3. Click on Authorize.

For detailed steps, follow the Amazon documentation:
Amazon SP API Docs

Step 4: Finalize the Integration

  • Copy your live API credentials from Amazon.
  • Paste them into the FullStro Amazon Addon configuration section..

Step 5: Sync Required Data

Once your shop is connected, sync the following:

  • Brands
  • Categories

This ensures your product listings are accurate and properly categorized.


Step 6: Manage Amazon Products

With the integration complete, you can now:

  • Create new products on Amazon
  • Sync existing products from FullStro
  • Manage stock levels
  • Handle other product operations with ease

That’s it! Your Amazon store is now integrated with FullStro, enabling you to streamline operations and grow your online sales.

Shopify

1. To connect Shopify, please move over to the addon integrations module and press “Connect” on Shopify.

2. Once clicked, you should be prompted to make the payment and subscribe to the addon.

3. After clicking on the “Connect” button, you will be asked to provide your Shop Name, Shop URL, access token.

4. Now, go to your shopify online store – Manage app – Apps & sales channels – develops app – Create an app – add name to your shopify shop & create – API credentials – enable every field to enable API access – click on the install button – get the API ADMIN ACCESS KEY

5. Now head back to your FullStro dashboard and add the required credentials to connect your store and start controlling your store from within FullStro. Once done, please press “Connect Shopify”

6. Now your Shopify store is connected to FullStro and you will be able to upload products, view orders and control your Shopify store from FullStro.

WooCommerce

1. To connect WooCommerce, please move over to the addon integrations module and press “Connect” on WooCommerce.

2. Once clicked, you should be prompted to make the payment and subscribe to the addon.

3. After you have made the payment, you will be asked to provide your Shop Name, Shop URL, Consumer Key and Consumer Secret.

4. To get your API keys from your WordPress website, you will need to login to your WordPress website dashboard and head over to WooCommerce > Settings. Once you are here, please navigate to the tab labeled “Advanced” and from there go to the tab named “REST API” and press “Add Key” or “Create and API Key”

5. Fill up the details and make sure to give permission to “Read/Write” in the permissions field and hit “Generate API Key”

6. Once done, WooCommerce will provide you the required credentials to add to in your FullStro dashboard

7. Now head back to your FullStro dashboard and add the required credentials to connect your store and start controlling your store from within FullStro. Once done, please press “Connect WooCommerce”

8. Now your WooCommerce store is connected to FullStro and you will be able to upload products, view orders and control your WordPress website from FullStro.

eBay

1. To connect eBay, please move over to the addon integrations module and press “Connect” on eBay.

2. Once clicked, you should be prompted to make the payment and subscribe to the addon.

3. After clicking on the “Connect” button, you will be asked to provide your Store nickname, marketplace, RUName, Client ID, Client Secret.

4. Now go to the eBay account & follow these steps.

Step: 1

For creating a new account go to developer.ebay.com and click on

Step: 2

Register here with valid data.

Step: 3

Click Create a keyset in the production section.

Step: 4

Click here.

Step: 5

Register here with valid data.

And confirm 

Finally, Submit 

Step 6: 

Go to the Application keysets

Step: 7

You will get a Client ID  and Client Secret.

Step: 8

Go to User Access Tokens

Step: 9

You have to fill in the Display Title, Accept URL, and OAuth checkbox.  

Accept URL will be your domain name (example: https://fullstro.com )  / ebay-verify

Finally accept URL: https://{tenant_companyname}.fullstro.com/app/ebay-verify

Step: 10 

Now you need to copy and paste (RuName, Client ID, Client Secret) to Connect eBay. 

6. Now your eBay store is connected to FullStro and you will be able to upload products, view orders and control your eBay store from FullStro.

Lazada

1. To connect Lazada, please move over to the addon integrations module and press “Connect” on Lazada.

2. Once clicked, you should be prompted to make the payment and subscribe to the addon.

3.  After clicking on the “Connect” button, you will be asked to provide your Shop Name, Shop URL, access token.

To get the API Details, Now, go to your Lazada online store

1. First register an open platform account

1.1 Registration link

https://open.lazada.com/apps/user/register?spm=a1zq7z.27197301.login_form.1.1db47c73kmujqv

1.2 Precautions for account registration

1.2.1 Registered Email and Password Conditions

a. The password needs English+number+symbol, and the symbol cannot use “!” “<” 、”>”;

b. The registered mailbox should not have a “+”.

1.2.2 After registration, you need to fill in profile information first, and wait for review after submission

1.2.3 After the profile information is approved, the app can be created

a. There are two steps to create an app.

First, click Apply and wait for the approval before clicking Create App. After the approval, an app in test status will be automatically obtained;

Step 2: Click Create APP.

b. It is recommended to select ERP System or Seller in house APP. Their differences are as follows:

The number of authorized sellers is different: the default number of authorized sellers in the ERP system is 300, and can be increased according to the needs of the project;

The number of authorized sellers of the Seller in house APP is 20 by default, and the maximum number is 60;

Different authorization methods:

ERP System: for users who do not need to add white list of sellers;

Seller in house APP: for sellers who need to add white list.

You can find more details below

https://open.lazada.com/apps/user/register?spm=a1zq7z.27197301.login_form.1.1db47c73kmujqv

c. If the app of type seller in house  is not whitelisted, the following error messages will appear

1.2.4 The newly created app is in test status

a. The APP is in the test status: the maximum call amount is ten thousand per days; The validity of the token is 7 days, and the validity of the refresh token is 14 days;

b. Online status: the maximum call volume is 10 million per day; The validity of the token is 30 days, and the validity of the refresh token is 180 days;

If you can ensure that the success rate of app calls is above 85%, you can apply for the app to go online.

c. Offline: If you want to Offine the app, you can click manage>Apply offine on the app console

d. Delete: If you want to delete an app, you can only delete it in test status.

2. Now head back to your FullStro dashboard and add the required credentials to connect your store and start controlling your store from within FullStro. Once done, please press “Connect Lazada”

3. Now your Lazada store is connected to FullStro and you will be able to upload products, view orders and control your Lazada store from FullStro.

Daraz Integration Guide

Integrating Daraz with FullStro is simple and powerful. Follow the steps below to connect your Daraz shop and start managing your products seamlessly.

Step 1: Start the Connection

  • Log in to your FullStro account.
  • Navigate to Addon > Addon Integration from the left panel.

On the Addon Integration Dashboard, find Daraz and click the “Connect” button.

Step 2: Complete the Payment

  • A pop-up will appear prompting you for payment.
  • Click “Proceed” to view the payment details.

Enter your payment information in the next pop-up to complete the purchase for the Daraz Addon.

After clicking on the “Connect” button, you will be asked to provide your Shop Name, Shop URL, and access token.

Step 3: Provide Shop Credentials

After the payment, you will be asked to provide the following:

  • Shop Name
  • Shop URL
  • Access Token

Note: To generate your credentials, follow the official Daraz API documentation:

Step 4: Sync Required Data

After connecting your shop, you must sync the following:

  • Brands
  • Categories

This ensures that your product listings are consistent and structured properly.

Step 5: Manage Daraz Products

Once syncing is completed, you can:

  • Create new products on Daraz
  • Sync existing products from FullStro
  • Manage stock levels
  • Perform other product-related operations as needed

You’re all set! Daraz is now integrated with FullStro—manage your online sales efficiently and effortlessly.

WhatsApp Chat